
Basegrade And The Evolution of Color Grading Tools
By Andy Minuth
The color-grading specialist Filmlight caused a bit of stir in the colorist community at NAB 2016. They introduced Base Grade, a new grading operator for Baselight. Base Grade is intended to replace classic tools such as 'Lift', 'Gamma' and 'Gain'. That sounds like a small revolution. Filmlight promises more consistent results compared to existing tools and a more natural working style. This is reason enough to take an in-depth look at it - not only for Baselight colorists.
For the evaluation of Base Grade, a rough understanding of the evolution of color correction helps. The origins of color grading, as we know it today, date back to the beginnings of television and cinema. For television, video signals originating from TV cameras or film scanners always had to be adjusted or corrected. The profession of the colorist emerged in the telecine, where film footage was transferred into a pleasing video signal.
VideoGrade
The technicians provided the colorist with four basic technical parameters to shape the video signal: 'Lift', 'Gamma', 'Gain' and 'Saturation'.These are still among the most popular grading tools. In Baselight, one can find them in the VideoGrade operator.
The colorist adjusts the black level of the video signal with 'Lift' (sometimes referred to as 'Pedestal') and the white level with gain. For those who are experienced in Photoshop, it makes sense to visualize the resulting gradation curve: 'Lift' sets the starting point (bottom-left) and 'Gain' the end point (top-right). When working with VideoGrade, these are the most important points of reference for the colorist.
'Gamma' is technically a power function whose only parameter is the exponent. The gamma function determines the curvature of the gradation curve between the two endpoints.
These three parameters can be adjusted not only for the brightness, but for all three color channels of the video signal (RGB). However, individual controllers for red, green and blue are usually not presented to the user. The user has one controller for the brightness signal and a two dimensional controller for the color component. This results in the basic layout of all grading control surfaces: Three trackballs that adjust the color two-dimensionally and around them a rotating ring for the luma adjustment. 'Lift' is on the left, 'Gain' on the right and 'Gamma' in the middle. These three parameters are often colloquially referred to as shadows, midtones and highlights.
With the help of an RGB waveform monitor, these adjustment possibilities have proven to be very efficient to forge a video signal within the given technical specs. A very popular and proven working method of video-style colorists is to first adjust the black and white point of an image. All three channels are balanced both in the blacks and in the whites just before clipping. The brightest point in the image is then pure white, thus without color cast and with maximum brightness. The darkest point is pure black. People often speak of "clean" blacks and whites in this case. Next, the 'Gamma' parameter is set. It adjusts a combination of brightness and contrast. If one wants to put a color tone on the picture, this is often done with the 'Gamma', since then black and white remain “clean”.
Baselight provides two modes for VideoGrade. The default mode is RGB. In the Y'CbCr mode, the luma channel is processed separately. Brightness or contrast changes will then not affect the color and saturation of the image.
Over time, VideoGrade has proven to be the most important tool of telecine-style colorists. They convert high dynamic range images (e.g. log encoded) manually to the desired output color space utilizing the available grading toolset instead of a technical color space conversion (e.g. a LUT). This means that nowadays VideoGrade is not only used, as originally intended, on images in a video color space, but also for images in log color spaces.
The 'Lift', 'Gamma' and 'Gain' trio is probably the most commonly used grading operator in the current video world. However, it dates from a time when handling features such as specular highlights was not that important. Burned out windows or skies were tolerated as long as the faces looked nice. A soft-clip, a gentle transition into the over-exposure, is not realizable with VideoGrade alone. Over time, video colorists developed different techniques to meet this aesthetic demand. Gradation curves, luma keys, blend modes and specialized soft-clip operators are among the techniques that have been used for this purpose.
A further disadvantage becomes obvious in VFX workflows. Contemporary compositing works the most realistically in a scene-referred linear color space. Then pixel values are proportional to light photons on the set. VFX pre-grading might still make sense to adjust the general brightness and white-balance and to match shots in a sequence. Unfortunately, 'Lift' as well as 'Gamma' and 'Gain' destroy the scene-linearity of a shot and make VideoGrade impractical for this type of VFX pre-grading workflow.
FilmGrade
Long before the telecine colorist, the profession of the film color-timer emerged. They determined the look of a film by adjusting the intensity of printer lights and chemical processes in the film lab. This profession required a lot of experience and intuition. Contrary to the telecine with its sometimes saturated or harshly clipped colors, the analogue lab process has film-stock as an aesthetic foundation.
With the introduction of the Digital Intermediate process (DI) around the year 2000, the new profession of the DI-colorist arose. DI-colorists correct images digitally before they are recorded onto intermediate-film and printed. The footage usually originated from film as well and was scanned to Cineon log color space. The DI gradually replaced the analogue intermediate process and thus the creative part of the color-timing in the lab. Film is a key component of the DI process, since one is restricted to the colors that can be reproduced in the film print. The lab processes generating the film print and the projection are therefore simulated live during the grading with a film print emulation look-up table. The so-called 'Film LUT' is applied in the preview output and causes the images to react differently to input from the colorist compared to telecine or video mode.
The manufacturers developed new grading tools for the DI process based on lab color-timing. In Baselight, the tool is called 'FilmGrade'. Some film-style colorists have previously worked as color-timers and thus got an easy entry into digital color correction. FilmGrade is designed for images in Cineon-Log color space. After the color correction, the image is converted into a display color space (e.g. DCI P3) utilizing a LUT or the more recently available GPU-shaders of Truelight Colour Spaces dating from Baselight 4.4.
FilmGrade consists of six tools divided onto two tabs. The main page consists of 'Exposure', 'Contrast' and 'Saturation'. The second page consists of 'Shadows', 'Midtones' and 'Highlights'. All tools offer a trackball and a rotatable ring. The most important tool is 'Exposure', which can be adjusted in RGB printer light steps via the Blackboard control surface. 'Exposure', which is also referred to as 'Offset' in other grading software, controls the general brightness and color of the image. Film style purists try to work as much as possible with 'Exposure', because then the image remains very natural. The contrast in all color channels and the scene-linearity are basically retained during 'Exposure' changes.
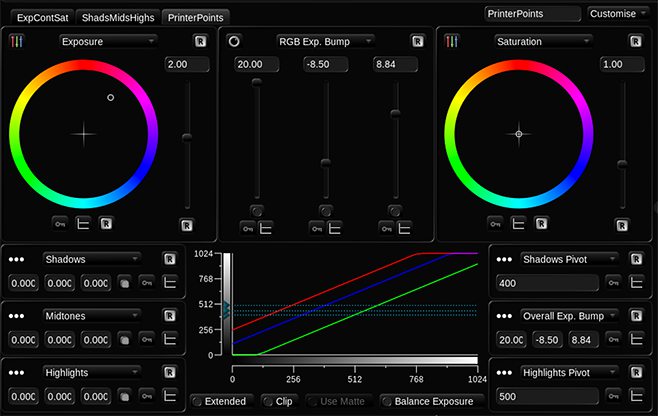 Color Timing - The 'Exposure' tool in FilmGrade not only simulates the work with printer lights, but also translates the correction to printer points.
'Contrast' and 'Saturation' seem self-explanatory. However, the trackball color-setting controls deserve an in-depth look. With the 'Saturation' trackball, the colorist controls the saturation of opposing colors in the color circle. For example, when you move the trackball towards the warm tones (yellow, red), these become more saturated. At the same time, the cold tones (blue, cyan) are desaturated. The 'Contrast' trackball, on the other hand, is used to tint the highlights and shadows in complementary colors. The corresponding pivot point is important when working with 'Contrast'. It defines the center of the curve and thus the strength of the effect on the highlights and shadows.
'Shadows', 'Midtones' and 'Highlights' in FilmGrade are not identical to 'Lift', 'Gamma' and 'Gain' because the luma working ranges are limited via pivot points. When you raise the 'Shadows' level, for example, the curve is warped only until a defined point. With 'Lift', on the other hand, the entire image is changed, but the shadows are affected the most.
It is difficult to determine maximum black and white with film because the transfer curves are very flat and non-linear in these regions. That is why the LAD grey patch, roughly in the middle of the curve, is the anchor point for both the calibration and the colorist. (The laboratory aim density patch was invented by Kodak and is a bit darker than 18% middle grey. You can find it on the Kodak website.
A film style colorist does not care much about whether he hits 100% black or white. A soft clip is automatically active in this system because of the film print emulation. Scopes are less important and the visual impression is mostly guiding decisions. Thus, FilmGrade is a more natural grading concept than VideoGrade.
Today, FilmGrade is used not only on Cineon log data, but on any kind of log encoding such as LogC from Arri. More modern approaches like ACES are also used in the output path in addition to film print emulations.
There are fundamental problems with this concept as well. The 'Exposure' tool adjusts brightness quite naturally, but it is not exactly like changing the lens aperture or the ISO value. The reason for this lies in the underlying log encodings which, for example, do not define the black value to zero. The detailed explanation is beyond the scope of this article.
Another problem is the future proofness. Log encodings can store only a limited amount of dynamic range. The Cineon curve, for example, was not sufficient for the high dynamic range of the Alexa camera. Therefore, Arri developed the LogC curve. Future cameras and HDR displays will require additional tweaks that might be compromising. This also applies to the VideoGrade Operator, which was designed with standard dynamic range video signals in mind.
Base Grade: Under the Hood
The time has come for a next generation color grading operator. Filmlight uses neither a video signal nor film stock as a foundation, but algorithms modeled on human perception. The dynamic range of Base Grade is not limited by a technical format like Rec.709 or the Cineon coding. It is ready for the HDR future.
Base Grade works the same way in every working color space. Therefore, it always feels the same for the colorist regardless of the camera used. This requires not only precise color setup in the scene settings but also correct tagging of the footage. Usually this happens automatically, but for transcoded footage it might require manual adjustments. Base Grade converts the image autonomously into a linear color space in which, as in the case of linear compositing, the original brightness ratios of the scene are restored. The user does not have to care about the internal color space conversions because Base Grade hands the image over to the next operator in the defined working color space.
Internally, Base Grade uses an Lab-based color model consisting of a pure luminance component L and two color components a and b. The color plane spanned by a and b was distorted by the developers in regards to color grading. This gives color and saturation changes the same visual effect in all color regions and makes the work feel more intuitive.
All exposure values and pivot points are specified in aperture stops. This is a well known unit that mimics human perception and is easy for photographers and DPs to understand. The colorist can give instantly meaningful feedback to the DP. For example: "I made the whole picture half a stop brighter”, or “I lowered the Highlights one stop". If a Dailies colorist uses Base Grade, such feedback — comparable to the camera report from the lab in the past — could conceivably help the DP working on the set. It will definitely make communication between the DP and the colorist easier, especially when the DP is not physically present.
Four parameters affect the whole image: 'Flare', 'Balance', 'Contrast' and 'Saturation'. Beside these global parameters, Base Grade partitions the image into brightness zones. This is reminiscent of the legendary zone system by Ansel Adams, which according to the developers served as a source of inspiration. The reference point of Base Grade is medium gray, as found on 18% grey cards. The luminance zones are defined from there in stops. A correction of three stops up or down is the maximum in the standard mode. This is generally sufficient. In extreme cases, up to six stops can be corrected in extended mode.
At first glance, there are few parallels to existing tools in Baselight or comparable grading software like DaVinci Resolve. The RAW development experience in Adobe Lightroom comes closest to that in Base Grade. However, Base Grade offers not only luminance controls per zone, but also color and saturation. In addition, each zone's region can be fine tuned via 'Pivot' and 'Falloff', which makes it much more powerful.
-
'Balance': Adjusts the exposure and the color balance of the entire image. Brightness changes behave exactly like the change in aperture or ISO value. The trackball corresponds to the white balance. 'Balance' can therefore replace settings in a RAW decoder. The scene-linearity remains intact while working with 'Balance'.
- 'Flare': Influences the lower part of the curve by defining the zero point. A correctly set 'Flare' value is crucial for proper functioning of Base Grade. Otherwise, the real brightness ratios from the set can not be restored. The zero point is usually the darkest point of the image.
-
'Contrast': Adjusts the image's global contrast. In contrast to other implementations, crushing the shadows is prevented by the 'Flare' parameter. 'Contrast' works achromatically, which means it does not affect the saturation of the image. The colorist controls the intensity of the effect on the shadows and highlights using the 'Contrast' pivot- as with FilmGrade.
-
'Saturation': This is self-explanatory: the color intensity of the image. The crucial difference from conventional implementations is the visual uniformity, which works in a more natural way
-
'Pivot': The user adjustable starting point of the zone. It is defined in stops in reference to medium grey. For example “-1” means one stop below 18% grey. The 'Dark' and 'Dim' zones range from pivot to black, the 'Light' and 'Bright' zones from pivot to white.
-
'Falloff': Describes the transition until a zone has full effect. 'Falloff' is not measured in stops because it changes adaptively relative to the set 'Balance' to avoid negative slopes. Therefore, it is an abstract value ranging between 0 and 1.
User interface
The user interface follows VideoGrade and FilmGrade. It consists of three main parameters mapped to the three trackball-ring combos on the Blackboard control panel. Below lies a visualization of the current grade as a tone curve, framed by further parameters such as pivot points. The developers have distributed Base Grade onto two tabs. The first page is 'Dim' / 'Balance' / 'Light' and the second 'Dark' / 'Balance' / 'Bright'. The most important parameter, 'Balance', is permanently visible and mapped to the middle trackball-ring combo on the Blackboard. 'Flare', 'Contrast' and 'Saturation' are also visible on both pages and can be adjusted via encoders.
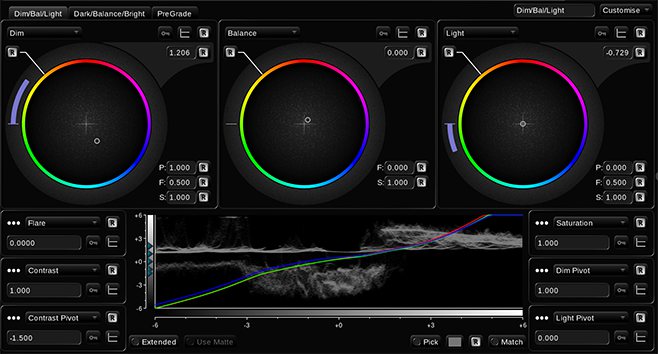 Look and Feel - The Base Grade user interface. As usual, users can create custom layouts on new pages.
The grade visualization display contains a special goodie. A luma waveform of the current image is superimposed over the curve. Thanks to this, the colorist constantly sees which parts of the image he is currently editing and how he should adjust the pivot points. It would be even more useful if the display superimposed a luma histogram.
Test-drive
It takes some time to get used to the new toolset. However, curiosity and the excitement of playing around with a new toy fuel one’s motivation to dig deeper. I tested the promise of the exact stop scale. Indeed, a 'Balance' boost of 1.0 shows the same result as doubling the ISO value in the RAW developer. And this applies for all tested cameras by Arri, Red and Sony. The clever part there is that you don't need RAW material for that. If you work with a mixed ProRes and ArriRAW Timeline, for example and all RAW shots have been pushed by one stop, you can now apply the exact same correction to all shots. And it is no longer necessary to switch to the DeBayer settings, because adjusting the exposure with Base Grade does not compromise image quality in that case.
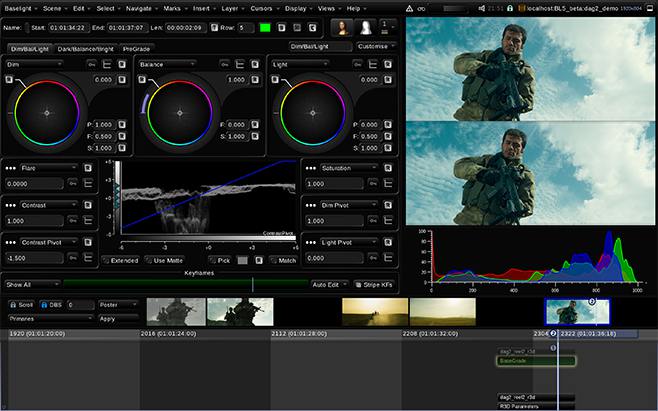 Unity – Below is pushed one stop in the RAW settings and top with Base Grade. The results are identical.
White-Balance should be adjusted with the 'Balance' trackball. It will not yield the same results as the RAW developer because of the ab color plane that was specifically optimized for color grading. In my opinion, the results are a bit more pleasing than adjusting the Kelvin value in the RAW settings.
Matching shot to shot seems to be another ideal task for the tool. Many colorists divide their grade into a basic correction per shot and the creative look. Used as the first layer in the stack, Base Grade makes it easier to compensate for exposure differences due to the scene-linear working style. Shots with diffuse lens flares are a common problem while matching. They cause raised black levels in the frame. Even quite clean lenses such as the Master Primes show this effect, especially when there are bright backgrounds. When you try to minimize the flare with VideoGrade’s 'Lift', for example, you mess up the whole picture and the grade does not fit properly anymore. The 'Flare' parameter helps in these cases because it corresponds to optical flare in the lens. If the exposure is basically correct, the differences in the black level caused by lens flare can be corrected quite well.
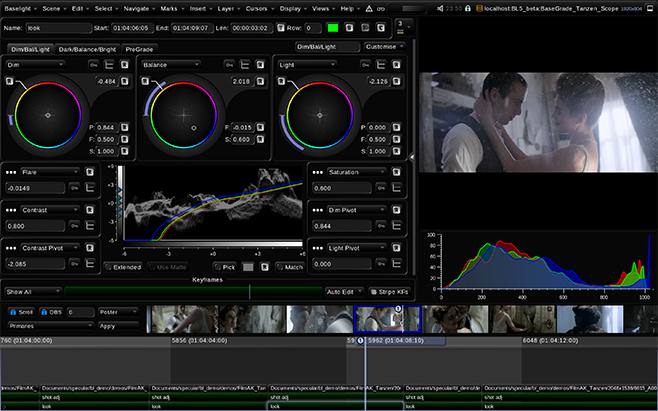 With the help of the 'Flare' parameter, the colorist matches scenes that contain a lot of lens flare.
When copying corrections from shot to shot, the colorist should also pay attention to the 'Flare' value and adjust it if necessary. For example, if you copy from a scene with lots of diffuse flare, the black will probably be crushed in the target shot. With none of Base Grades other controls except 'Flare', you can get it back to a decent level. If 'Flare' is set correctly, the black can practically never be fully crushed. Base Grade pushes the shadows into a pleasant-looking compression instead of a hard-clipping.
The 'Saturation' control yields pleasant results too. It is astonishing that a tool as widespread as color saturation could be improved further. Base Grade gives more visually pleasing results than existing implementations in a direct comparison. With classic saturation tools, primary colors such as red quickly become overweighted in the frame as you increase saturation. With Base Grade, the strength of the effect is more evenly distributed over the color circle. And the great thing about this is that it works similarly while desaturating pictures.

 Evolution - next generation of color saturation. Top: A scene containing strong neon colors reduced by 30% with a classic saturation implementation. Bottom: Same reduction with Base Grade. Not only the colors, but also the brightness seems more natural.
Base Grade reveals the full extent of its strengths with the zone model. The gradation of an image can now be modeled very precisely utilizing only one operator. With previous software, the colorist was forced into detailed and sometimes fiddly tweaking in CurveGrade or keying. Now there is a more intuitive alternative.
For example, optimizing sky definition usually requires luma keying the highlights. With Base Grade, I got amazingly far without any secondary correction. On one shot for example, I initially lowered 'Light'. Next I lifted 'Bright' to tickle out the last details just before clipping. By initially adjusting the correction quite aggressively, I could easily find the right pivot points. Then I reduced to a more pleasing level.
If the colorist opts for extremely strong corrections, there is a risk of unsightly effects, a preliminary stage of solarization. Base Grade prevents true solarization - negative slopes of the gradation curve - but the colorist can flatten the curve so much that the definition is ruined in certain brightness zones. In these cases, a larger 'Falloff', the transition of the zone, provides some relief. However, it also reduces the effect.
 Top: Uncorrected. A difficult shot, as the tonal values are compressed in the shadows as well as in the highlights. Bottom: Avoiding any keys or shapes, just modeling the gradation with Base Grade one obtains a picture with clearly more definition in the crucial areas.
Base Grade also performs strongly with Cross-Process Toning, a common case in color correction. The highlights and the shadows are given different hues. Complementary hues are often chosen for this. The shadows, for example, are tinted in cold teal and the highlights in warm orange. Colorists often use HLS keys for this technique to have more control over the effect. With Base Grade and its zone model, one can precisely control the strength and hue of the effect and probably save some keys in the timeline.
About VFX pregrading: Flare is an artifact that arises in camera lenses and distorts the scene-linearity. With the aid of Base Grade, the correct brightness ratios on the set can be reconstructed by setting the correct 'Flare' value. Something true black or the darkest shadows in the frame should usually be set to zero. After that, 'Balance' works completely scene-linear. Because of the flare correction, Base Grade is therefore better suited for scene-linear pregrading than 'Exposure' / 'Printer Lights' in FilmGrade.
Conclusion
Base Grade is very powerful, but it is also complex. Thoughtful setup of the project is essential for proper functioning. If the color space settings are a mess, it will not work properly.
My advice is to slowly familiarize yourself with the tool and then integrate it into the daily working style, bit by bit. A good start would be, for example, to perform saturation corrections with Base Grade. The next step would be to make the basic correction from shot to shot, and so on.
The new grading concept could also be a good starting point for Adobe Lightroom experienced photographers and DPs to color correct moving images because of the intuitive and stop based approach.
The first days with Base Grade were very promising. The tool has potential for both more natural and maybe even completely new looks. In addition, it provides relief from some tweaking and keying in a colorist's daily work.
Andy Minuth
Most of the software testing for this article was done with an early beta version (5.0.8907). Some things will probably change until the final release.
The comment field is open for questions and discussions.
-
 6
6
-
 2
2
Recommended Comments
Join the conversation
You can post now and register later. If you have an account, sign in now to post with your account.
Note: Your post will require moderator approval before it will be visible.