Jump to content
Lowepost
    Master Study in DaVinci Resolve Printer Lights

Master Study in DaVinci Resolve Printer Lights

xap3.139.93.242


Printer points were mechanical adjustments that affected the color balance and brightness of film before the digital age, and the technical process was done by a color timer. The systems used a series of dichroic filters that split the light into red, green, and blue, and each color then passed through 'light valves'. These were metal vanes that opened and closed in precise increments to allow the exact amount of light through to replicate the exact value for each light point. The three colors were then recombined back into full spectrum light and output to the film.

Mike Chewey at MGM labs developed the FCC system, which is the system still in use today.

- Dan Muscarella -

In digital grading, printer points are still very popular and common corrections for setting the primary balance, but also for creating looks. One of the reasons for its popularity is that printer points move the signal in its entirety and alter the entire tonal range in the image. This way, we stay true to the way the original image was shot, and the result can be very clean and cinematic.

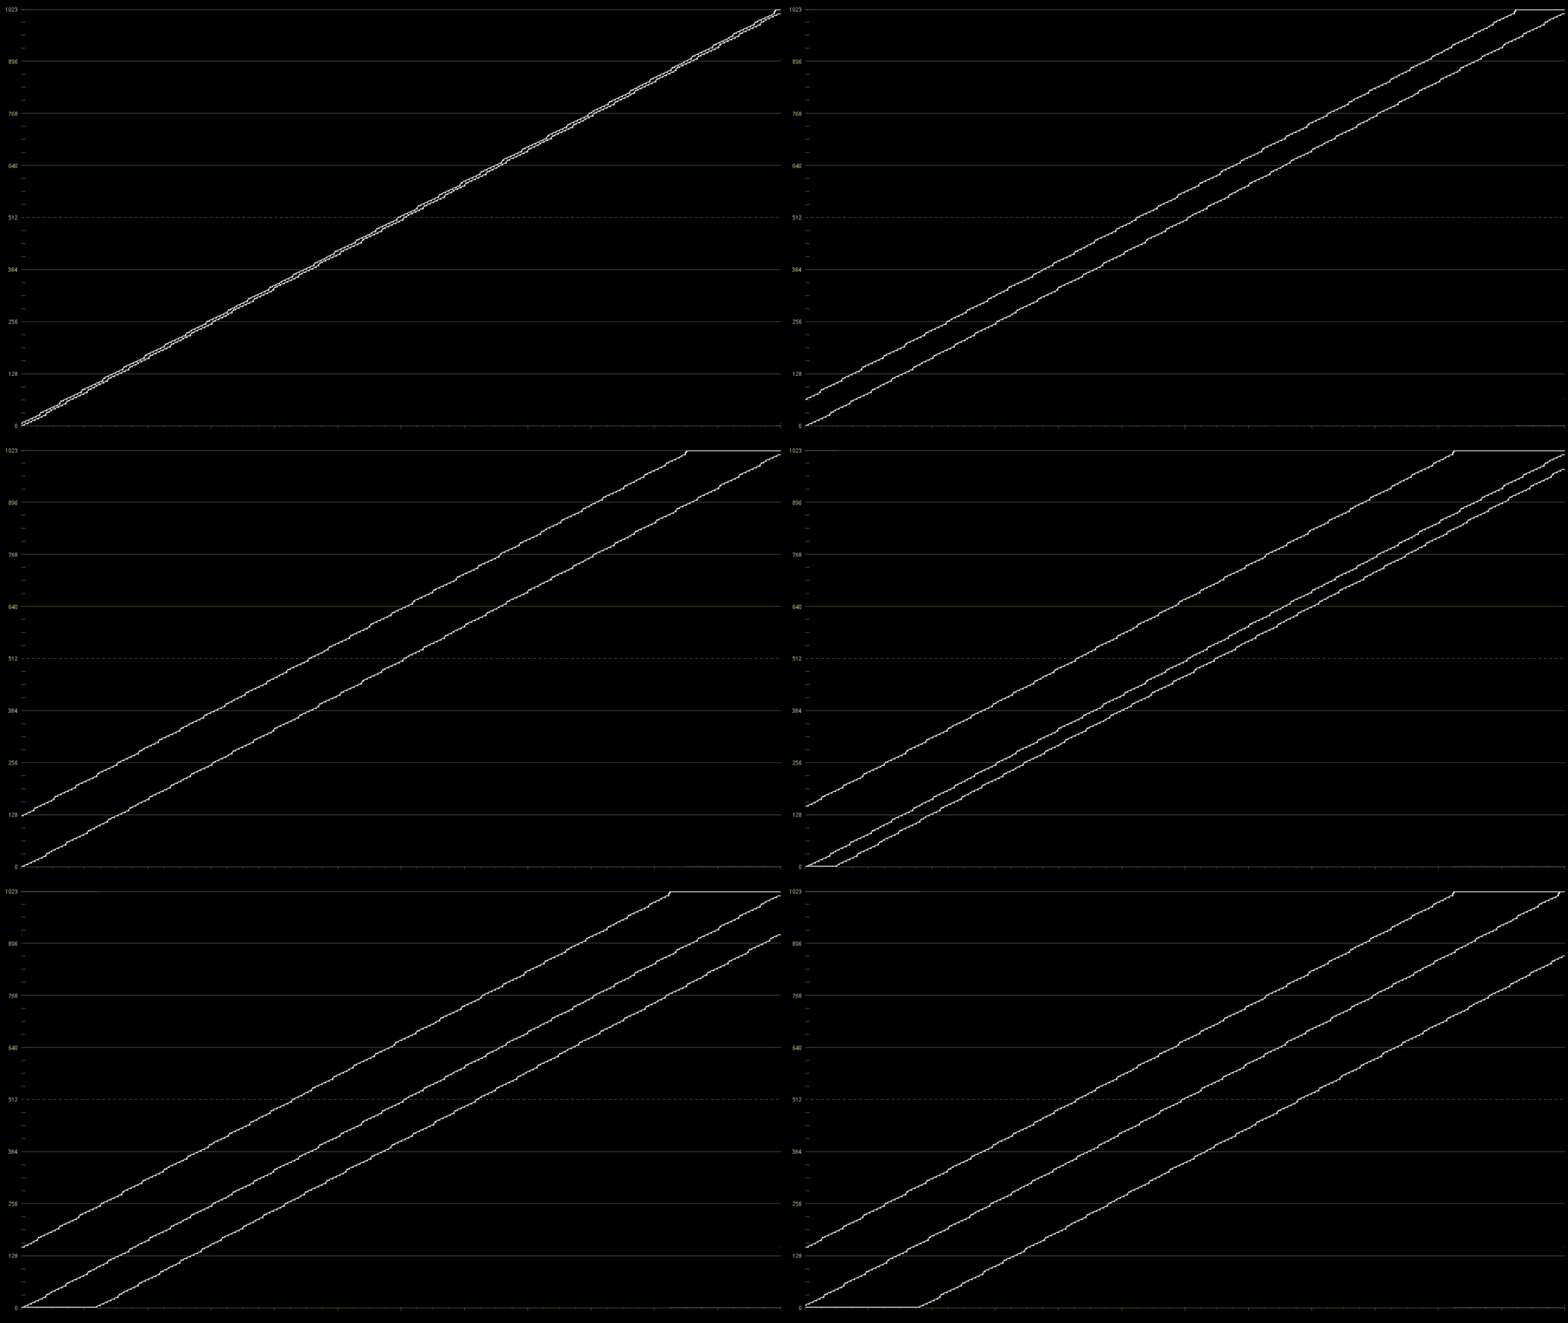
To illustrate this we can look at the waveform when we add red and subtract green to a grey-scale image. The relationship between the shadows, midtones and highlights stays consistent, and the contrast never changes.

waveform_printerlight_photoshop.gif

By using controls that separate tonal ranges such as lift, gamma and gain, we betray the natural relationship between the shadows, midtones and highlights. This is illustrated with a gain adjustment in the example below.
 

Get access

This was a short excerpt, become a premium member to access the full article.

Become a Premium Member


  • Like 30
  • Thanks 9

User Feedback

Recommended Comments


58 minutes ago, Jonathan Martin said:

This is a very naive question – apologies in advance... But what would be the correct way to apply this method to color correcting flat/log film scans, in terms of colour management in Resolve? What would you select as input and output gammas?

In Resolve YRGB Color Management set the input to you camera and output to rec709 2.4, and the printer lights will be applied in camera space (log).

  • Like 1
Link to comment
Share on other sites

Film scans are tough because the standards are loose in the film scanning business. In Resolve, sometimes I start with a CST node decoding from Cineon to Gamma 2.4 can help. If it's too much, I start with a Printer Light (Offset) node to adjust the overall density, then an S-Curve to tame the exposure and add contrast, After that, I have nodes for Balance, Gain ("Gain1"), and a Gain trim ("Gain2"), and usually by that point I can make a decent picture assuming Rec709 delivery. If I see a bias towards pinkish-reds or excessive yellow, I'll take care of that with secondaries right after that. Note that camera negative (OCN), internegative (IN, which is a copy used to make prints), interpositive (IP), and prints all have different looks and require different tactics for final color.

I worked on more than 46 film features in 2021, and each one took anywhere from 30 hours to 70 hours, about 50 hours each on average. The ones from camera negative are the most difficult, since this is effectively the "raw" image shot by the DP and developed by the lab. It takes time and effort to tame the image and give it a reasonable, dramatic look. In many cases, we have an older SD or HD home video release as a reference, and I'll make a judgement call on whether to match it exactly or just get reasonably close to it. Of course, if the old home video releases looked awful, I'll toss that and just go by my best instincts. My feeling is that digital is EASIER to work on, because you have a bit more range... but the client also depends heavily on you to establish a look, which wasn't necessarily the case with film. I always concentrate on telling the story as best I can, but at the same time respecting and preserving the work of the DP and not "stepping on" it too much. When in doubt, we go for less processing... but I will do a little bit of relighting when there's an obvious on-set problem (glare in the background, actor who misses their mark, an important plot detail that didn't get lit). 

I'll have more to say about this in an upcoming Master Class on Feature Films, which is now being worked on. 

  • Like 3
Link to comment
Share on other sites


Join the conversation

You can post now and register later. If you have an account, sign in now to post with your account.
Note: Your post will require moderator approval before it will be visible.

Guest
Add a comment...

×   Pasted as rich text.   Paste as plain text instead

  Only 75 emoji are allowed.

×   Your link has been automatically embedded.   Display as a link instead

×   Your previous content has been restored.   Clear editor

×   You cannot paste images directly. Upload or insert images from URL.

×
×
  • Create New...