Mazze
-
Posts
246 -
Joined
-
Last visited
Content Type
Profiles
Articles
Articles - Premium
Resources
Insider
Courses
Forums
Store
Everything posted by Mazze
-
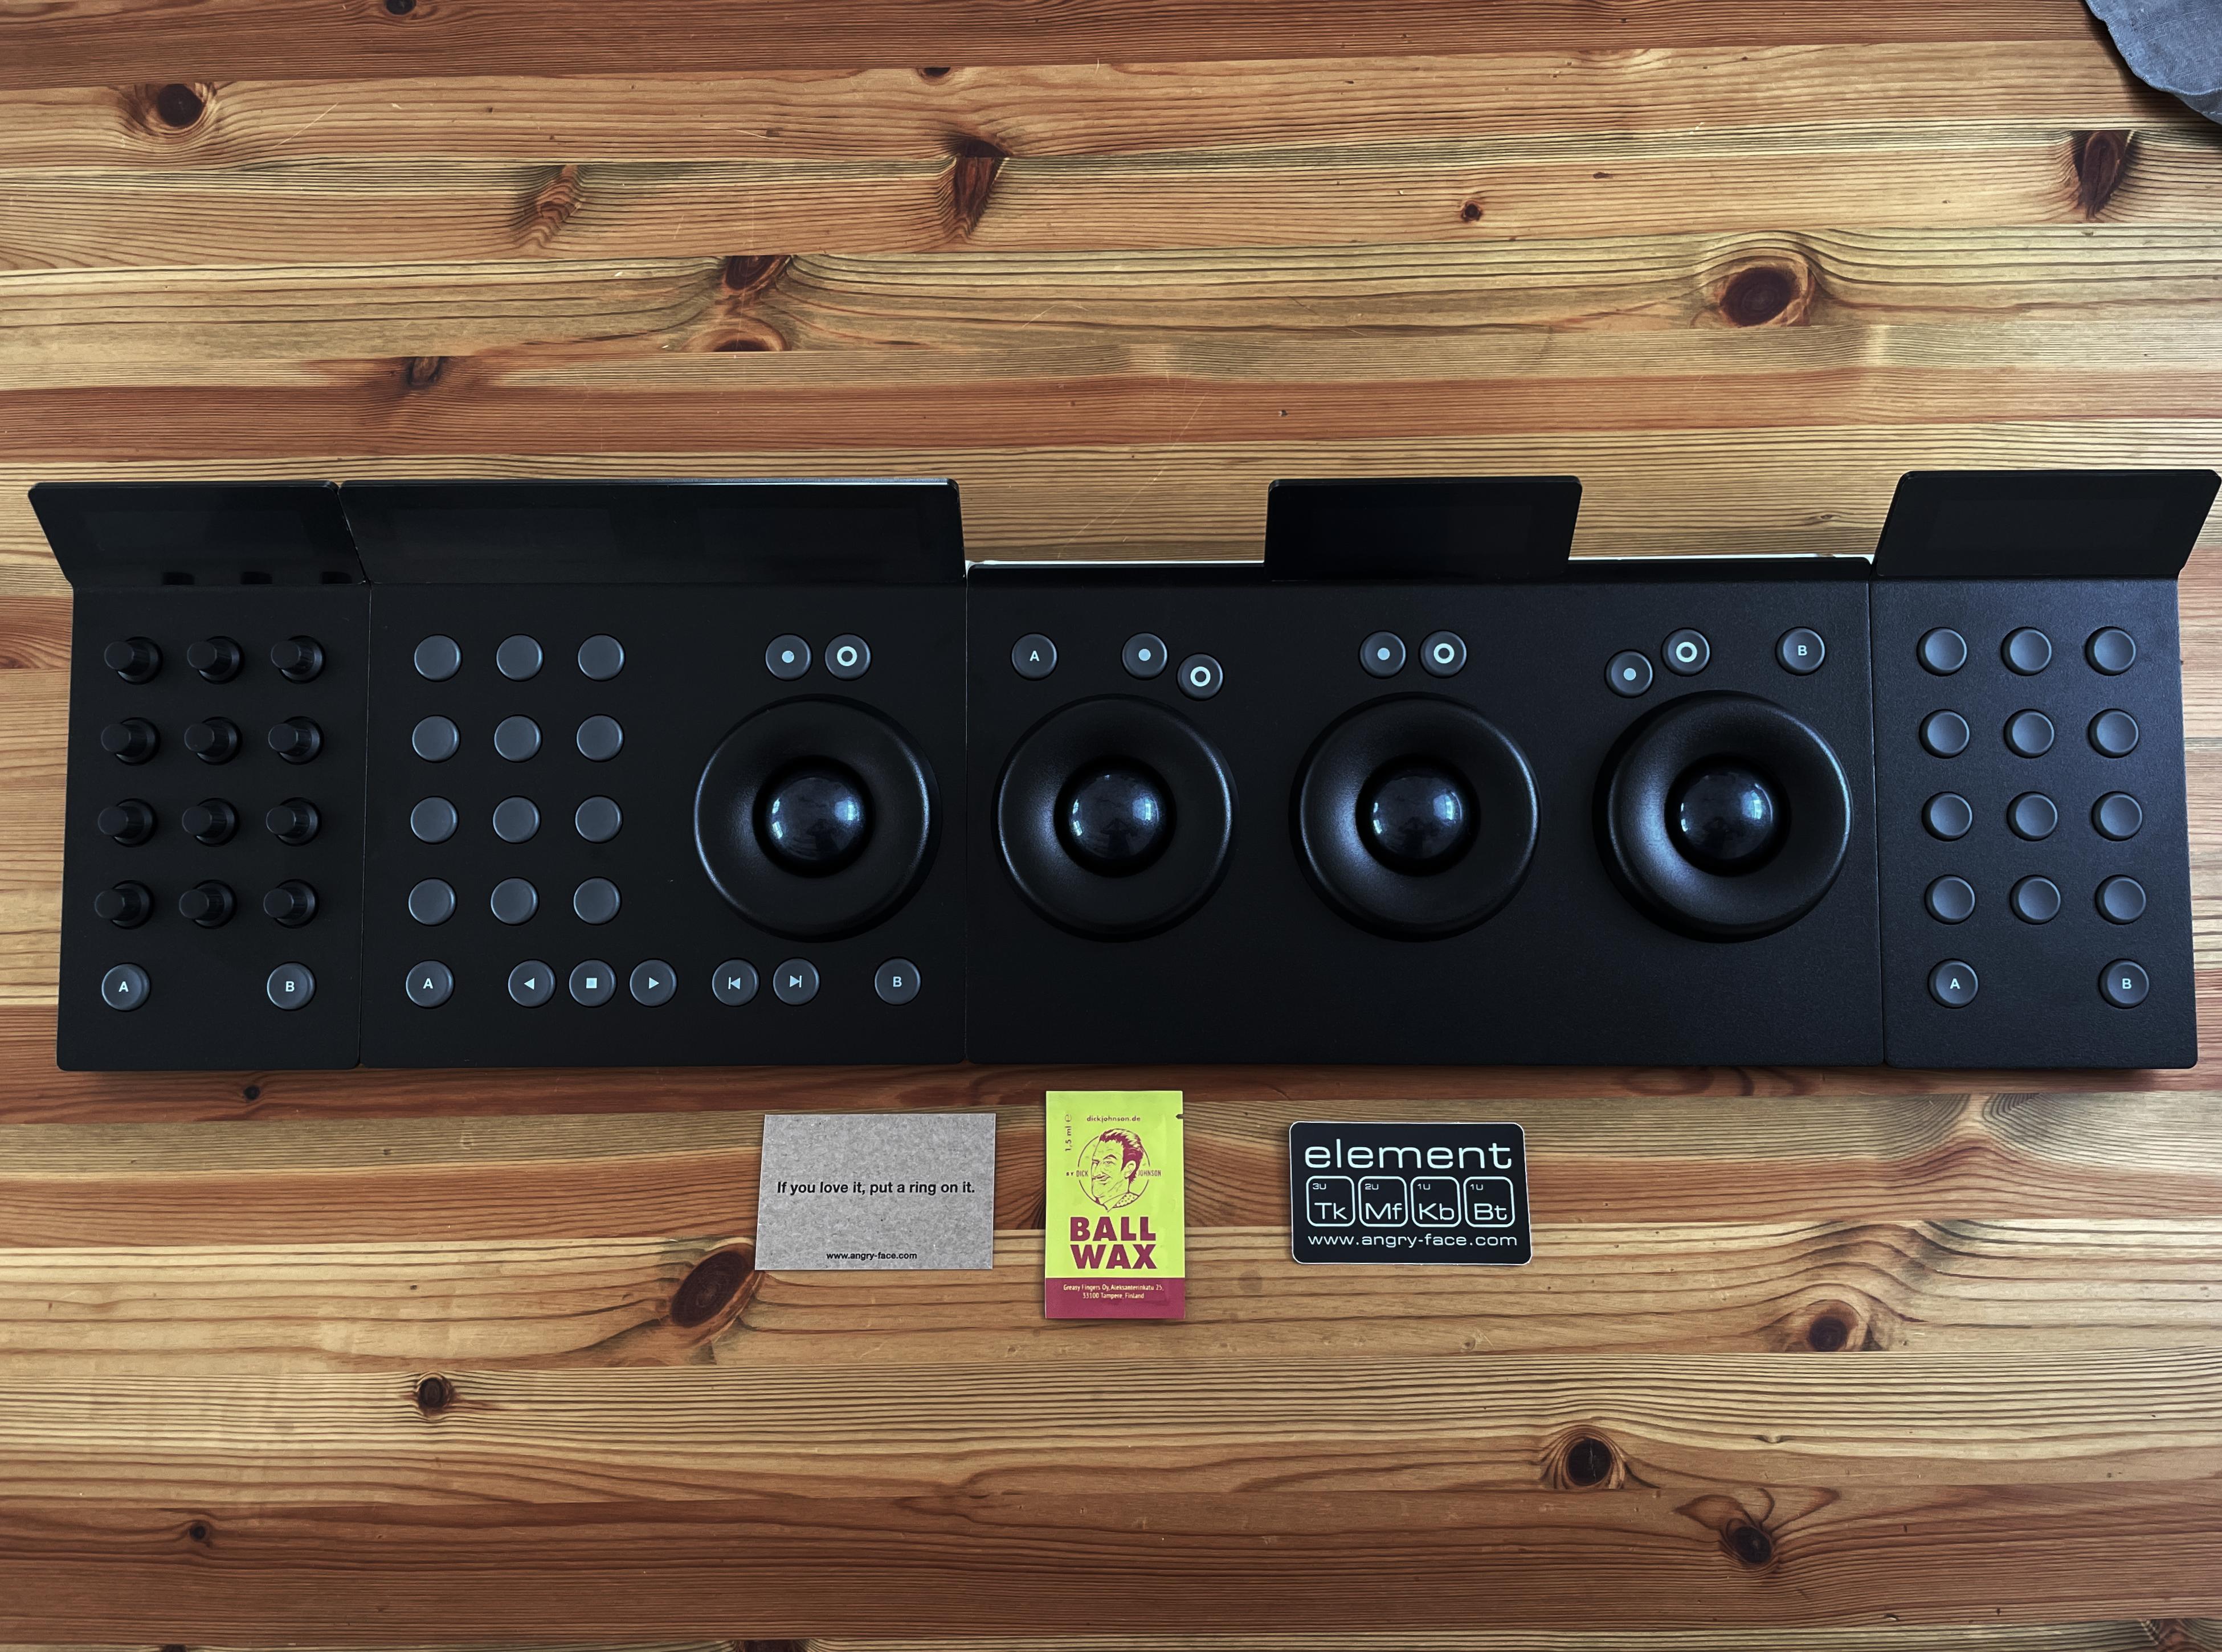
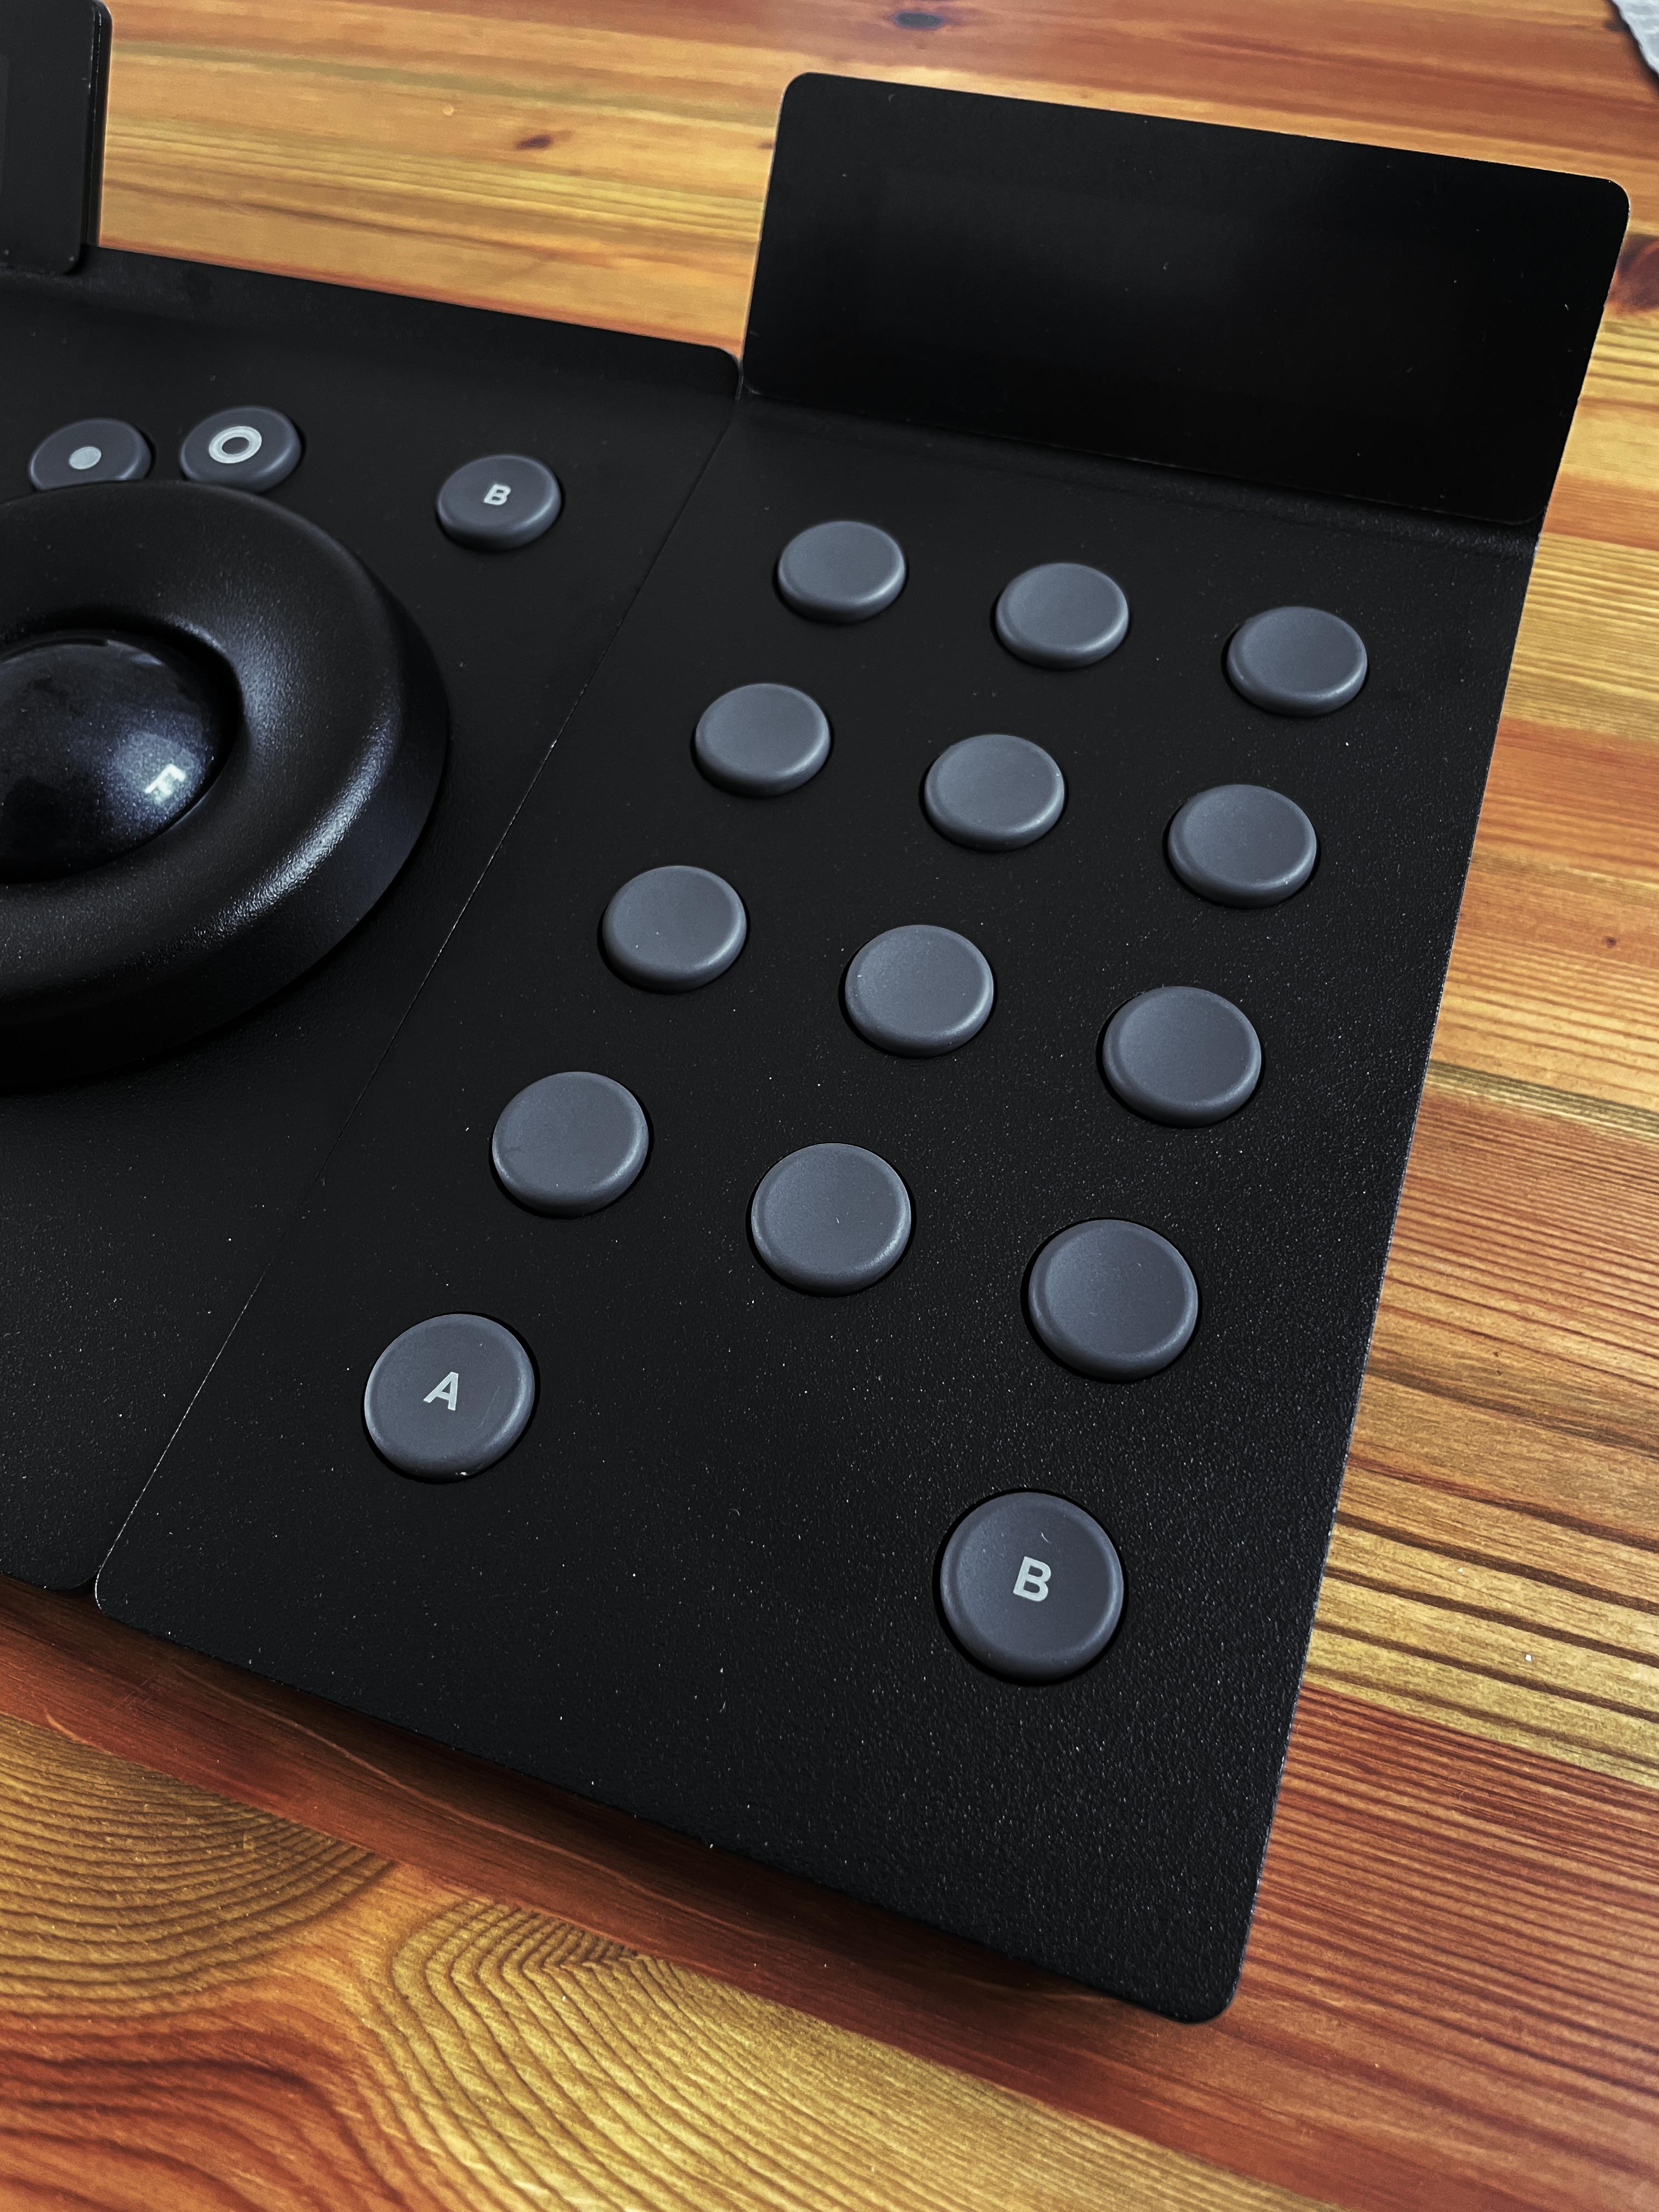
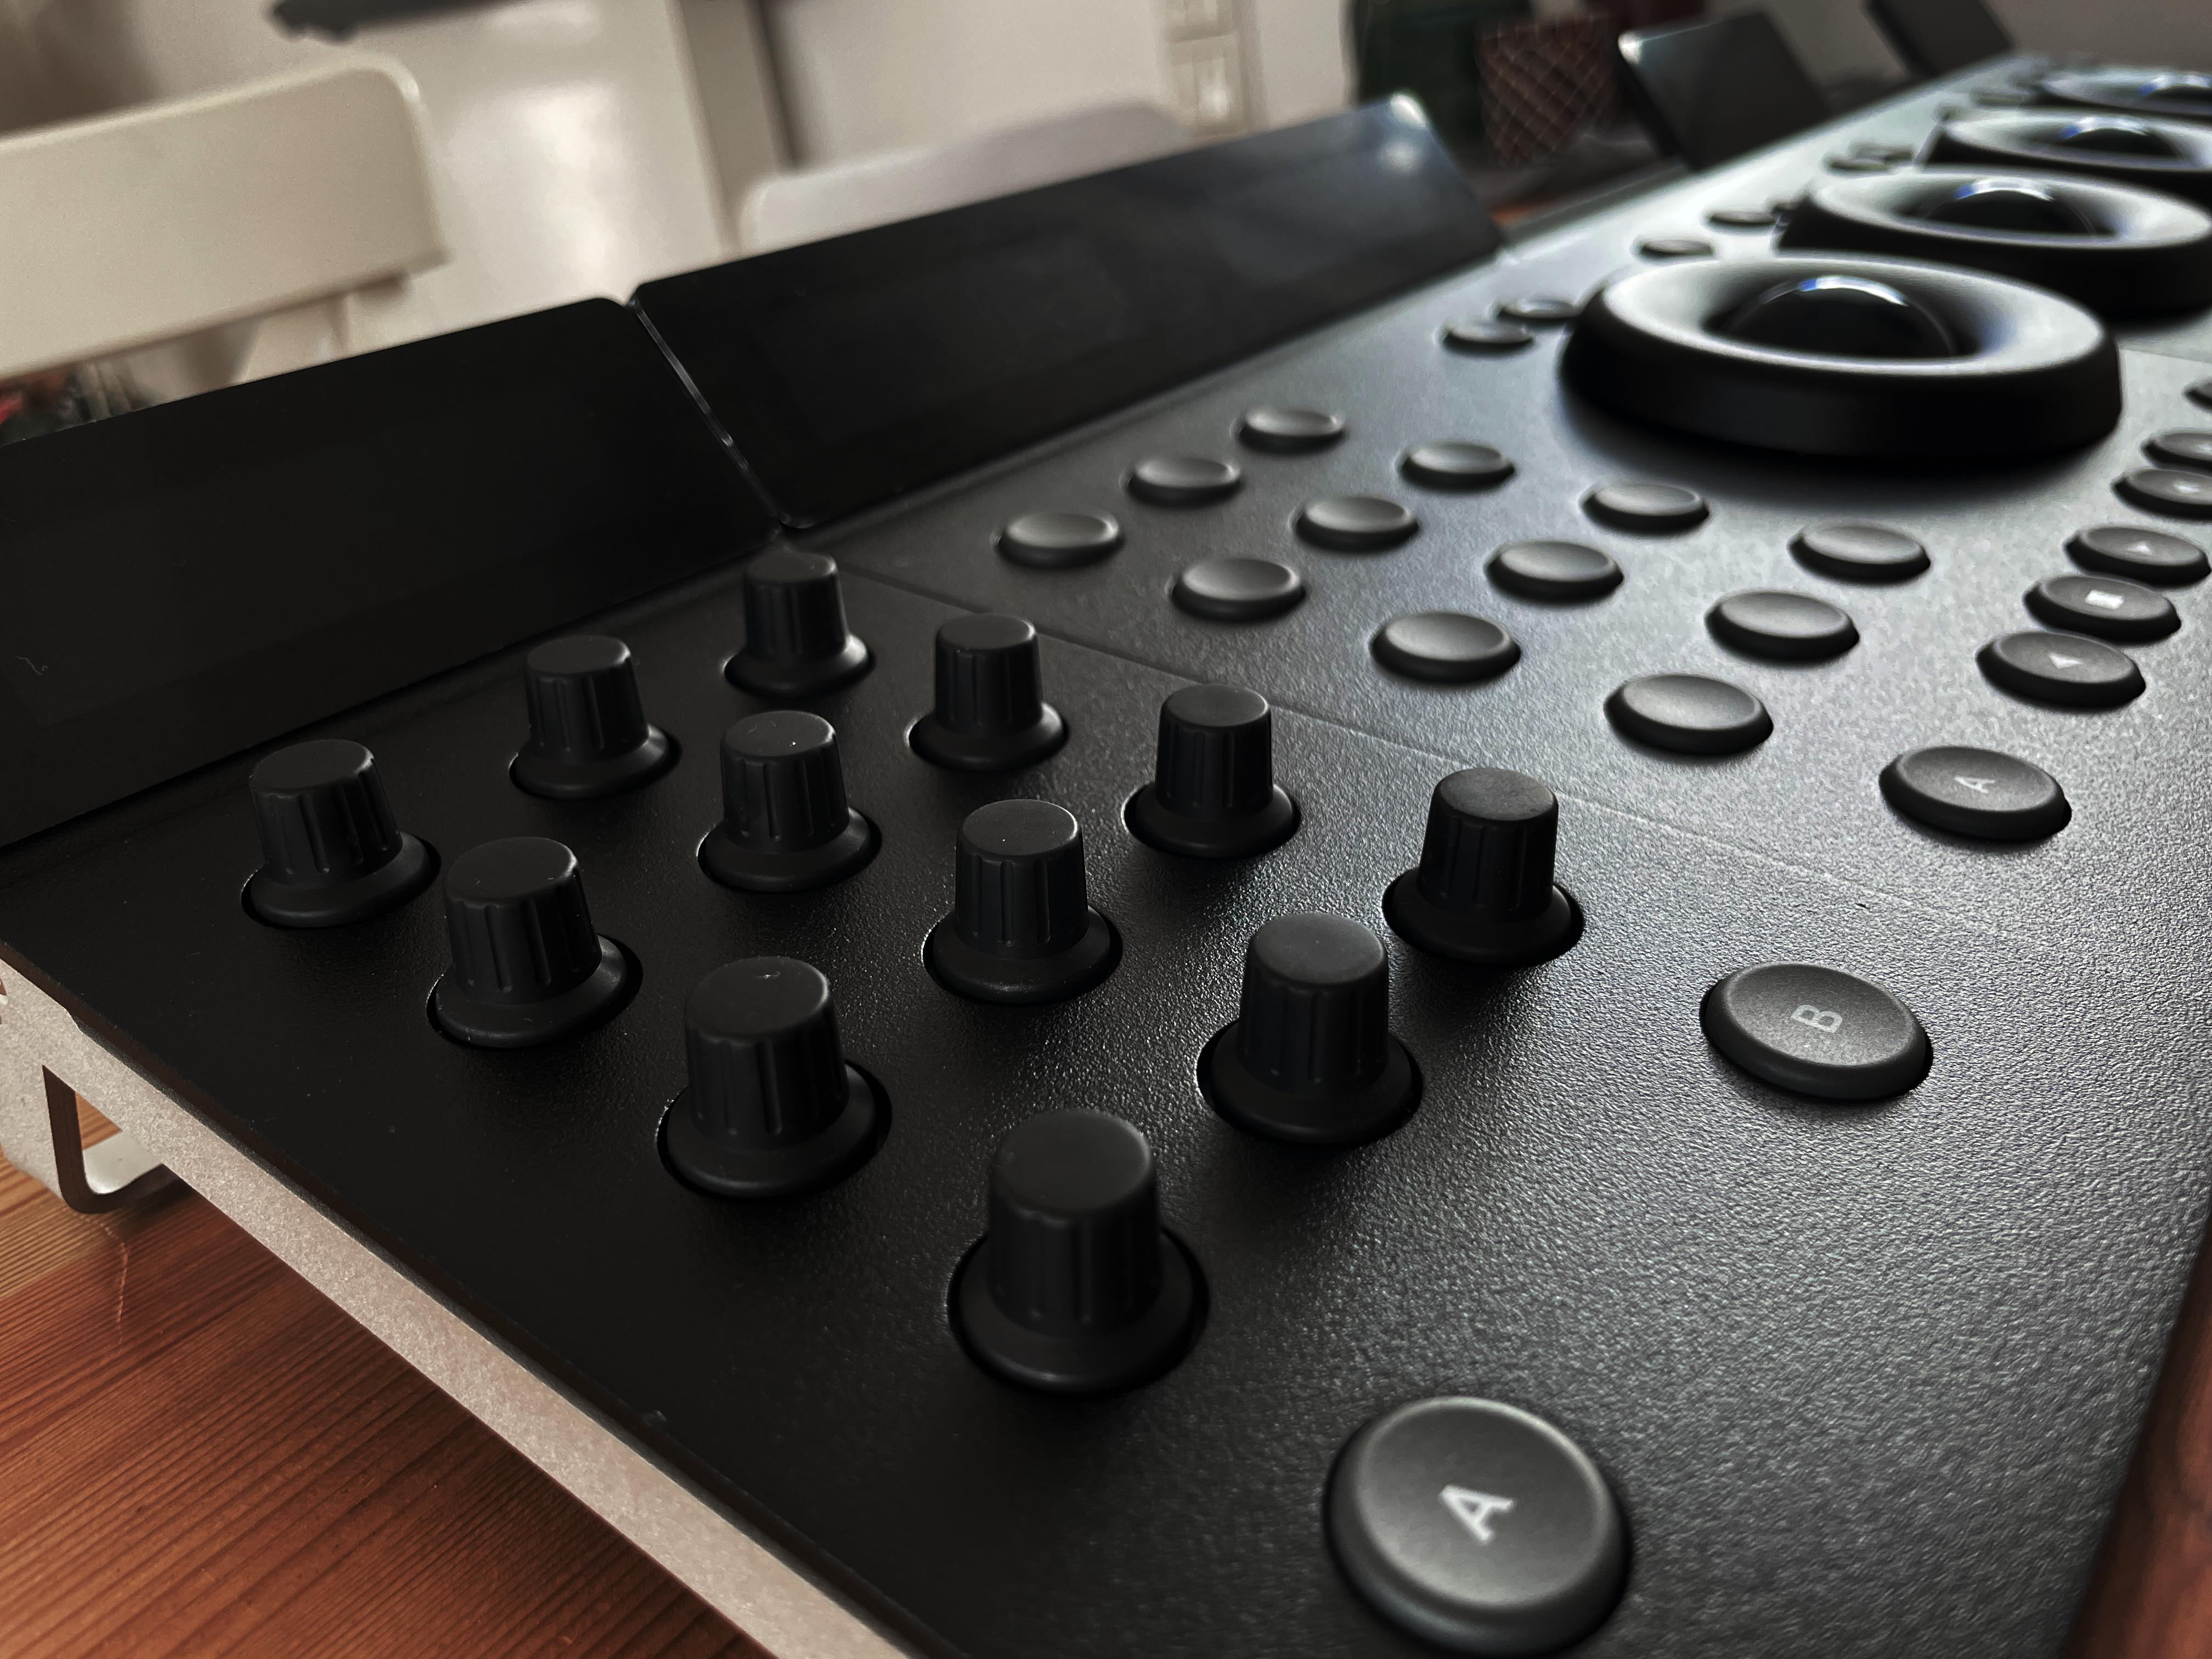
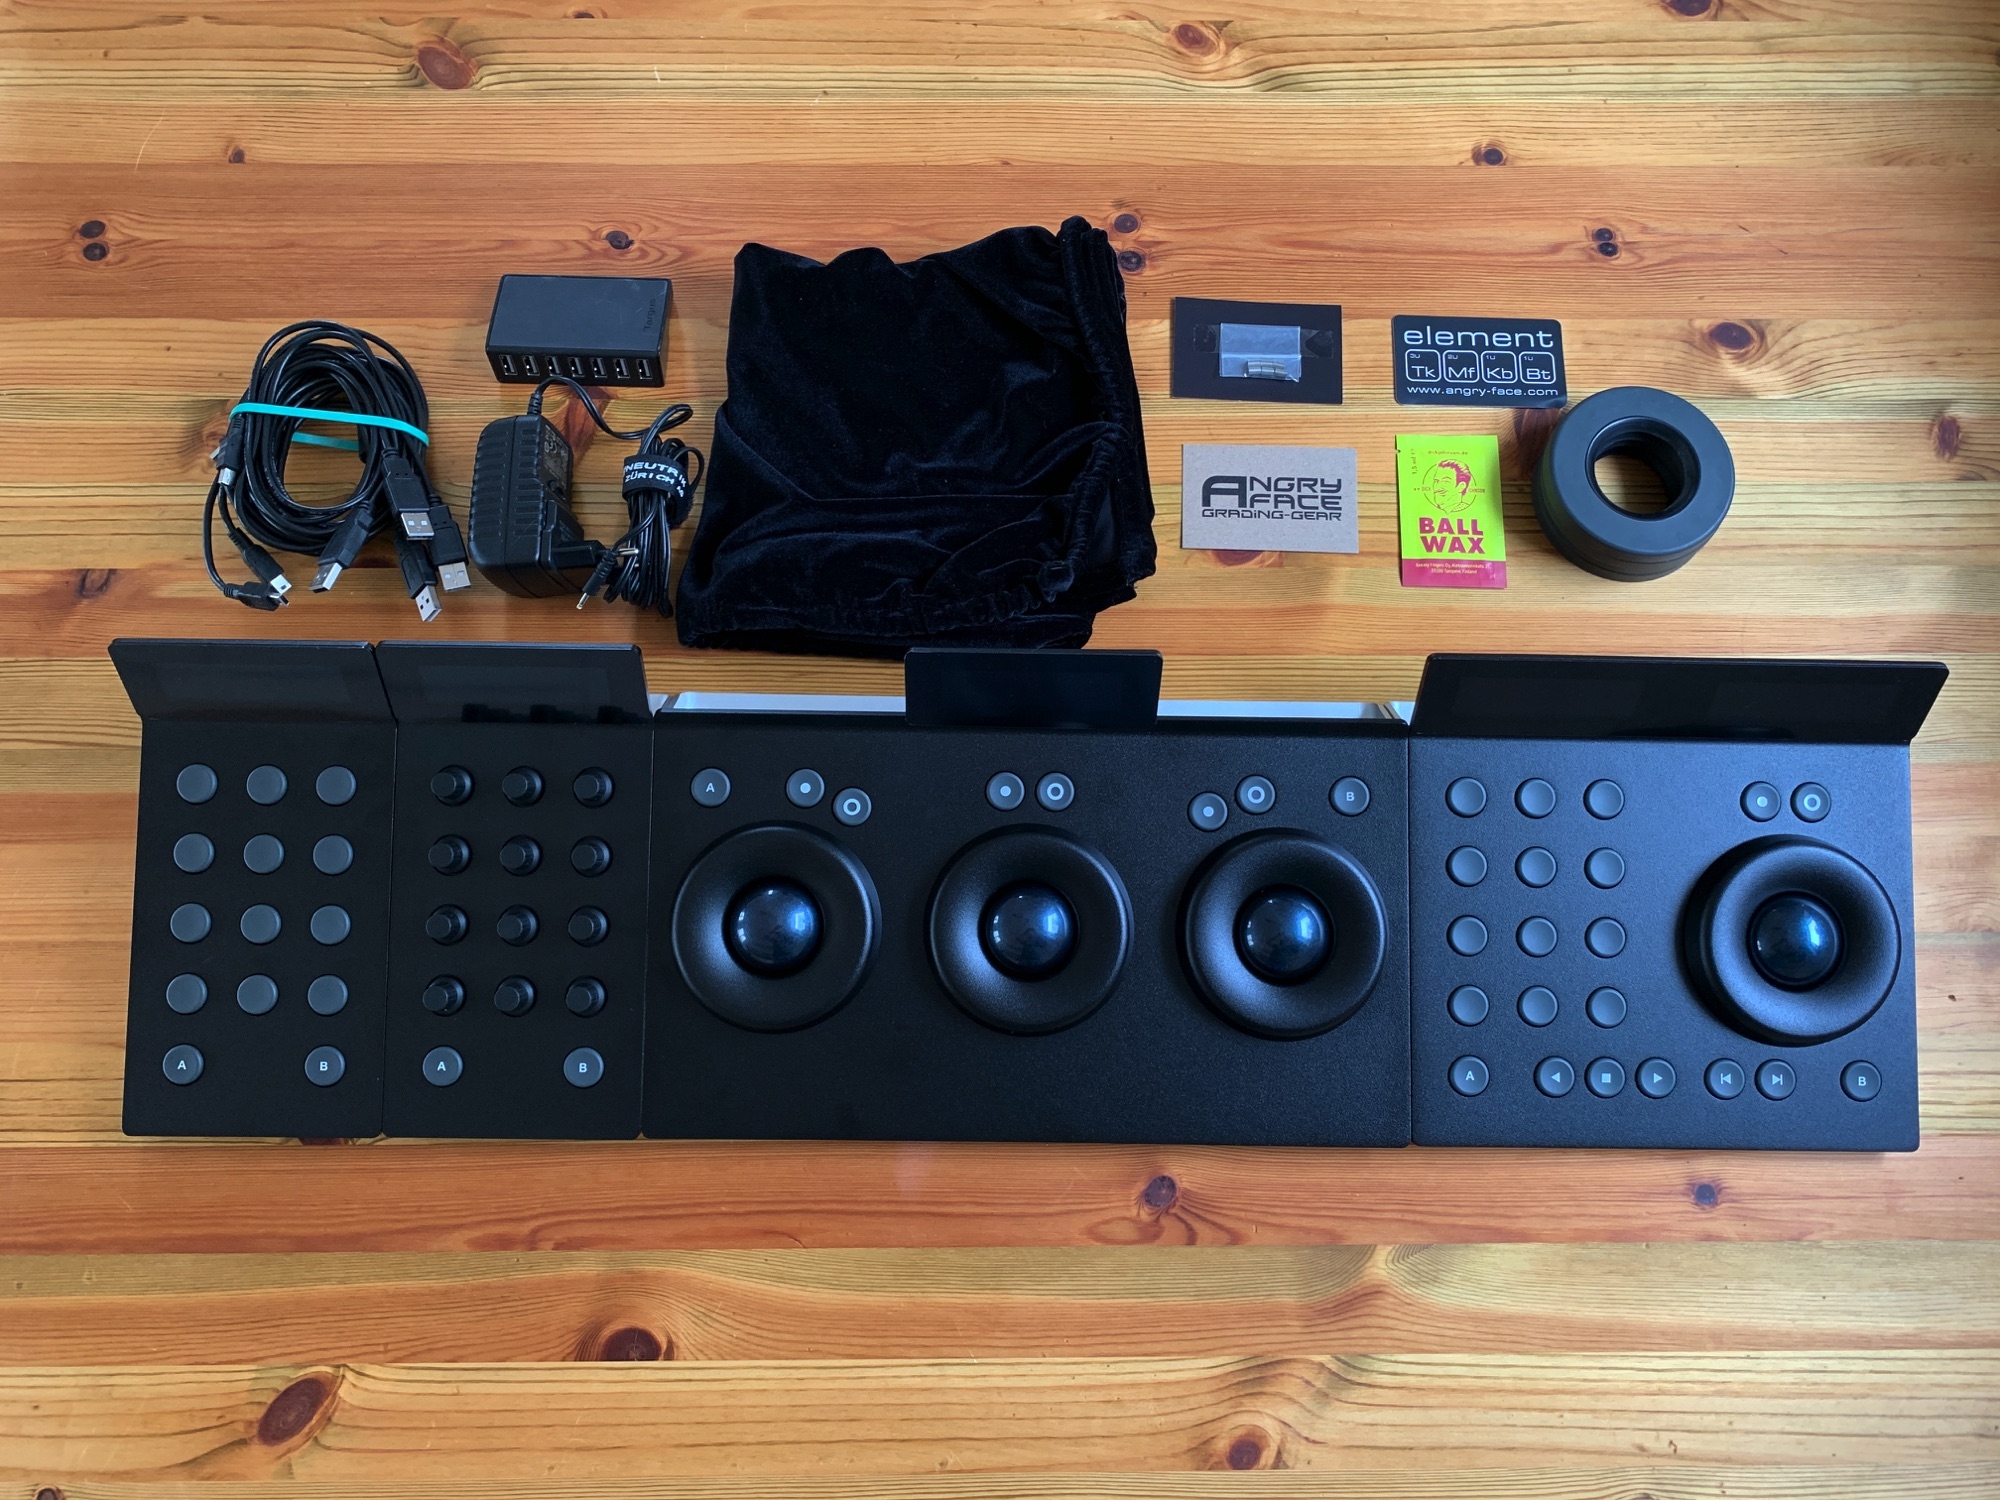
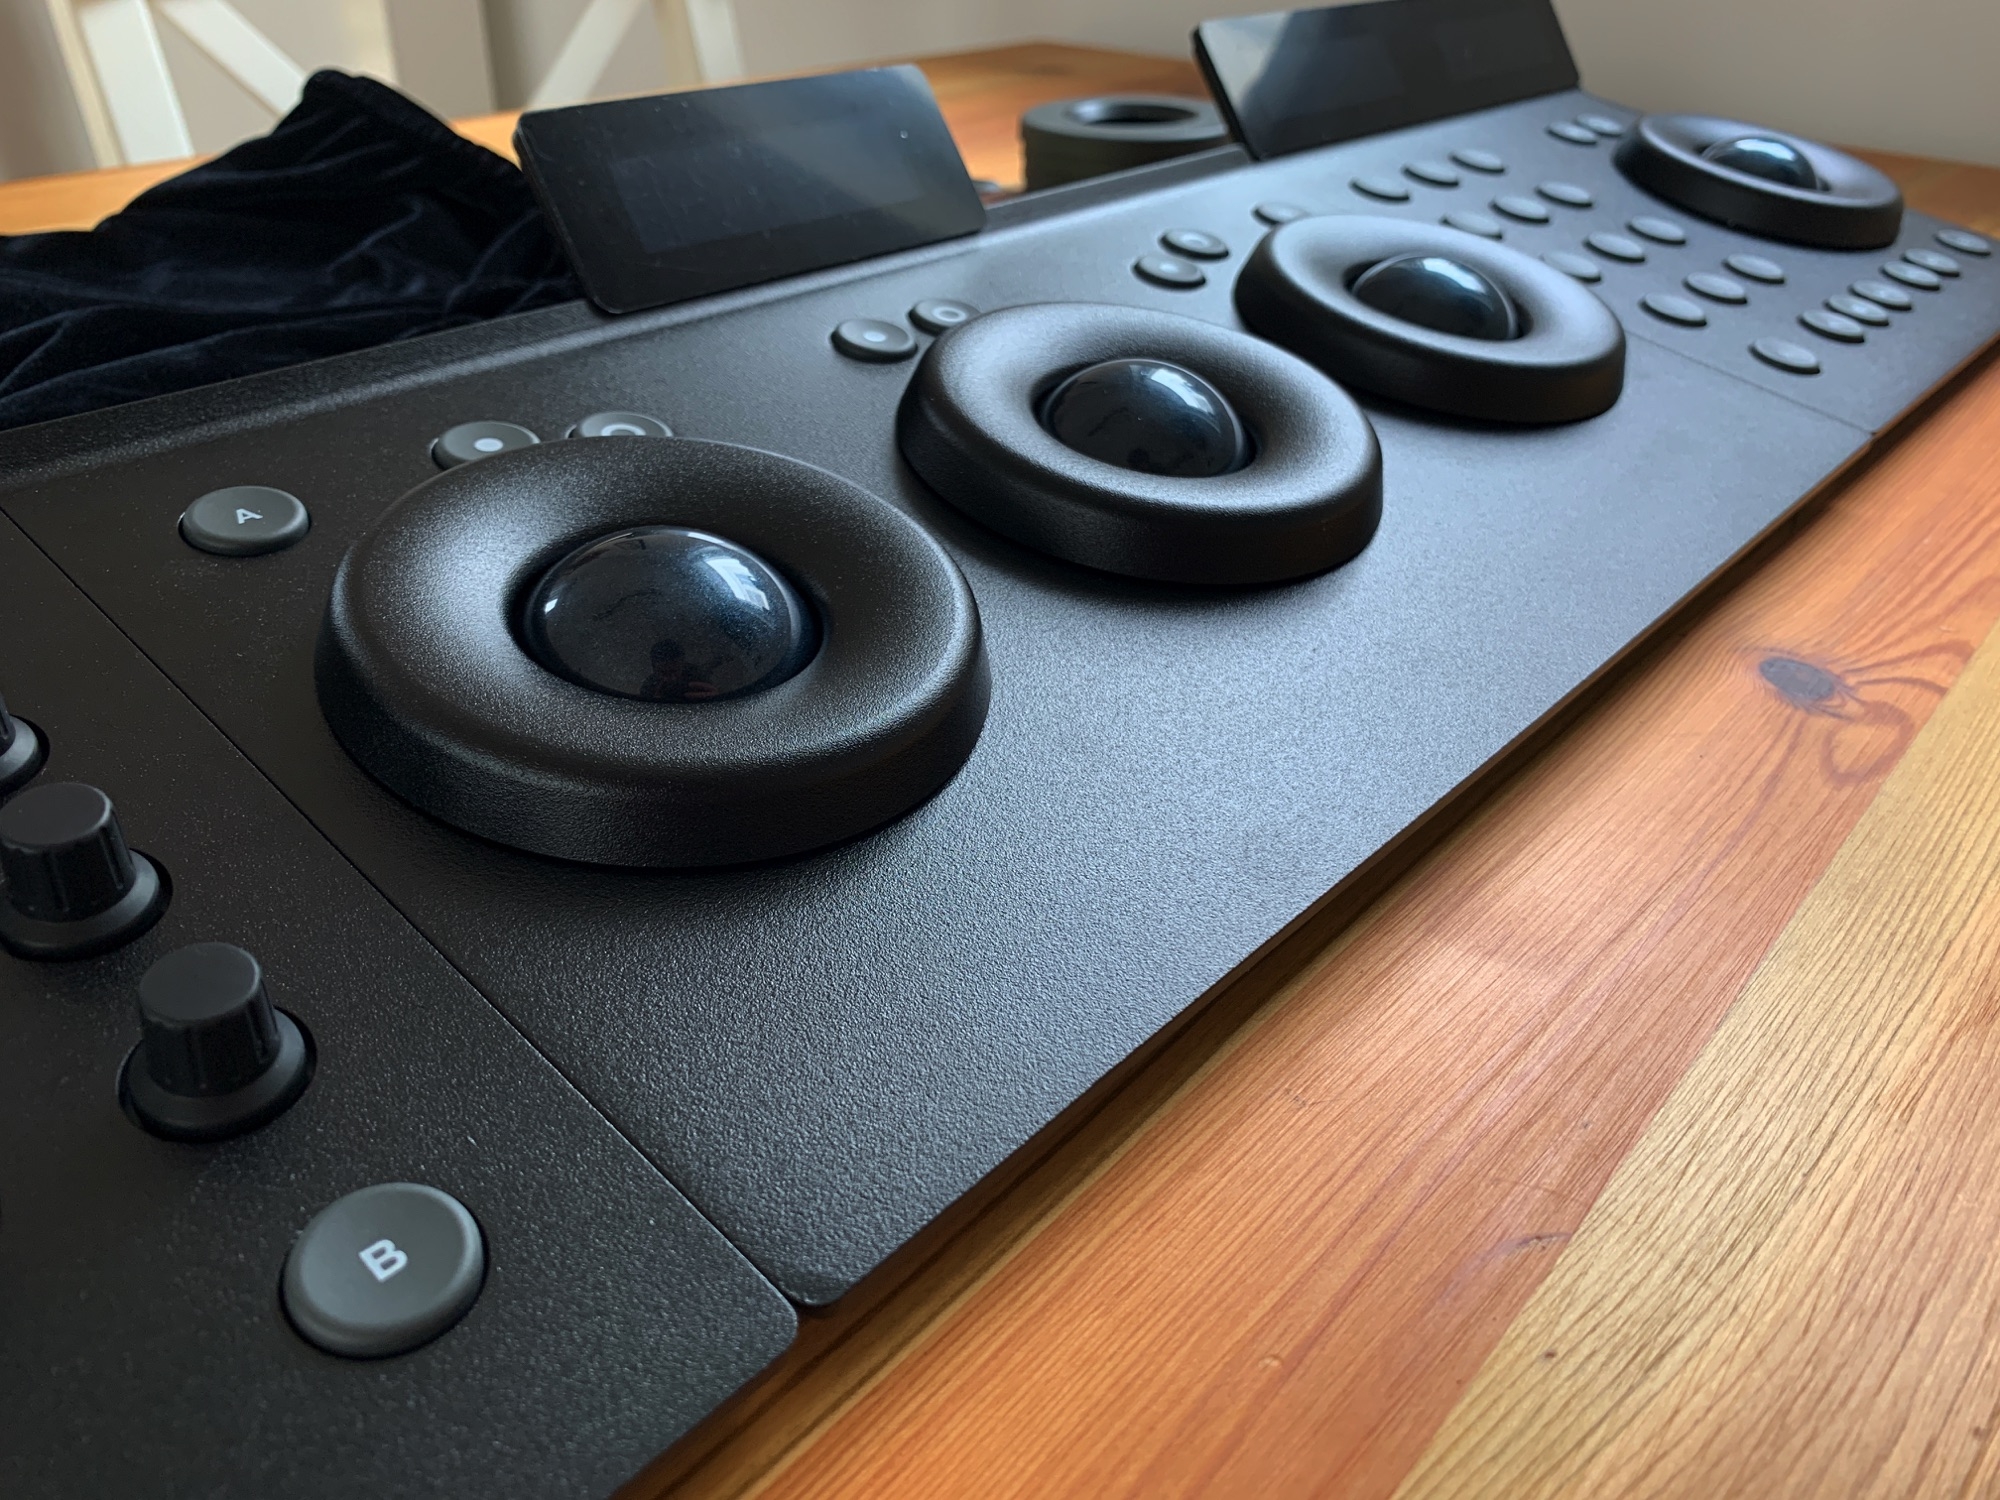
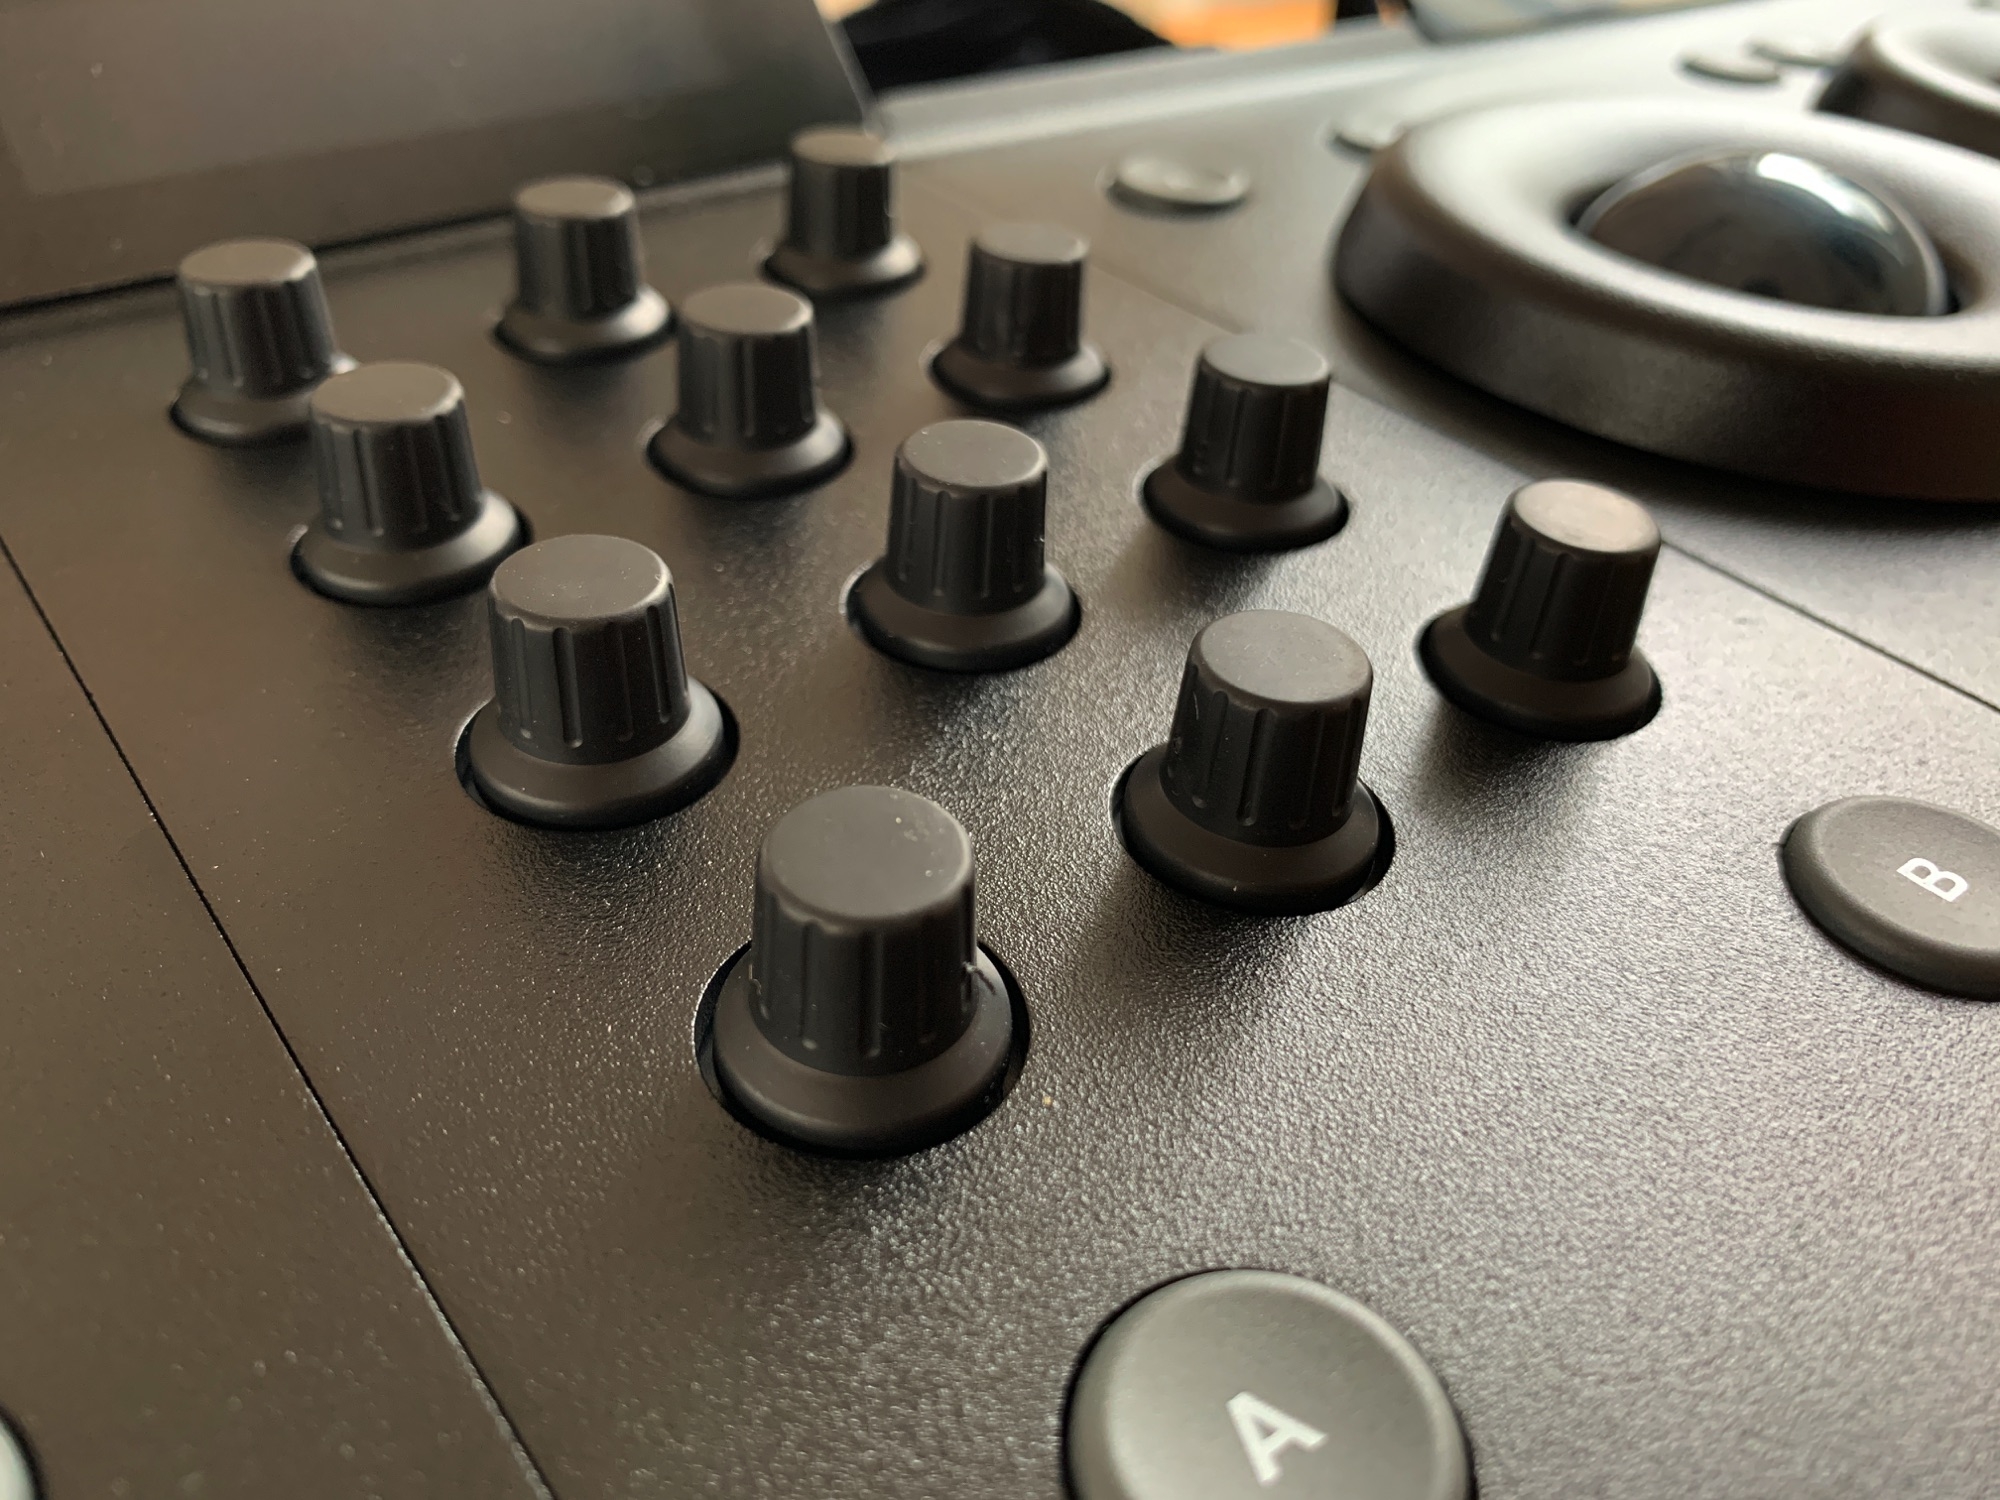
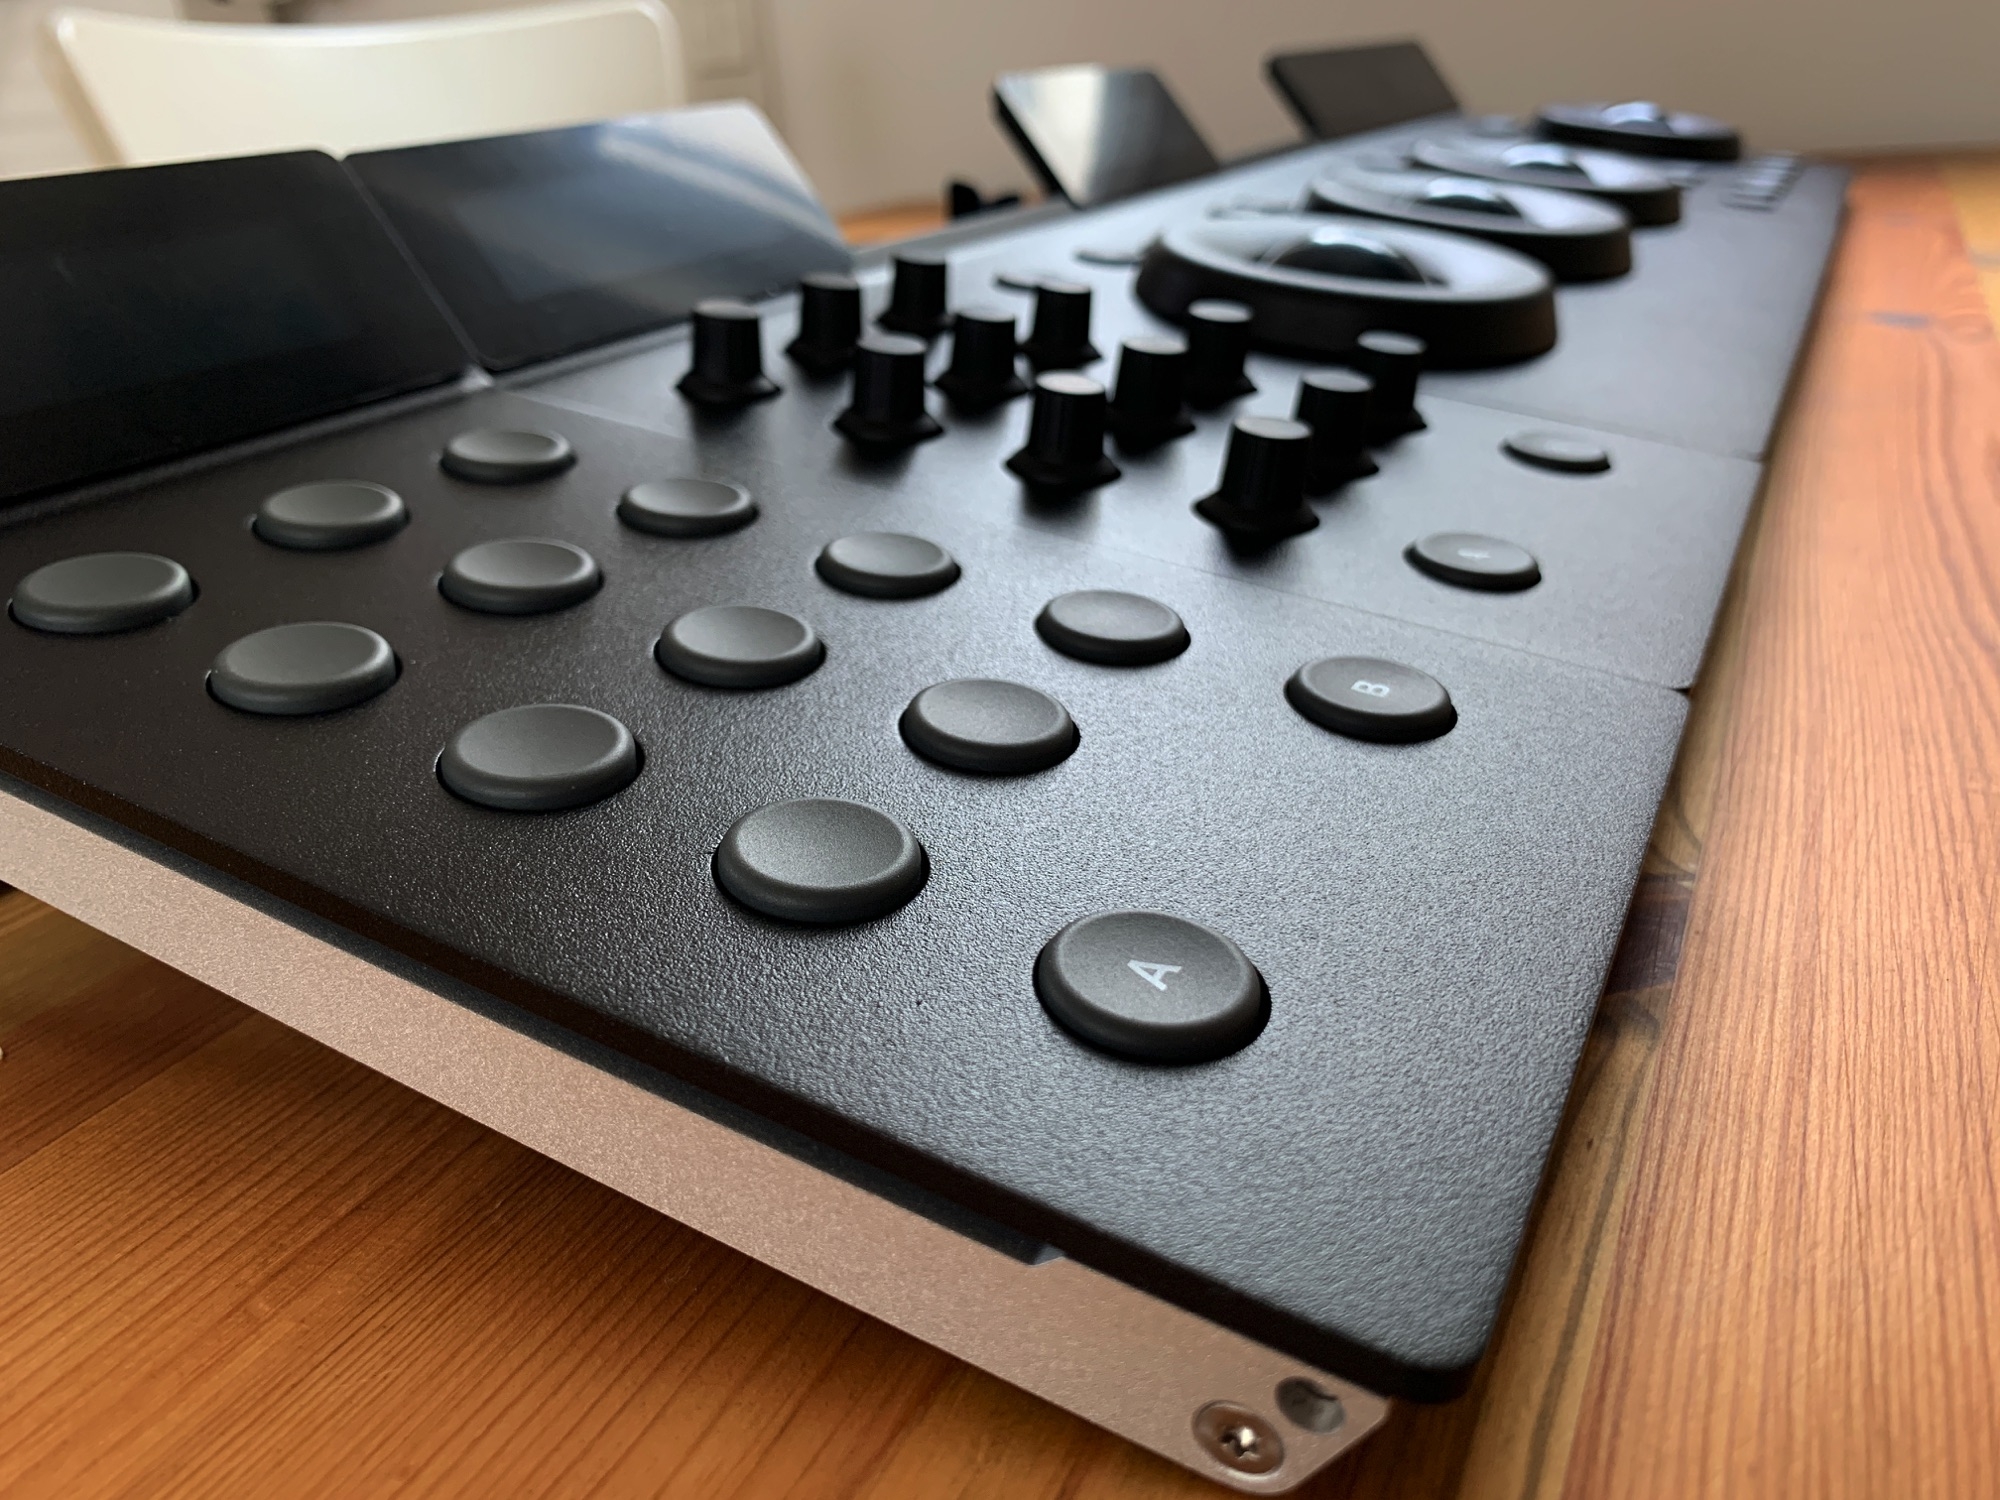
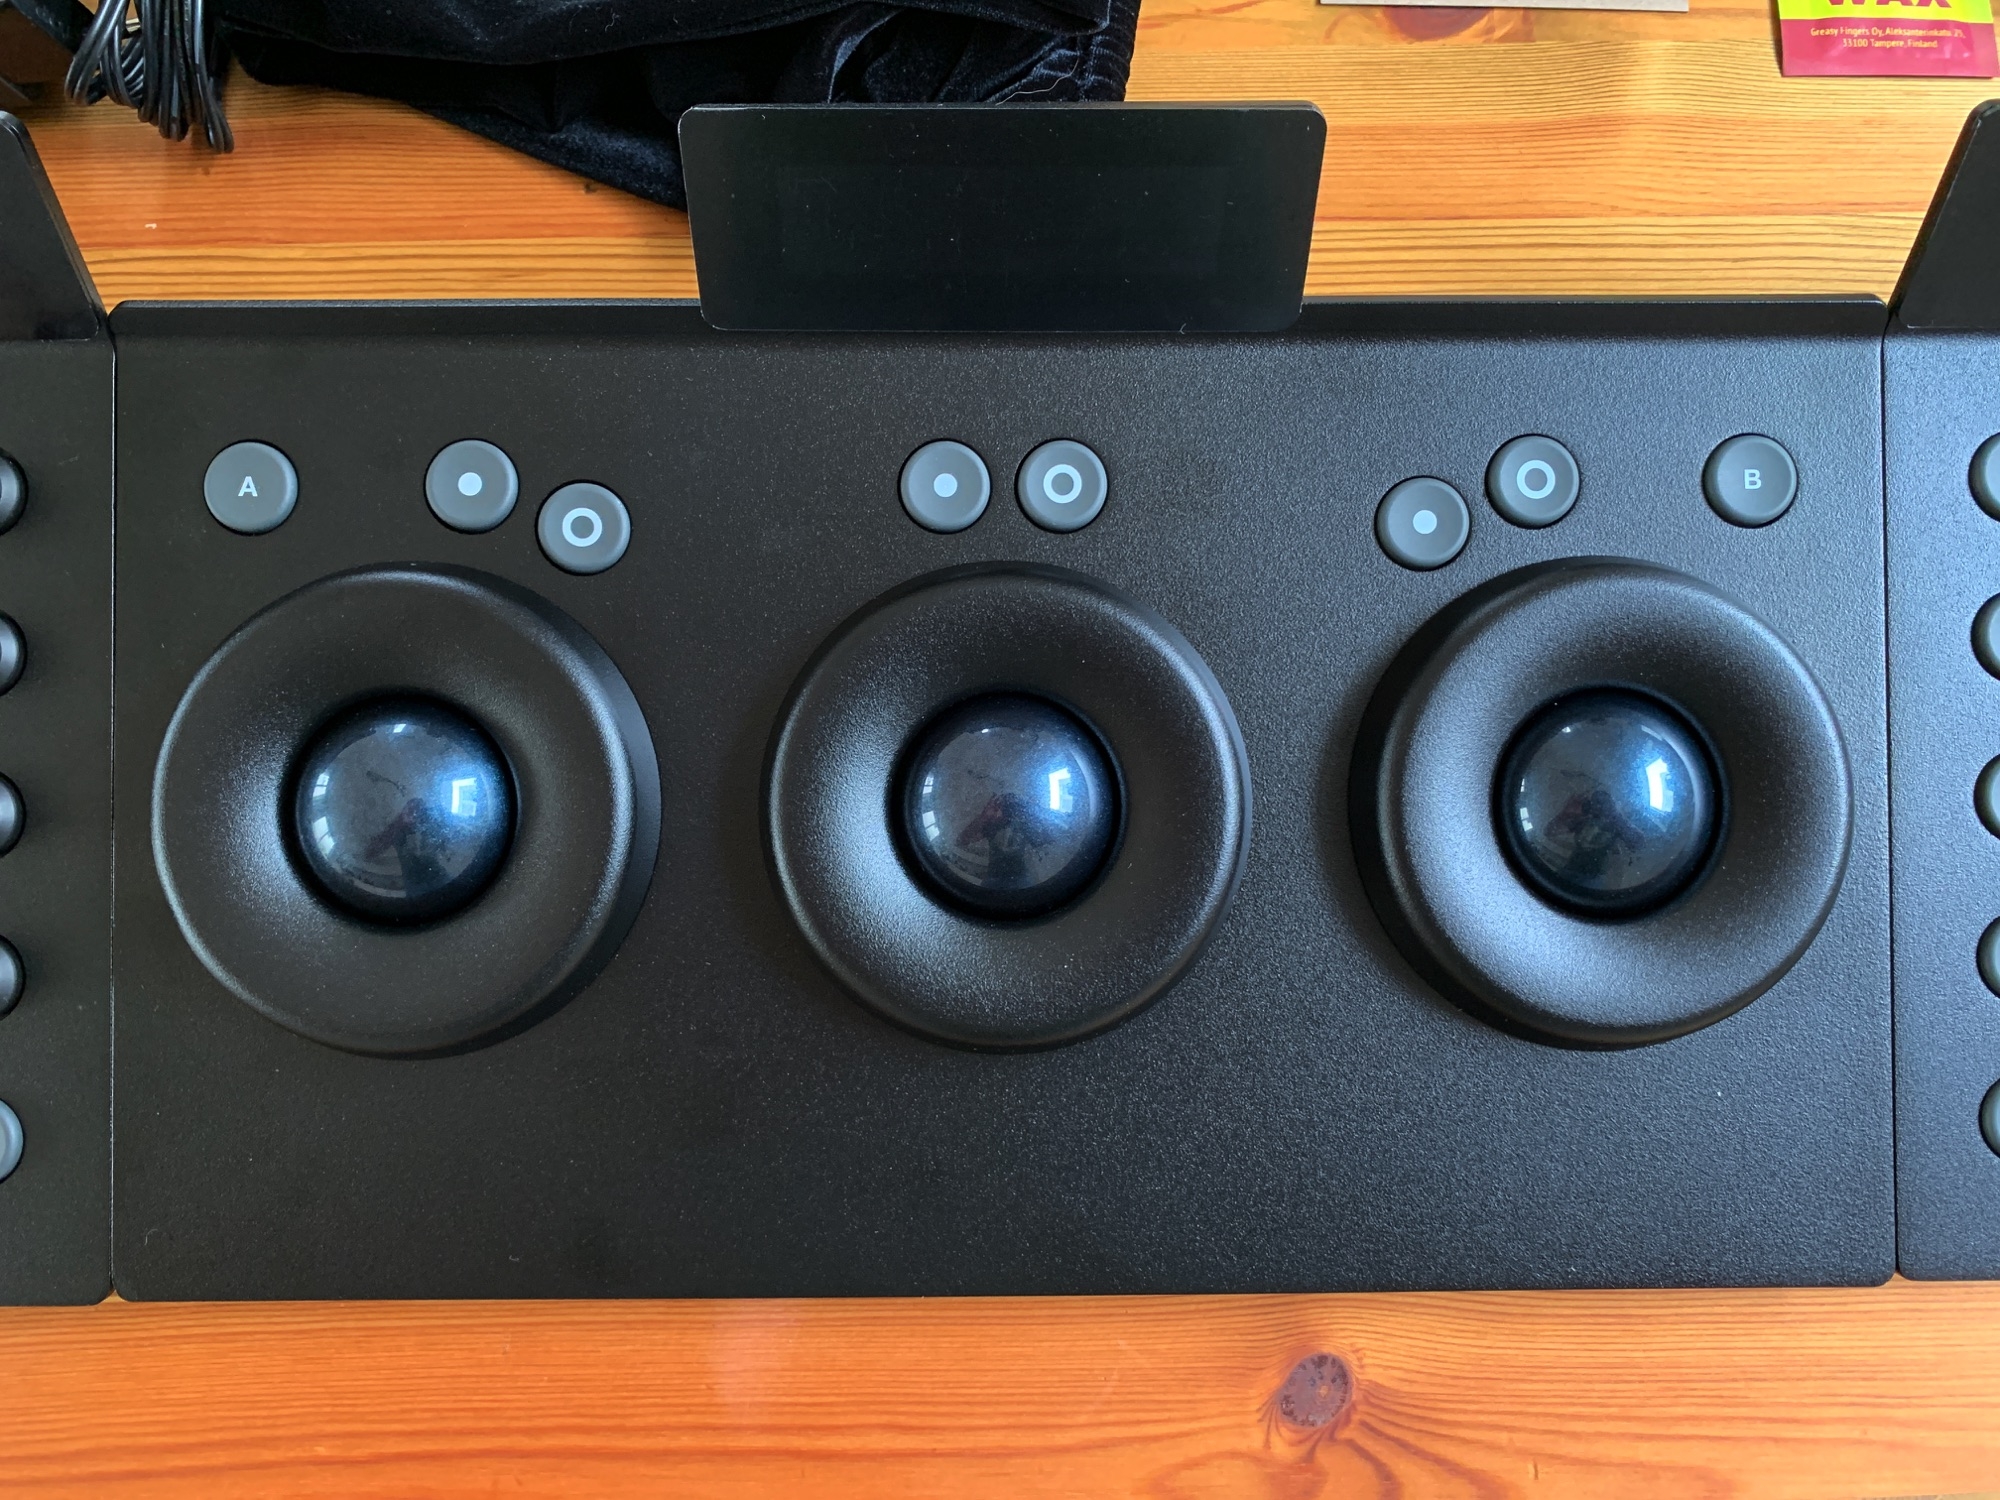
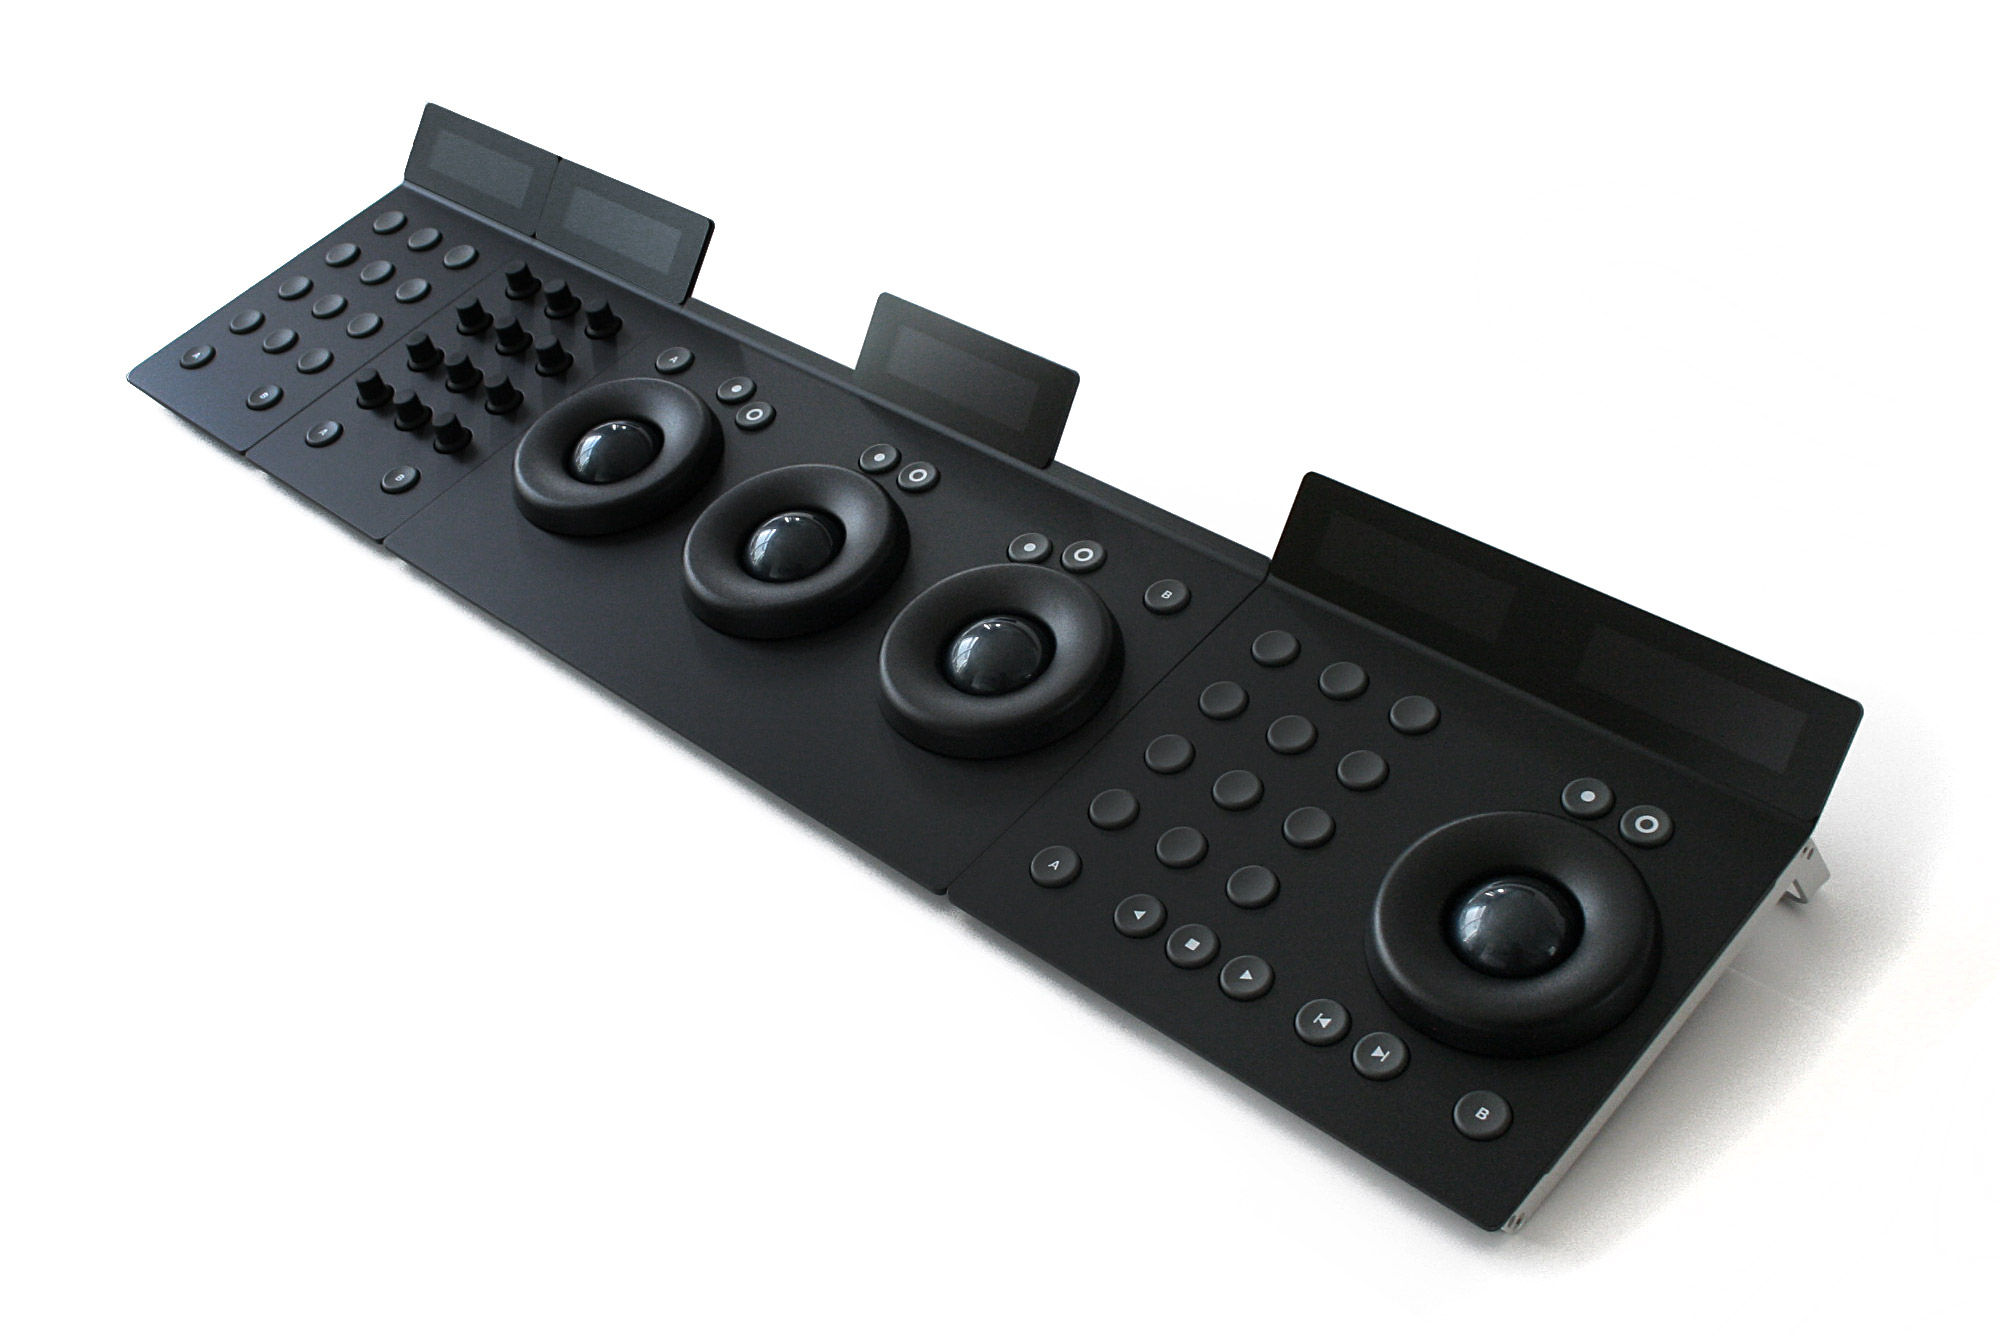
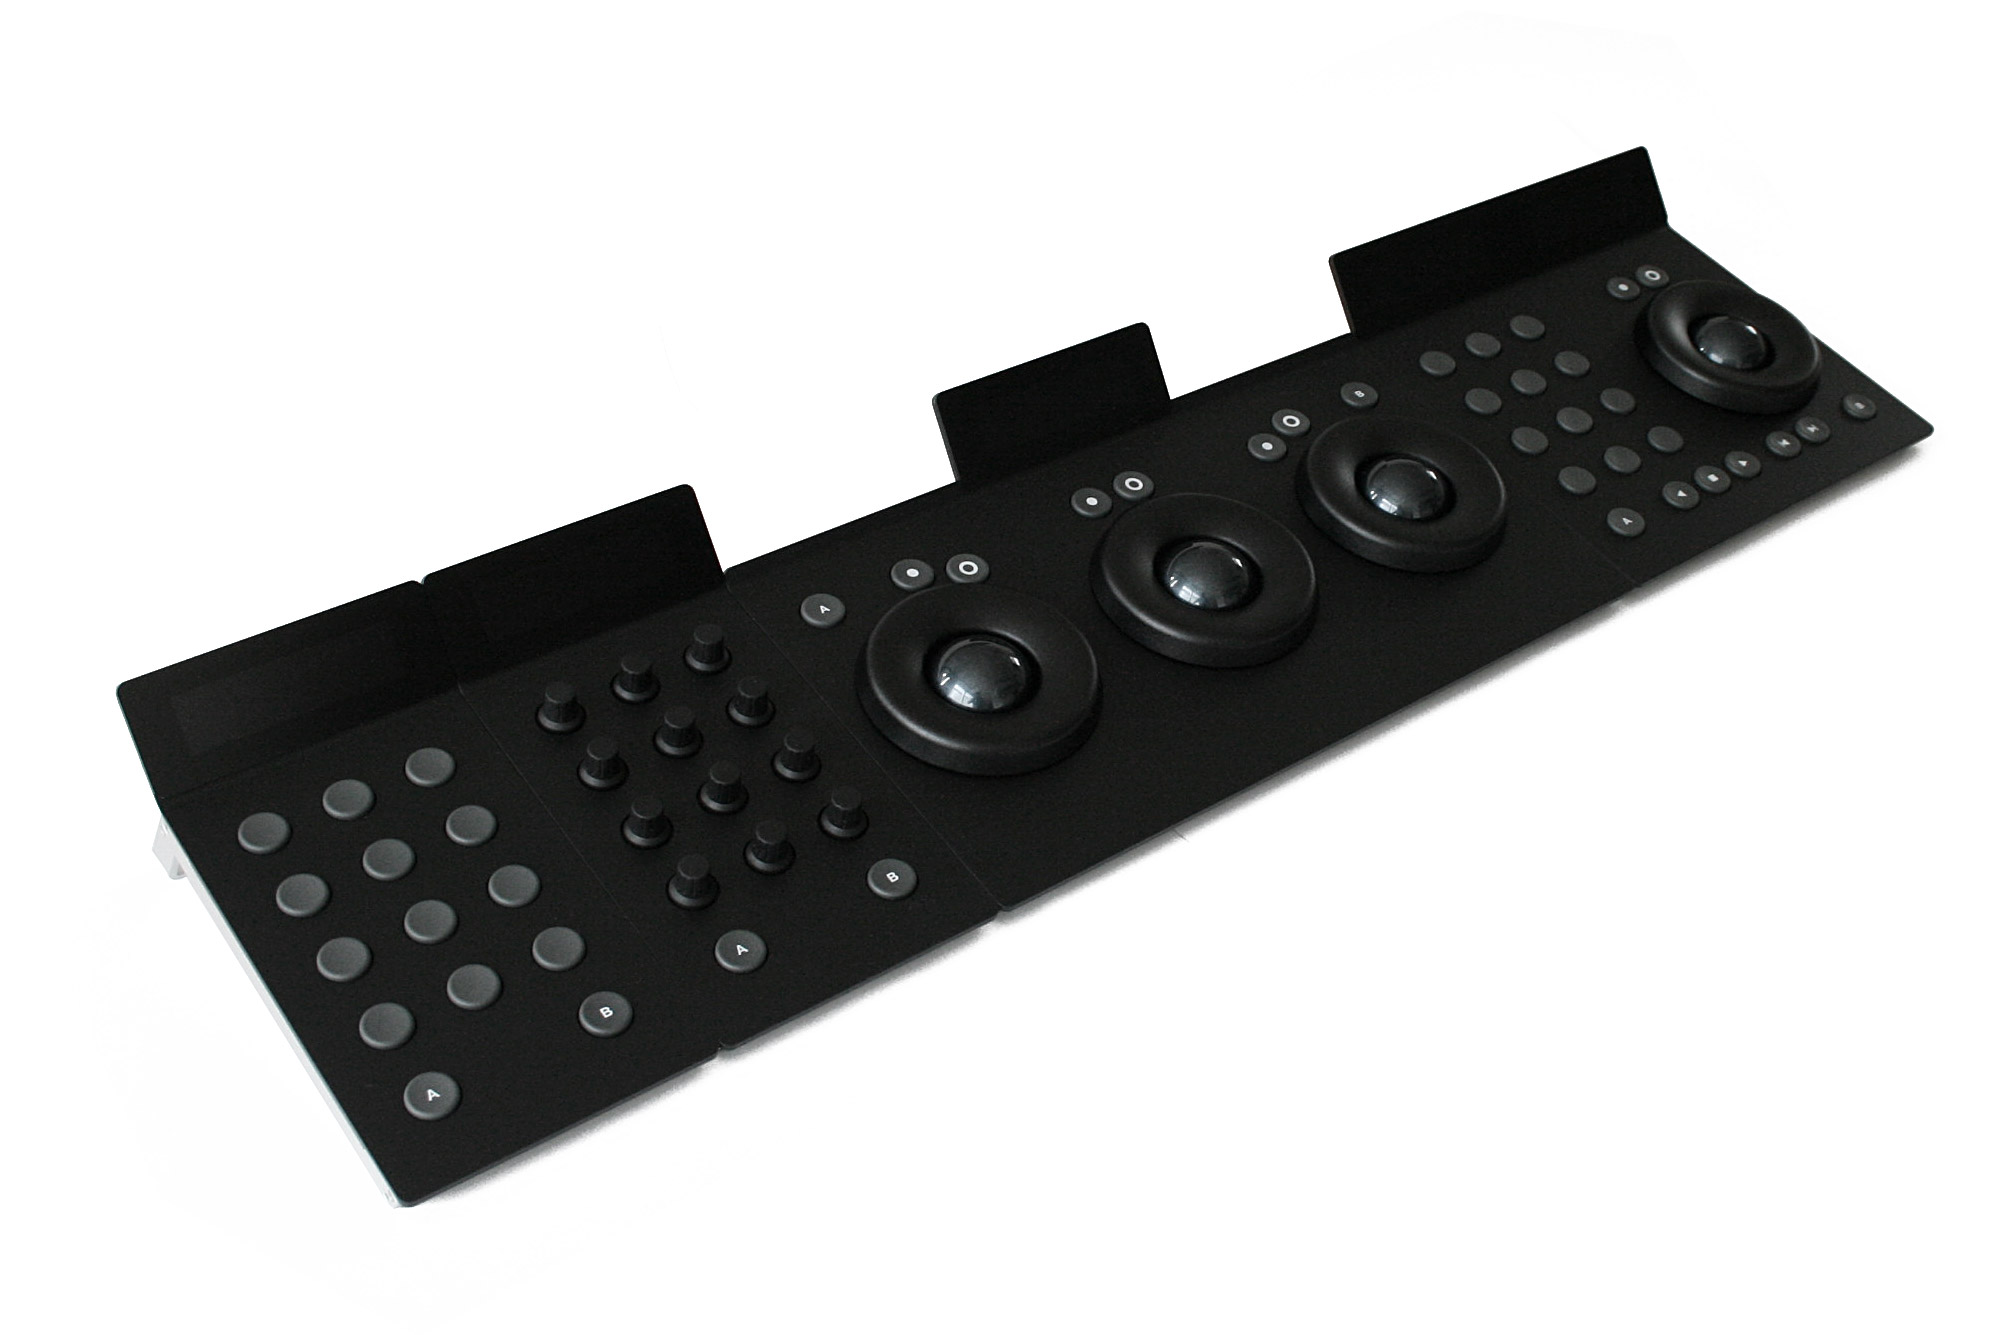
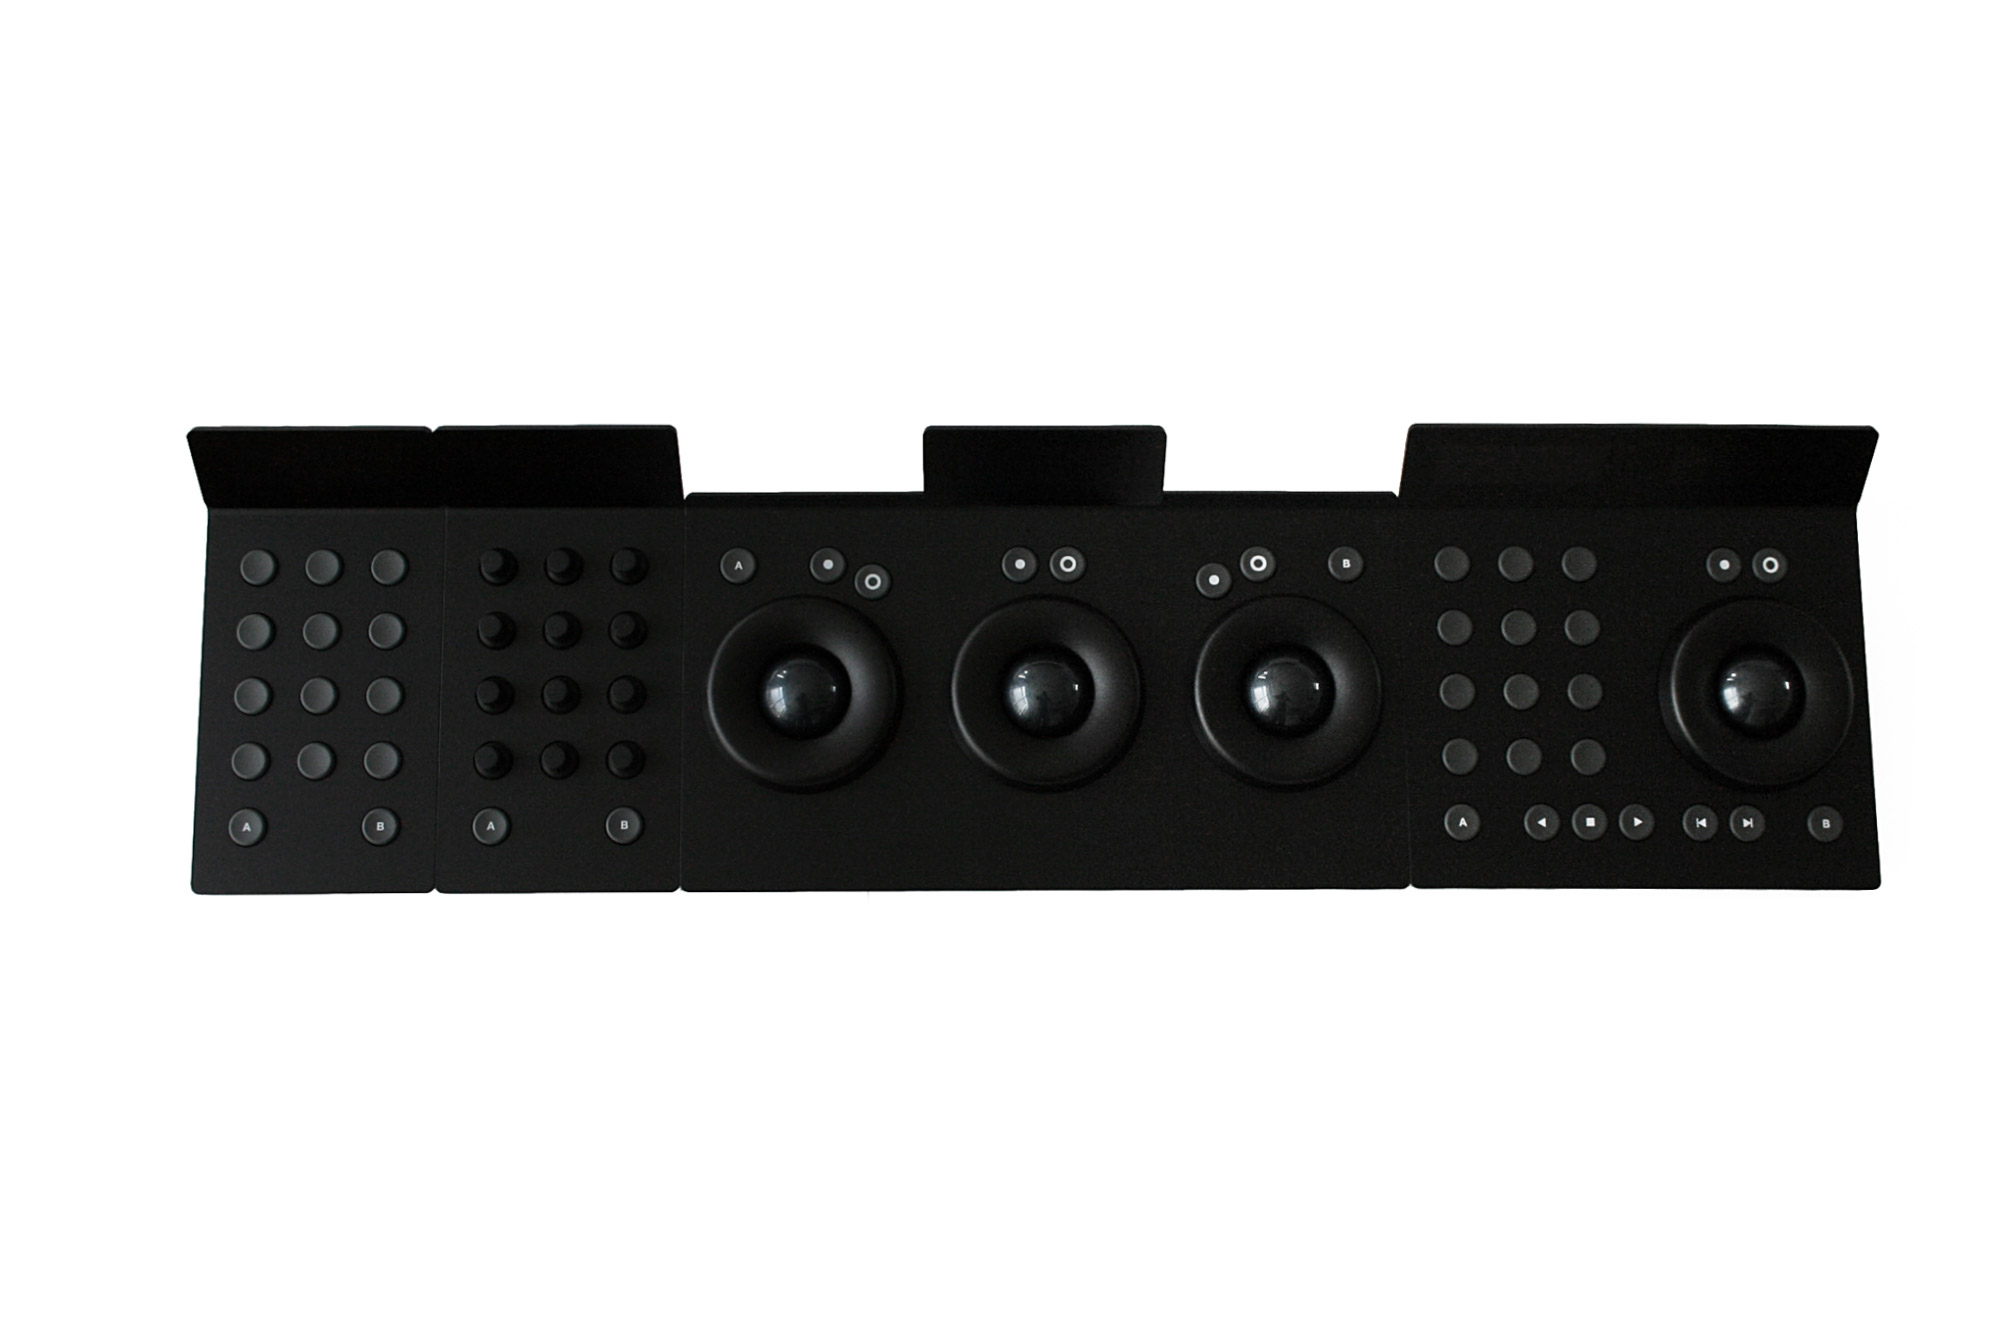
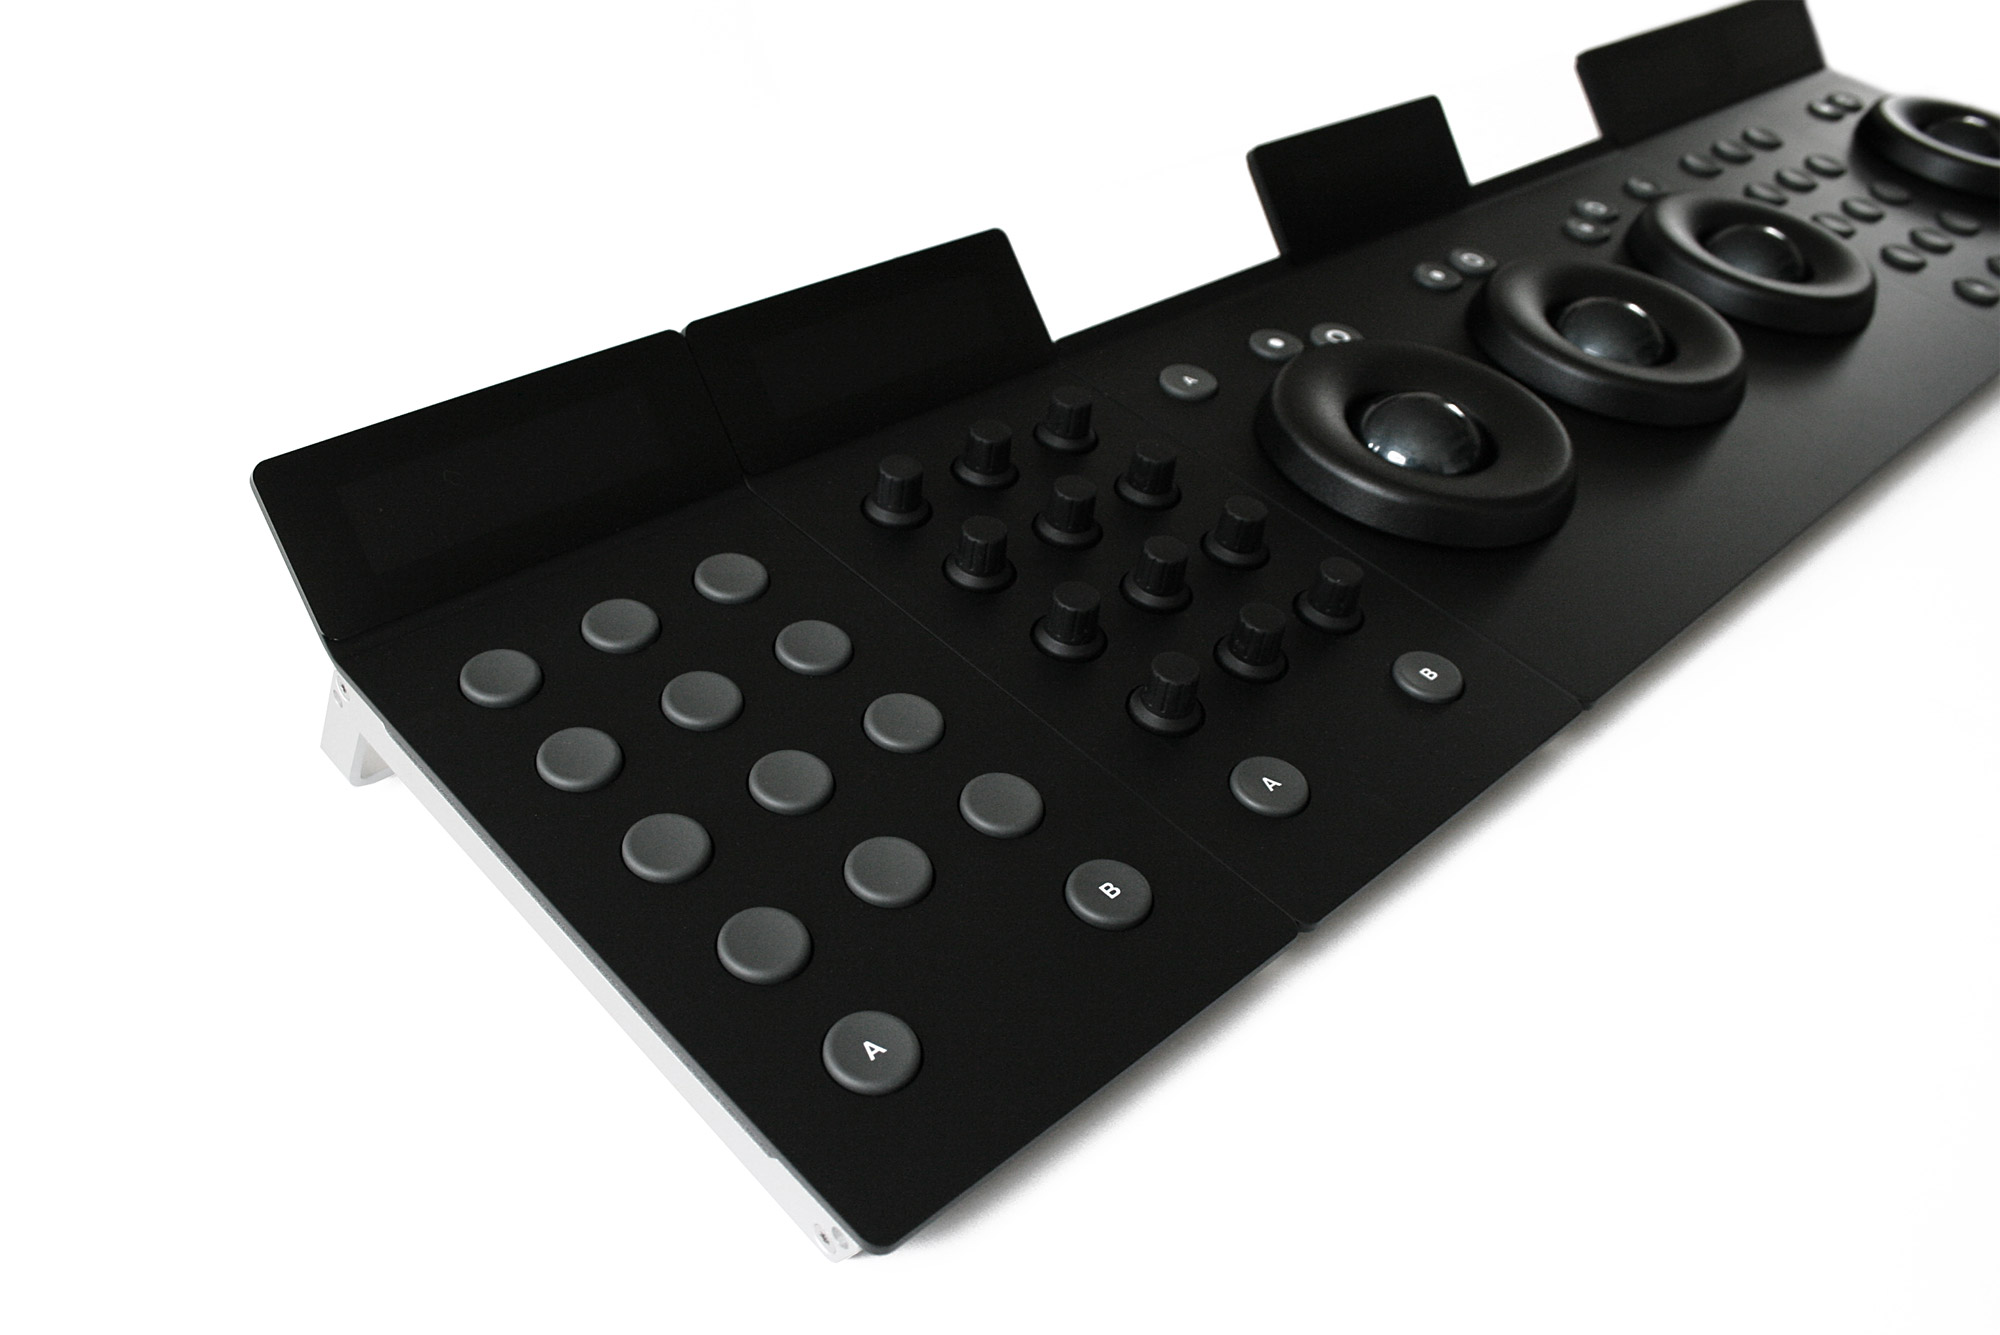
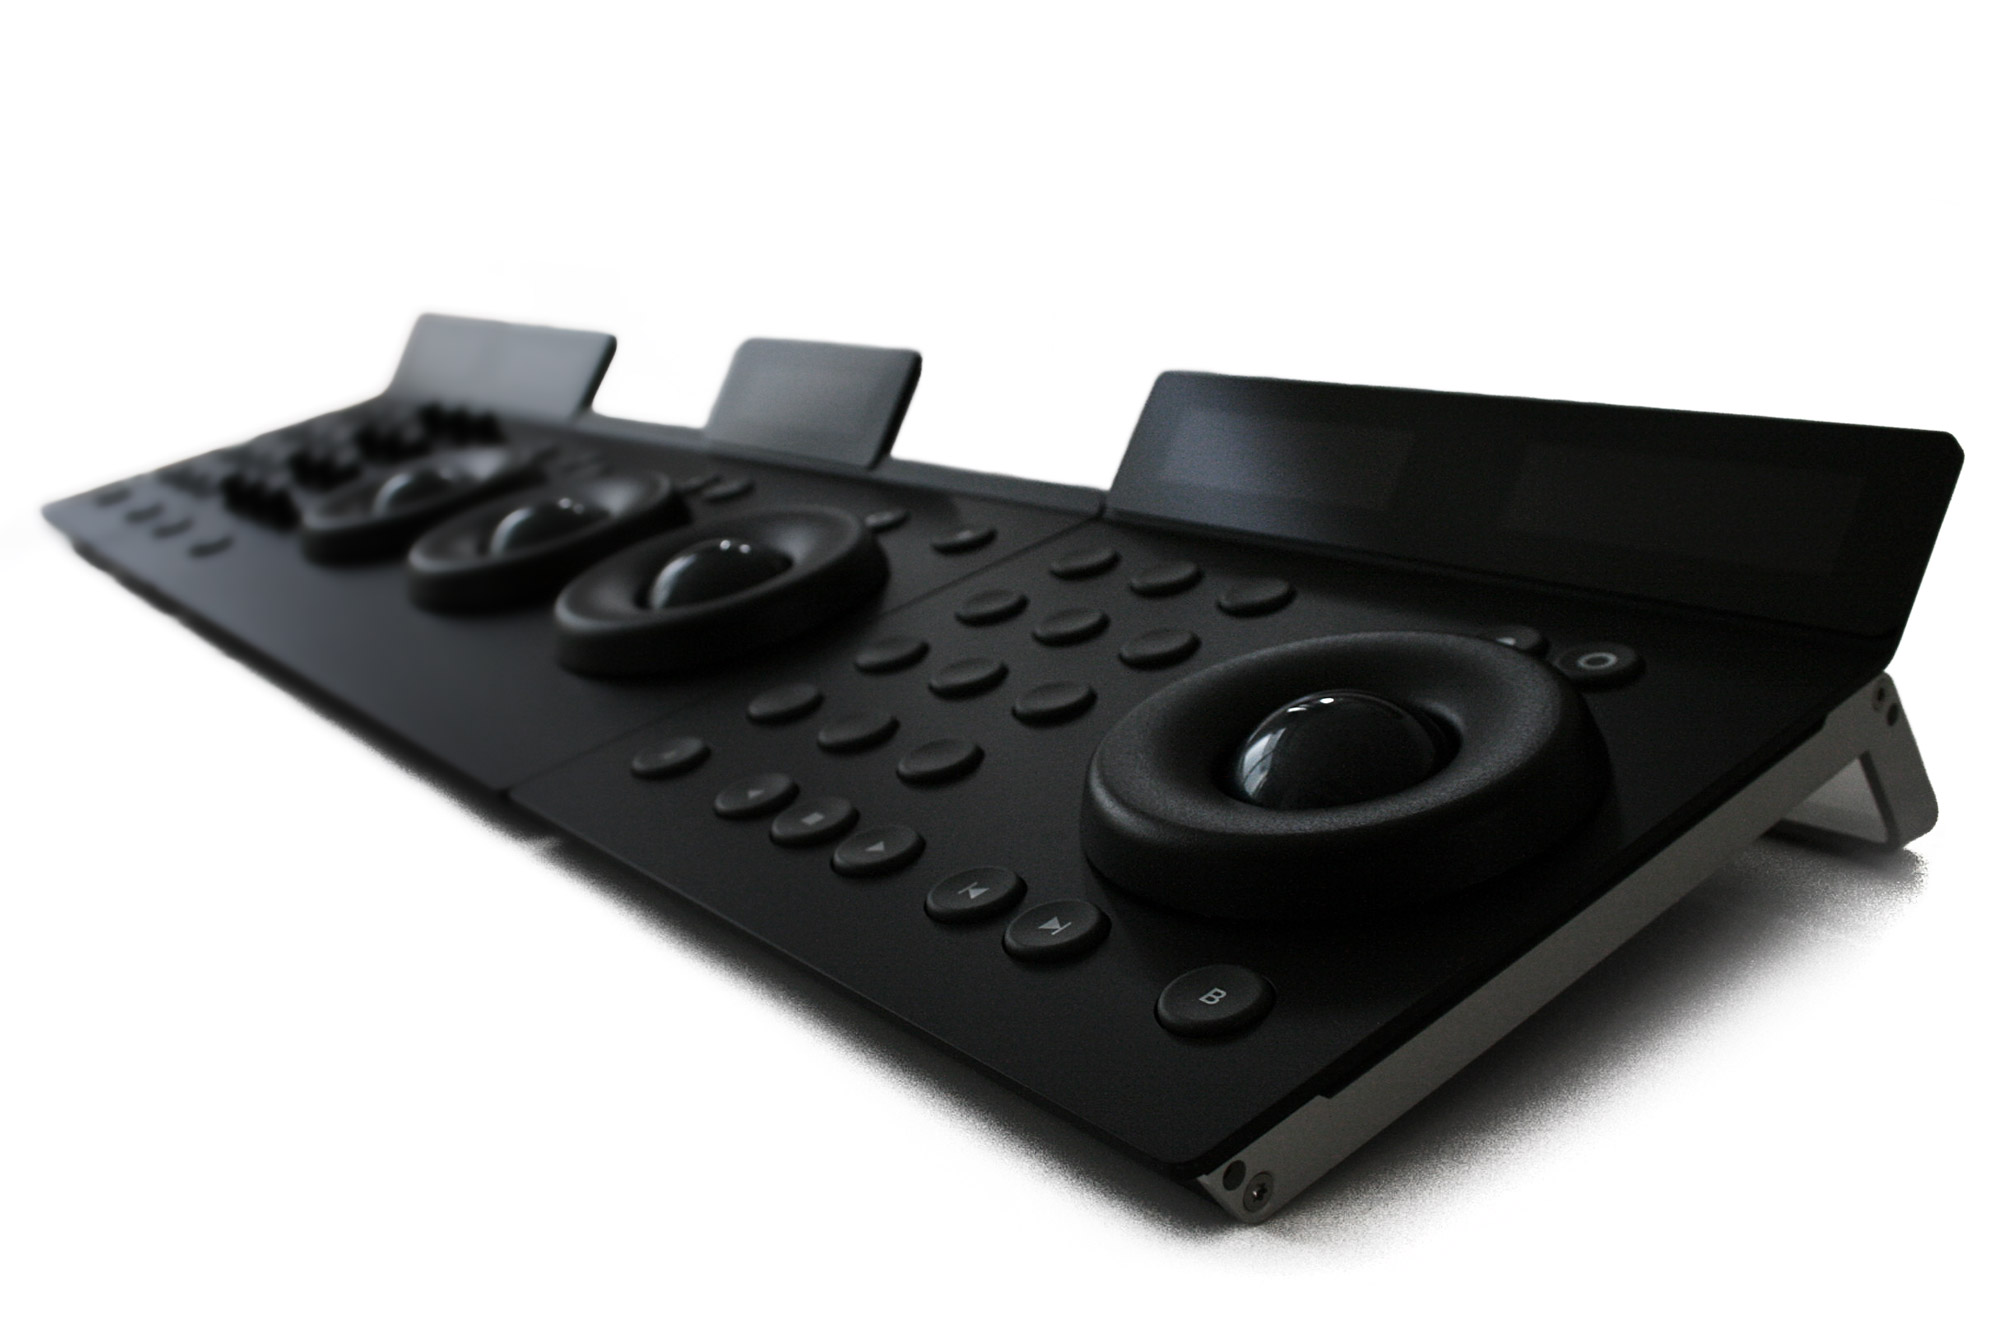
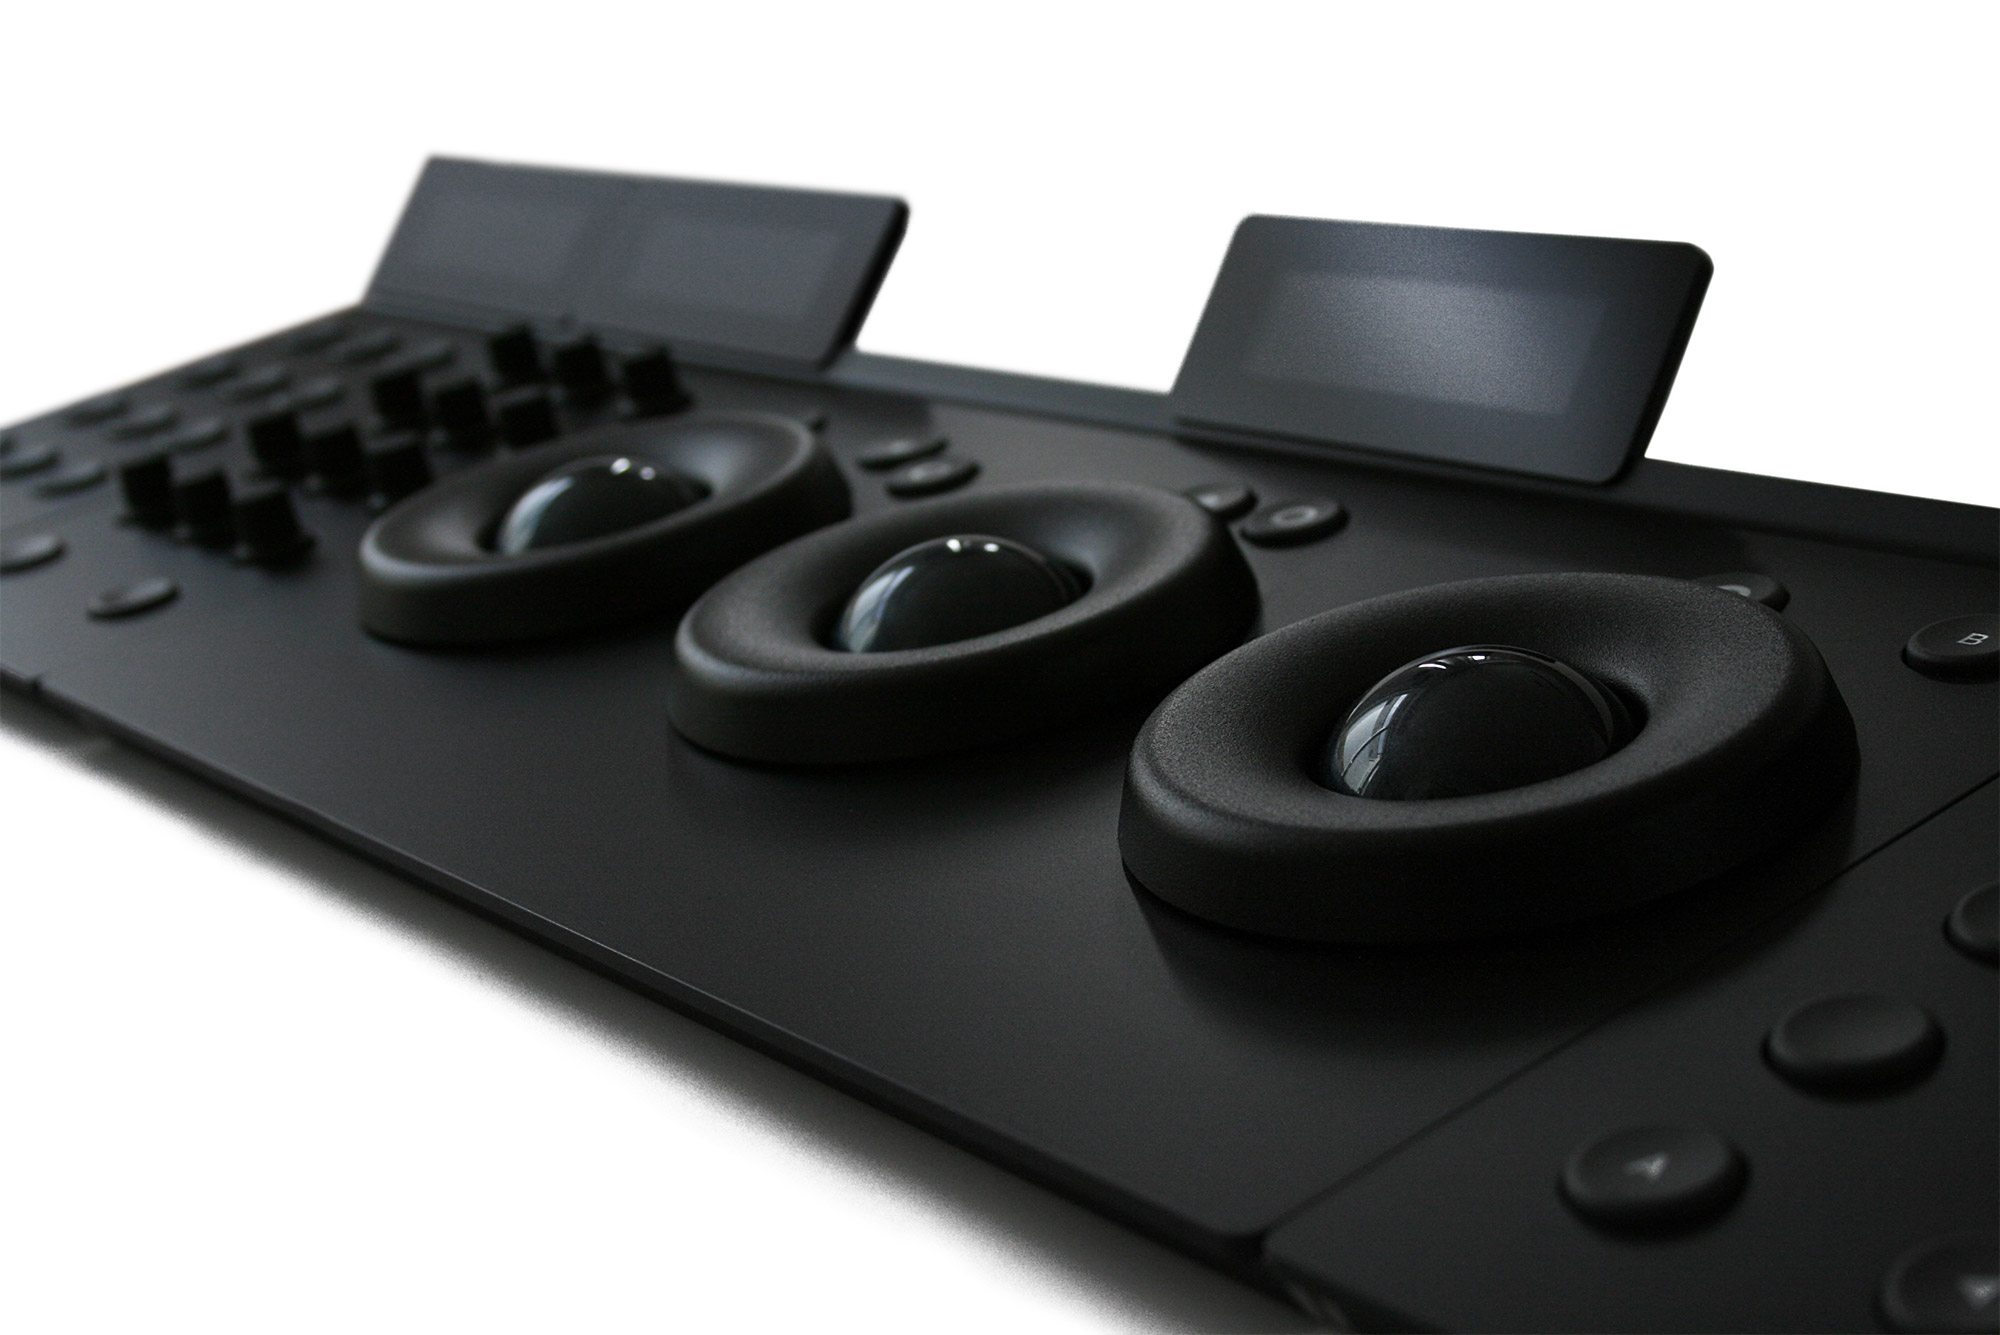
- SOLD - Selling this fully refurbished Tangent Element Black Edition. All fascias have been replaced with powder coated ones, incl. new display windows. It features the Angry Face Black Metal Rings and dark-petrol metallic trackerballs. Also the knobs on the Kb-panel have been swapped against custom black rubber knobs. Included is original packaging, set of link pins and (non-original) USB cables. Price is 2.250€ (excl. VAT). Location is in Munich, Germany - shipping EU-wide. Feel free to PM me here or through the contact form here: https://www.angry-face.com/contact/ Cheers! Mazze

-
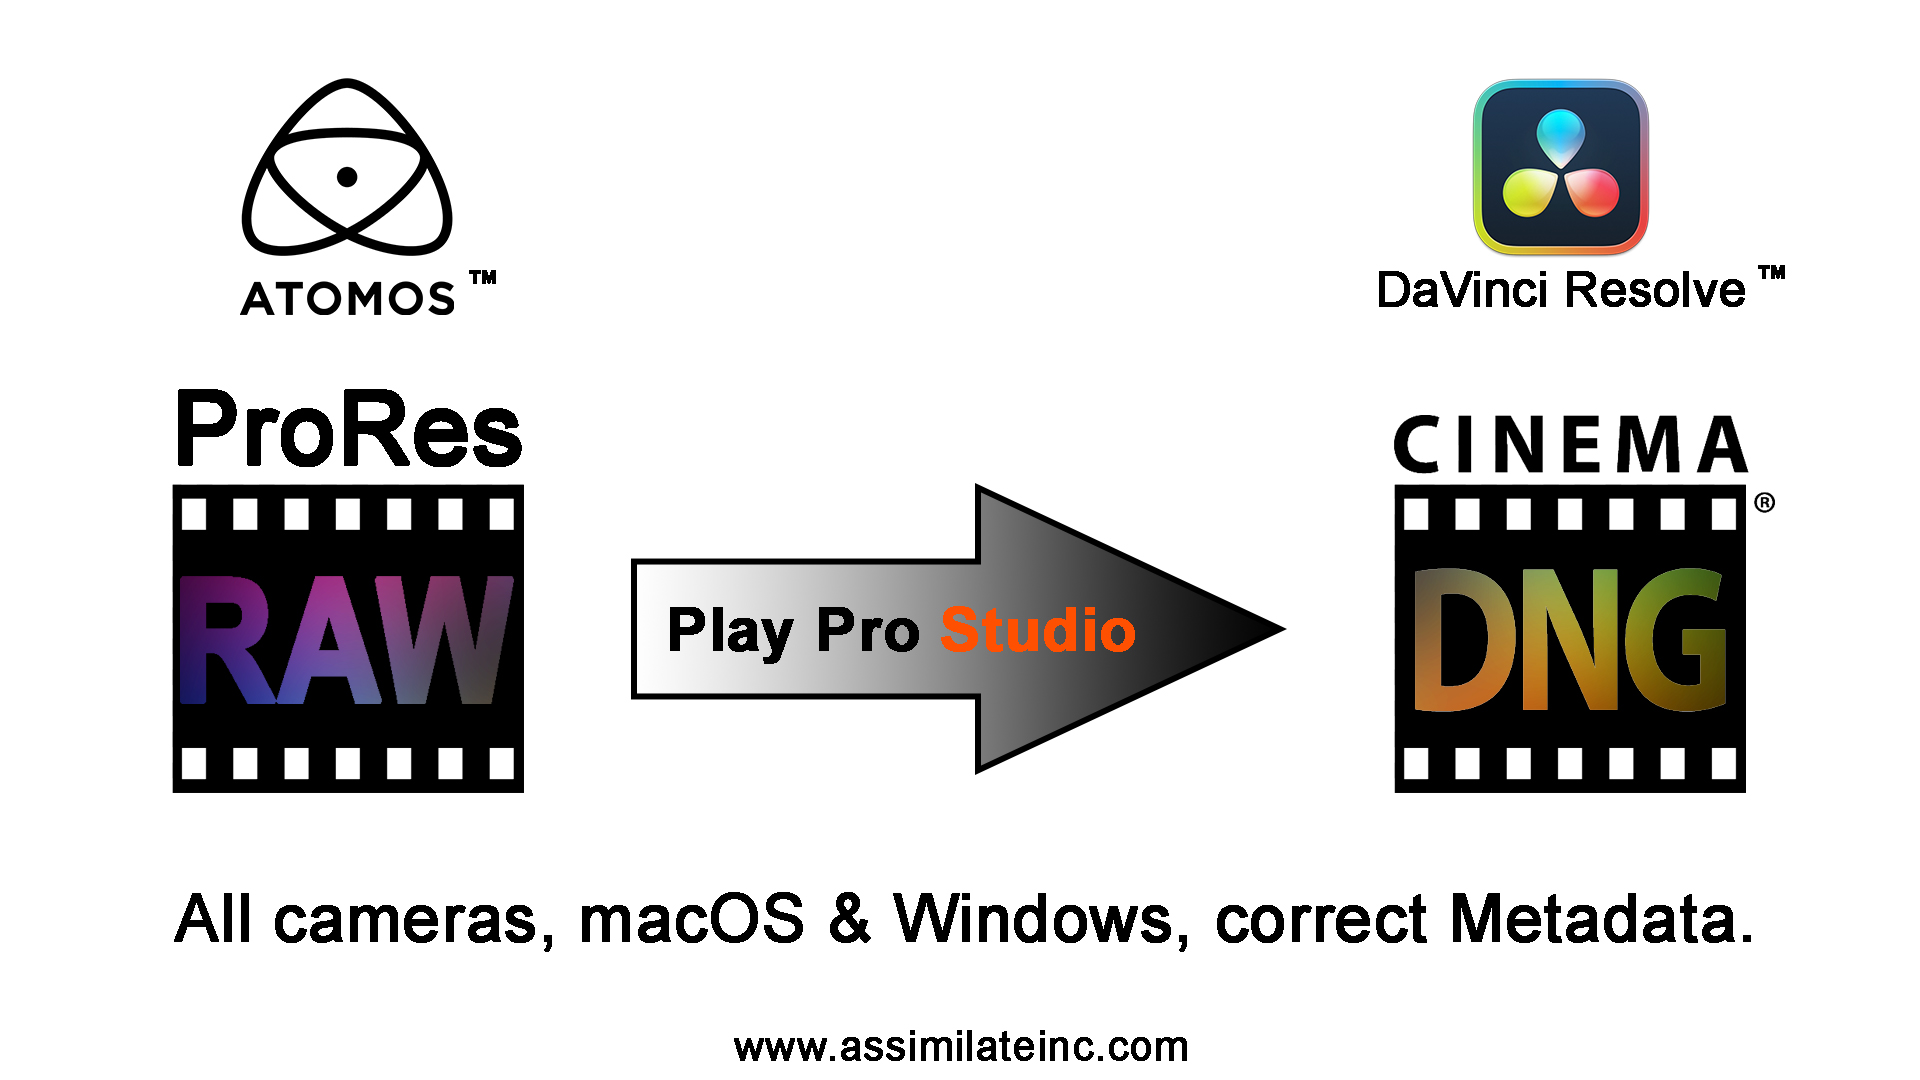
Hi friends, this tutorial uses Play Pro Studio, but obviously, the format support is the same for SCRATCH and all other products. Cool thing is that we also support lens dostortion and vignetting metadata with our implementation 🙂 . Cheers! Mazze
-
Hi friends, just an informal note to let you know that we released Play Pro Studio 🙂 . As you might be aware, Resolve does not support ProRes RAW, so you will need to turn it into something else, before you can import that kind of footage. Play Pro Studio allows to convert ProRes RAW not only to conventional ProRes, h264 and h265, but also to CinemaDNG with various compression flavors, if you need to keep it 'RAW'. We are running a discount with 50% off (coupon code "PPS50OFF") if you feel inclined to buy. We support all ProRes RAW enabled cameras and recorders equally on macOS and Windows 🙂 . Here is a tutorial that shows how-to: ==> https://www.assimilateinc.com/products/playprostudio/ Cheers, Mazze
-
Hi everyone, in this tutorial we show you how you can update, combine and move license keys to different machines. We’ll also show you what to do, if any issue arises and where to find mighty logfiles 😉 . Cheers, Mazze
-
A long overdue update: The foam inserts are now available (have been available for over a year already) from our webstore. Foam inserts only (€195): https://www.angry-face.com/product/element-panel-foam-inserts-for-peli-case-1510/ Foam inserts incl. PeliCase 1510 (€400): https://www.angry-face.com/product/peli-case-1510-incl-foam-inserts-for-element-panels/ Cheers, Mazze
-
Hi all, this is a two-part series on working with dual fisheye VR180 footage from the Canon R5C. Part 1: - importing Canon 180VR clips into SCRATCH - flagging them correctly as 180VR stereo clips to view inside a headset - applying an STmap to unwarp the fisheye footage - primary grade the footage - and transcode it to a different format to work with down the line Part 2: - work in a true stereo VR environment - grade left and right eyes separately - retouch the footage using vector paint - export to different stereo patterns Enjoy! Cheers, Mazze
-
AS Moritz stated, linear content, such as ACES2065-1 needs to be delivered in a floating point container. ProRes, H264, DNx, etc. are all integer and will clip the signal at 1 (while the actual image content can go way higher than that in lienar space) The only way to transport ACES via a ProRes file would be to encode it with a log curve (such as ACEScc or cct), but the proper way to deliver ACES, is to use ACES2065-1 in an OpenEXR container.
-
Yup, still there. Feel free to send me a PM.
-
Hi friends, this tutorial is makde for Live FX, but it 100% applies to SCRATCH as well. Especially since I'm using a clip from disk here 😉 Cheers, Mazze
-
Hi friends, here's a tutorial on how to use Stream Deck with SCRATCH (also in combination with an existing panel 🙂 ). Cheers! Mazze
-
Hi all, this is a small mini series, that starts with our virtual production tool Live FX on how to use Notch Blocks (3D environments) on virtual production shoots. Following are videos on how to use Notch Blocks in SCRATCH for finishing, how to review and QC Notch Blocks, as well as how to transcode and color accurately master in the GPU accelerated high-performance NotchLC codec with SCRATCH for LED wall use. Enjoy 🙂 .
-
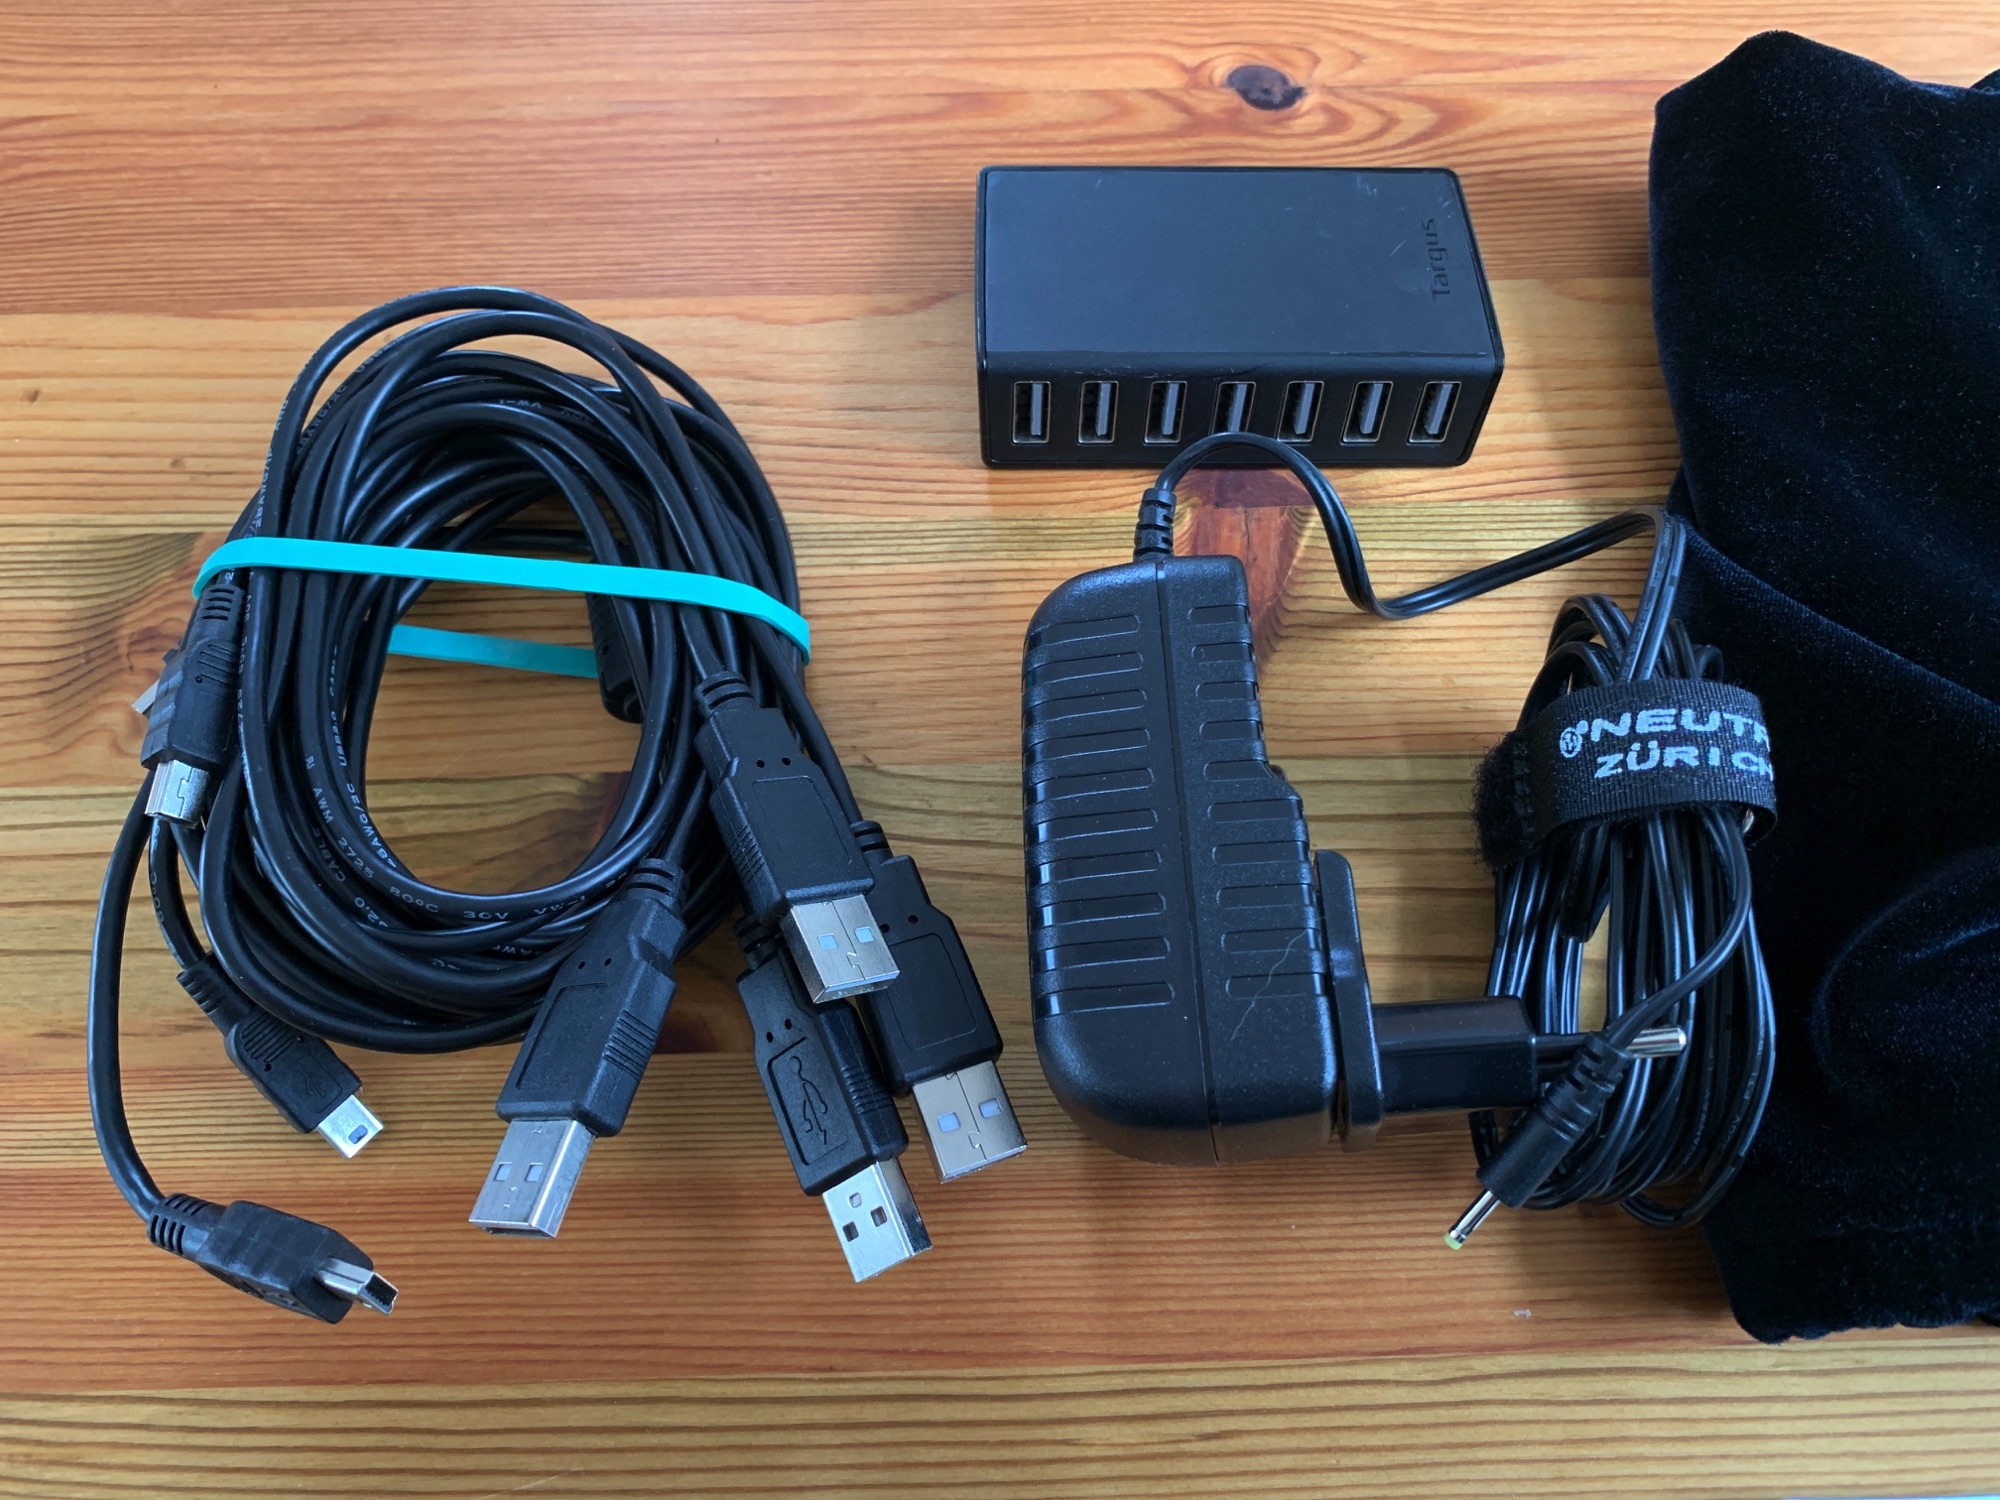
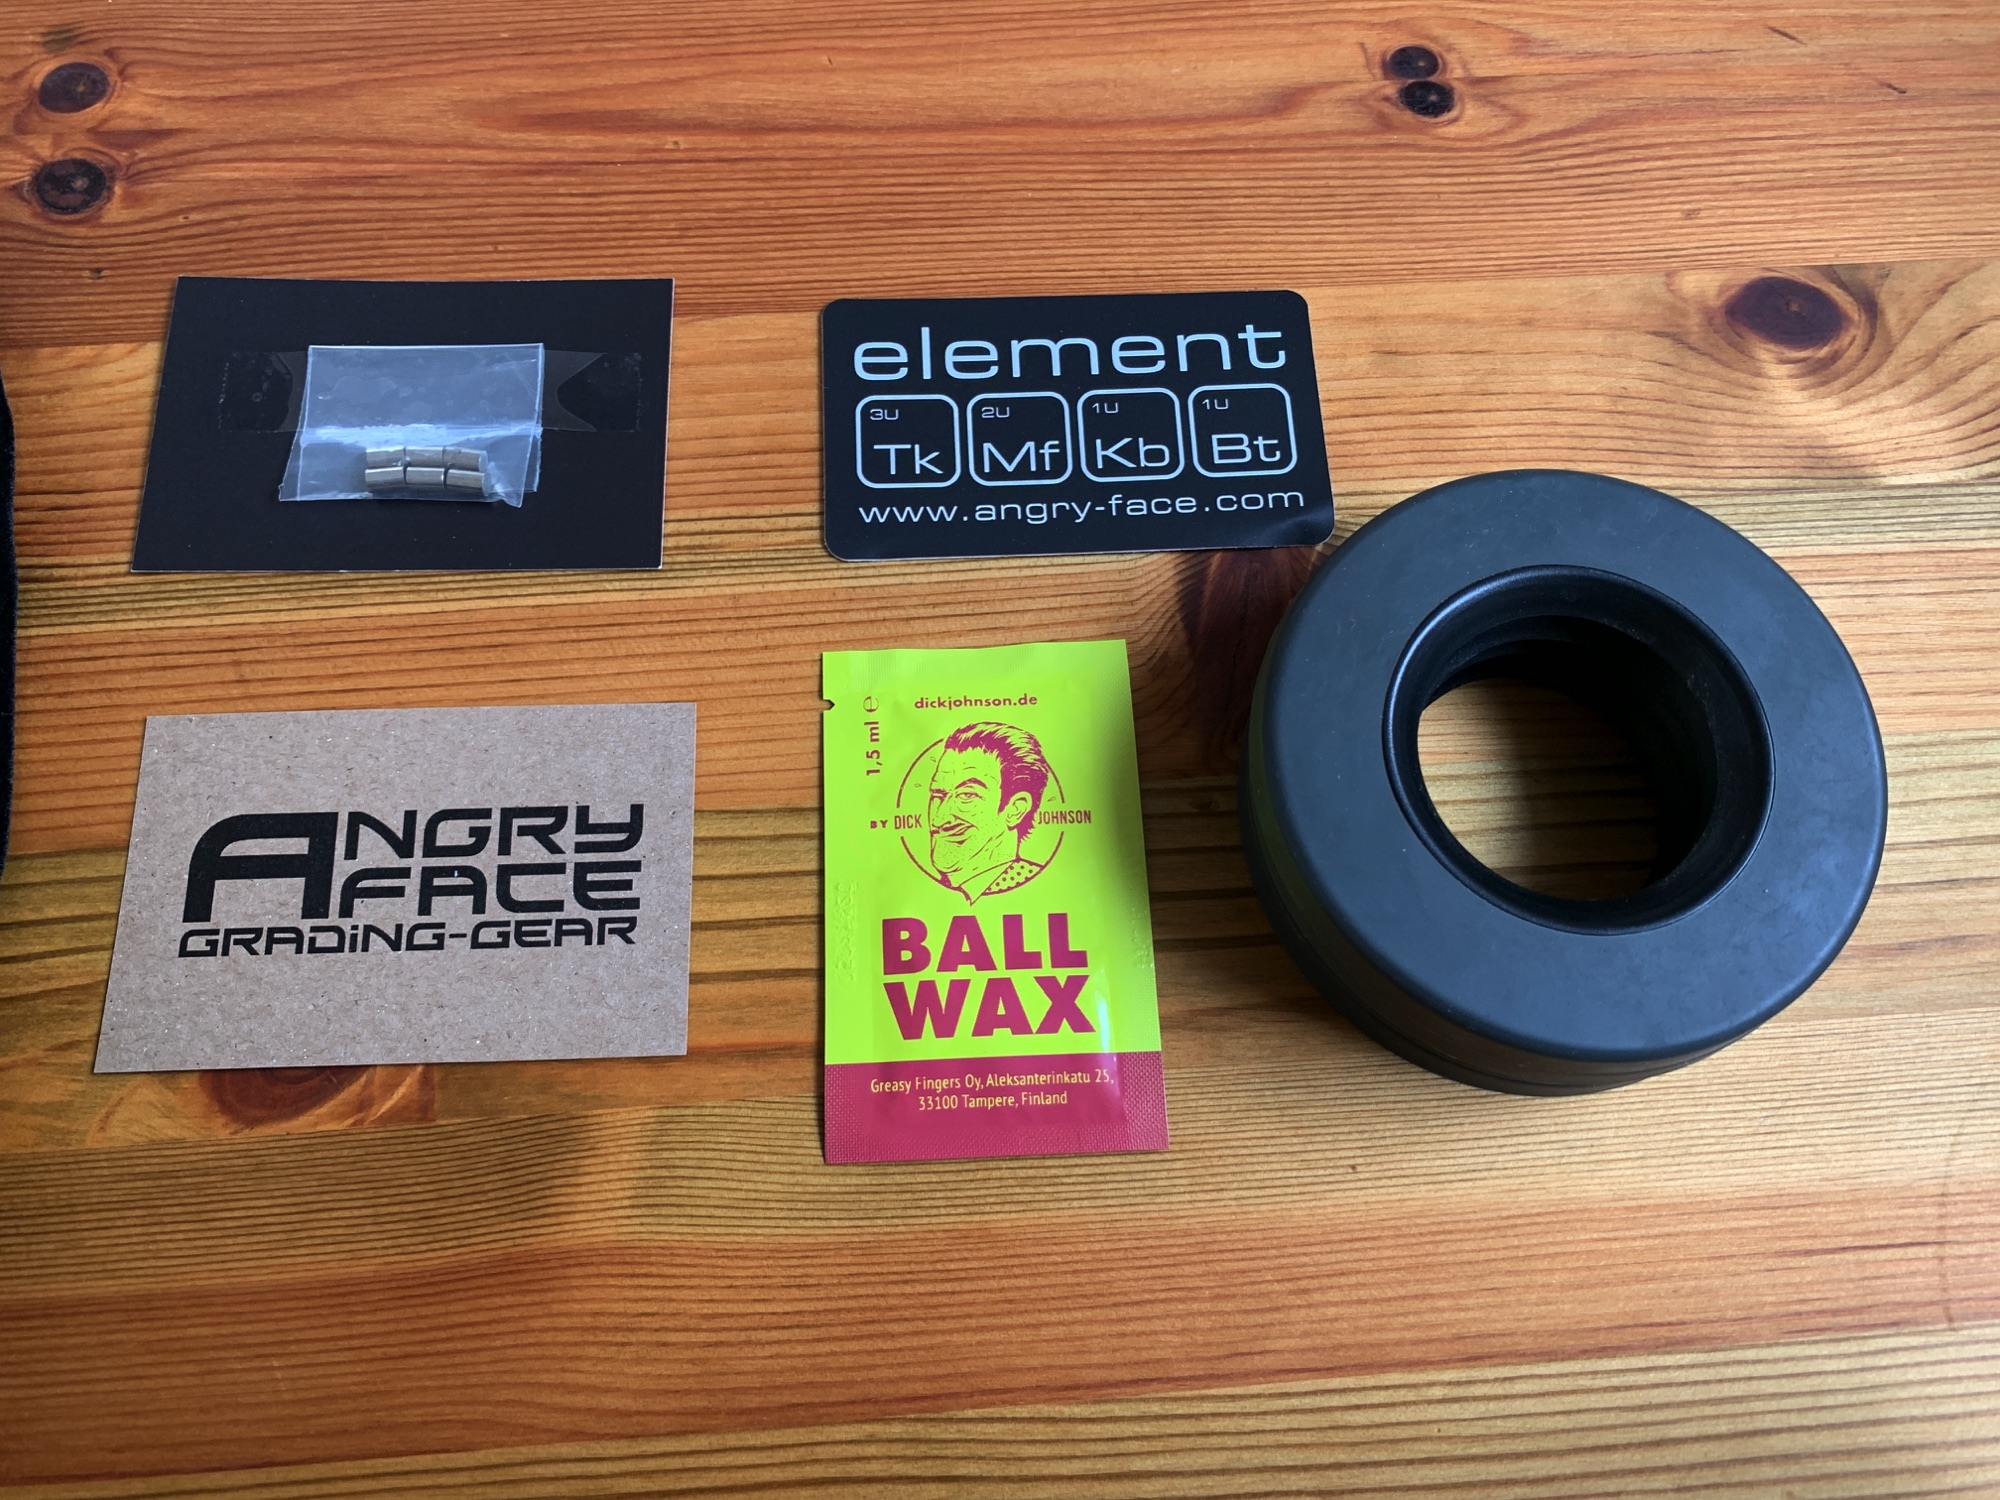
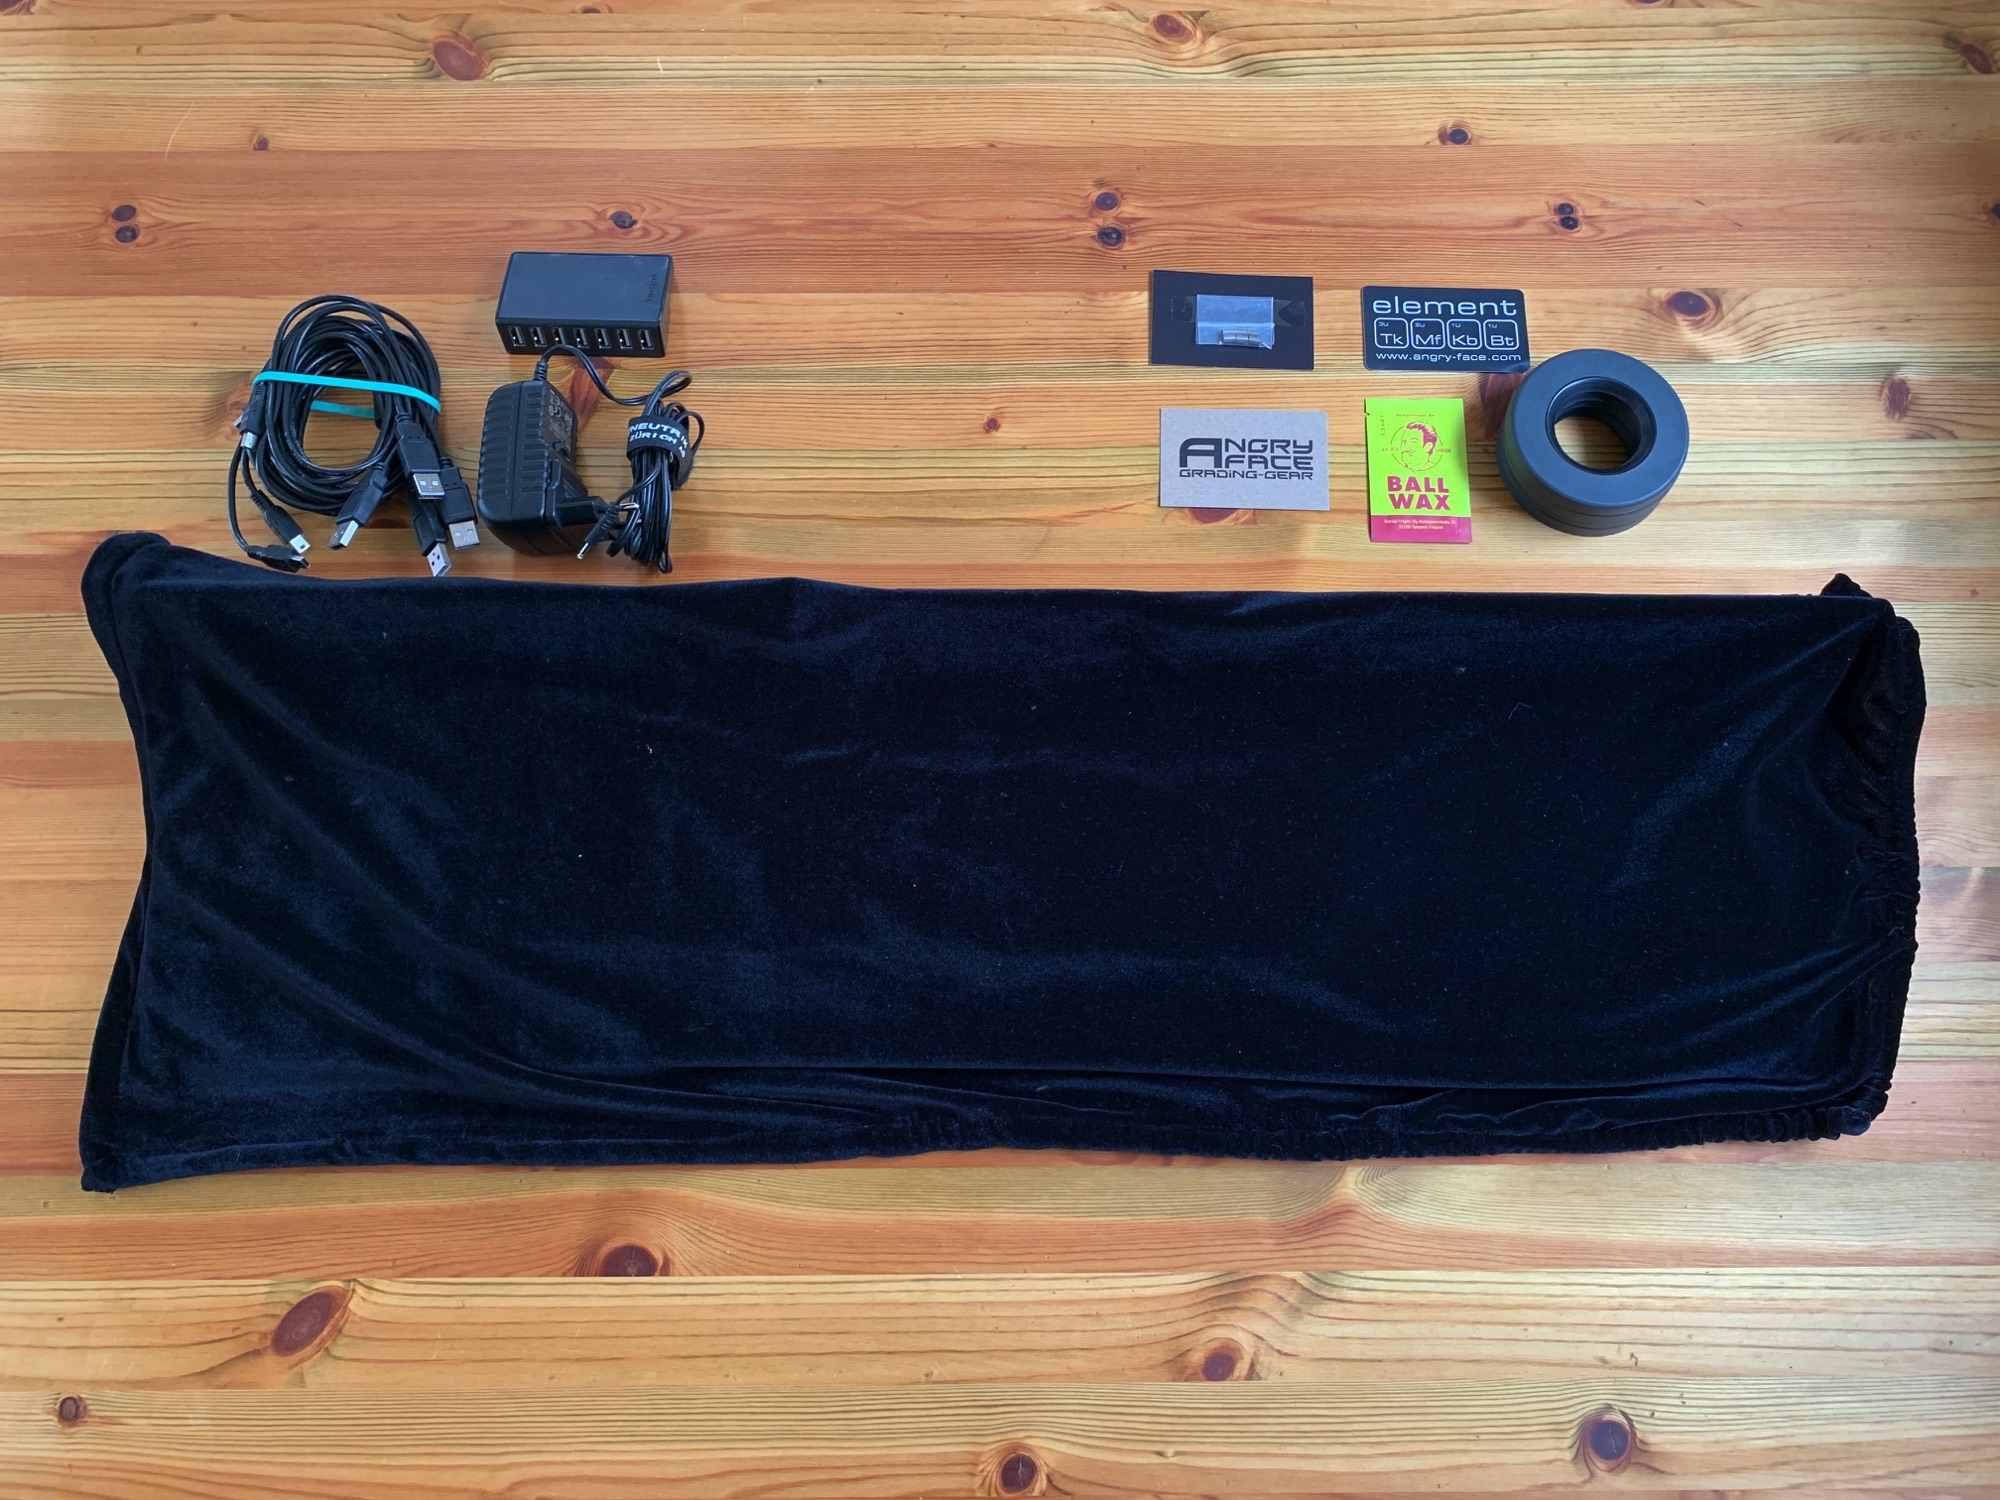
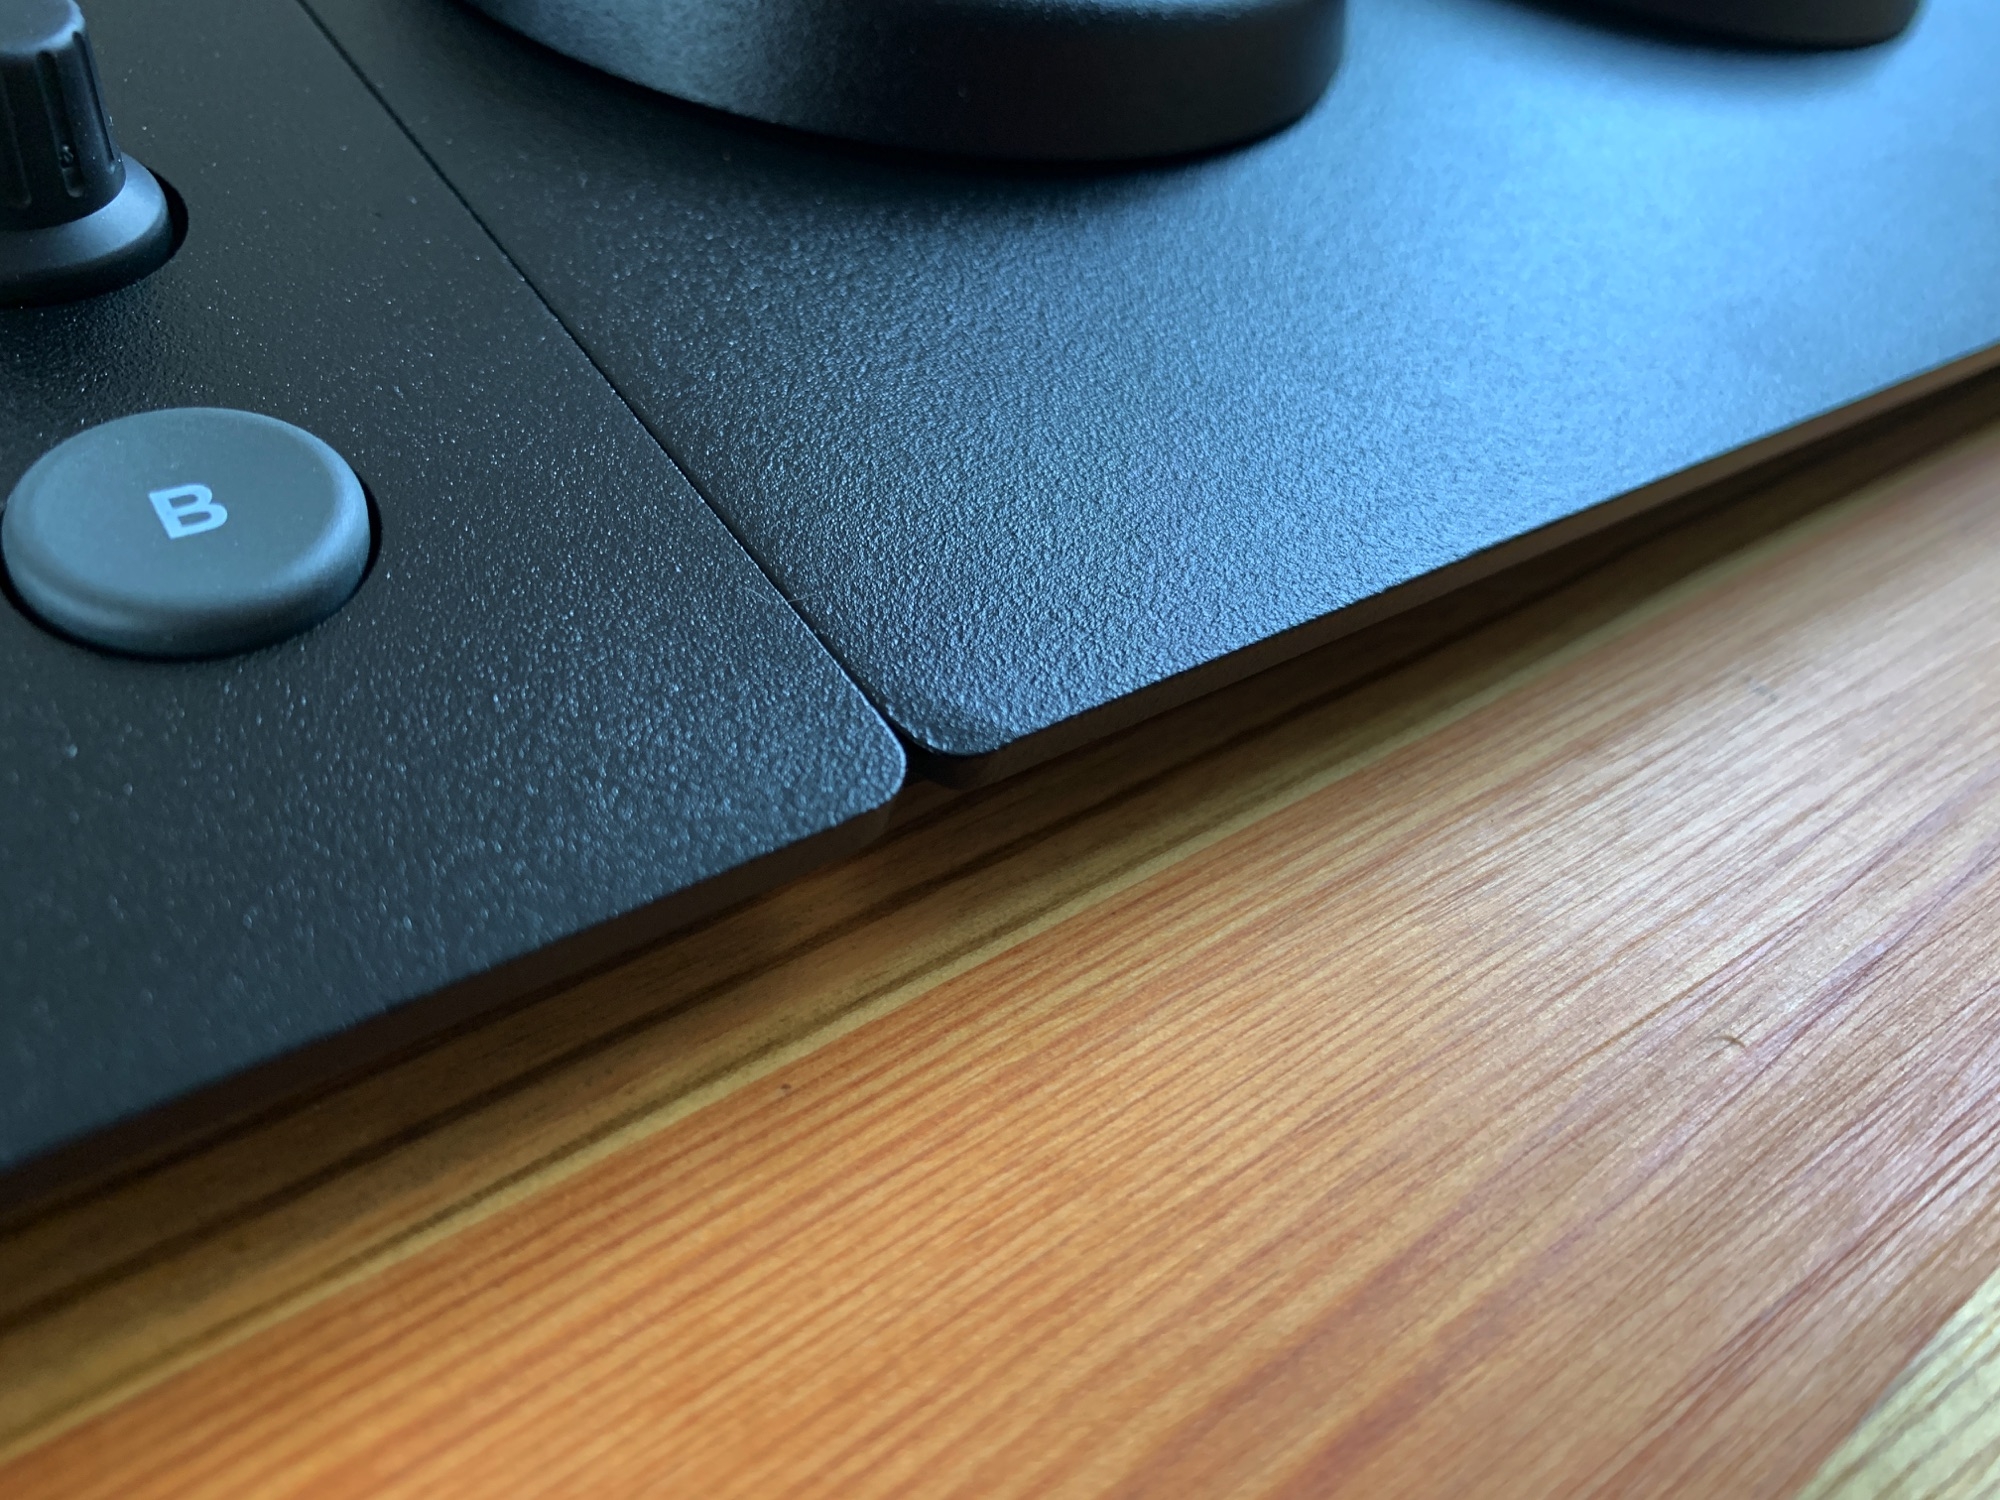
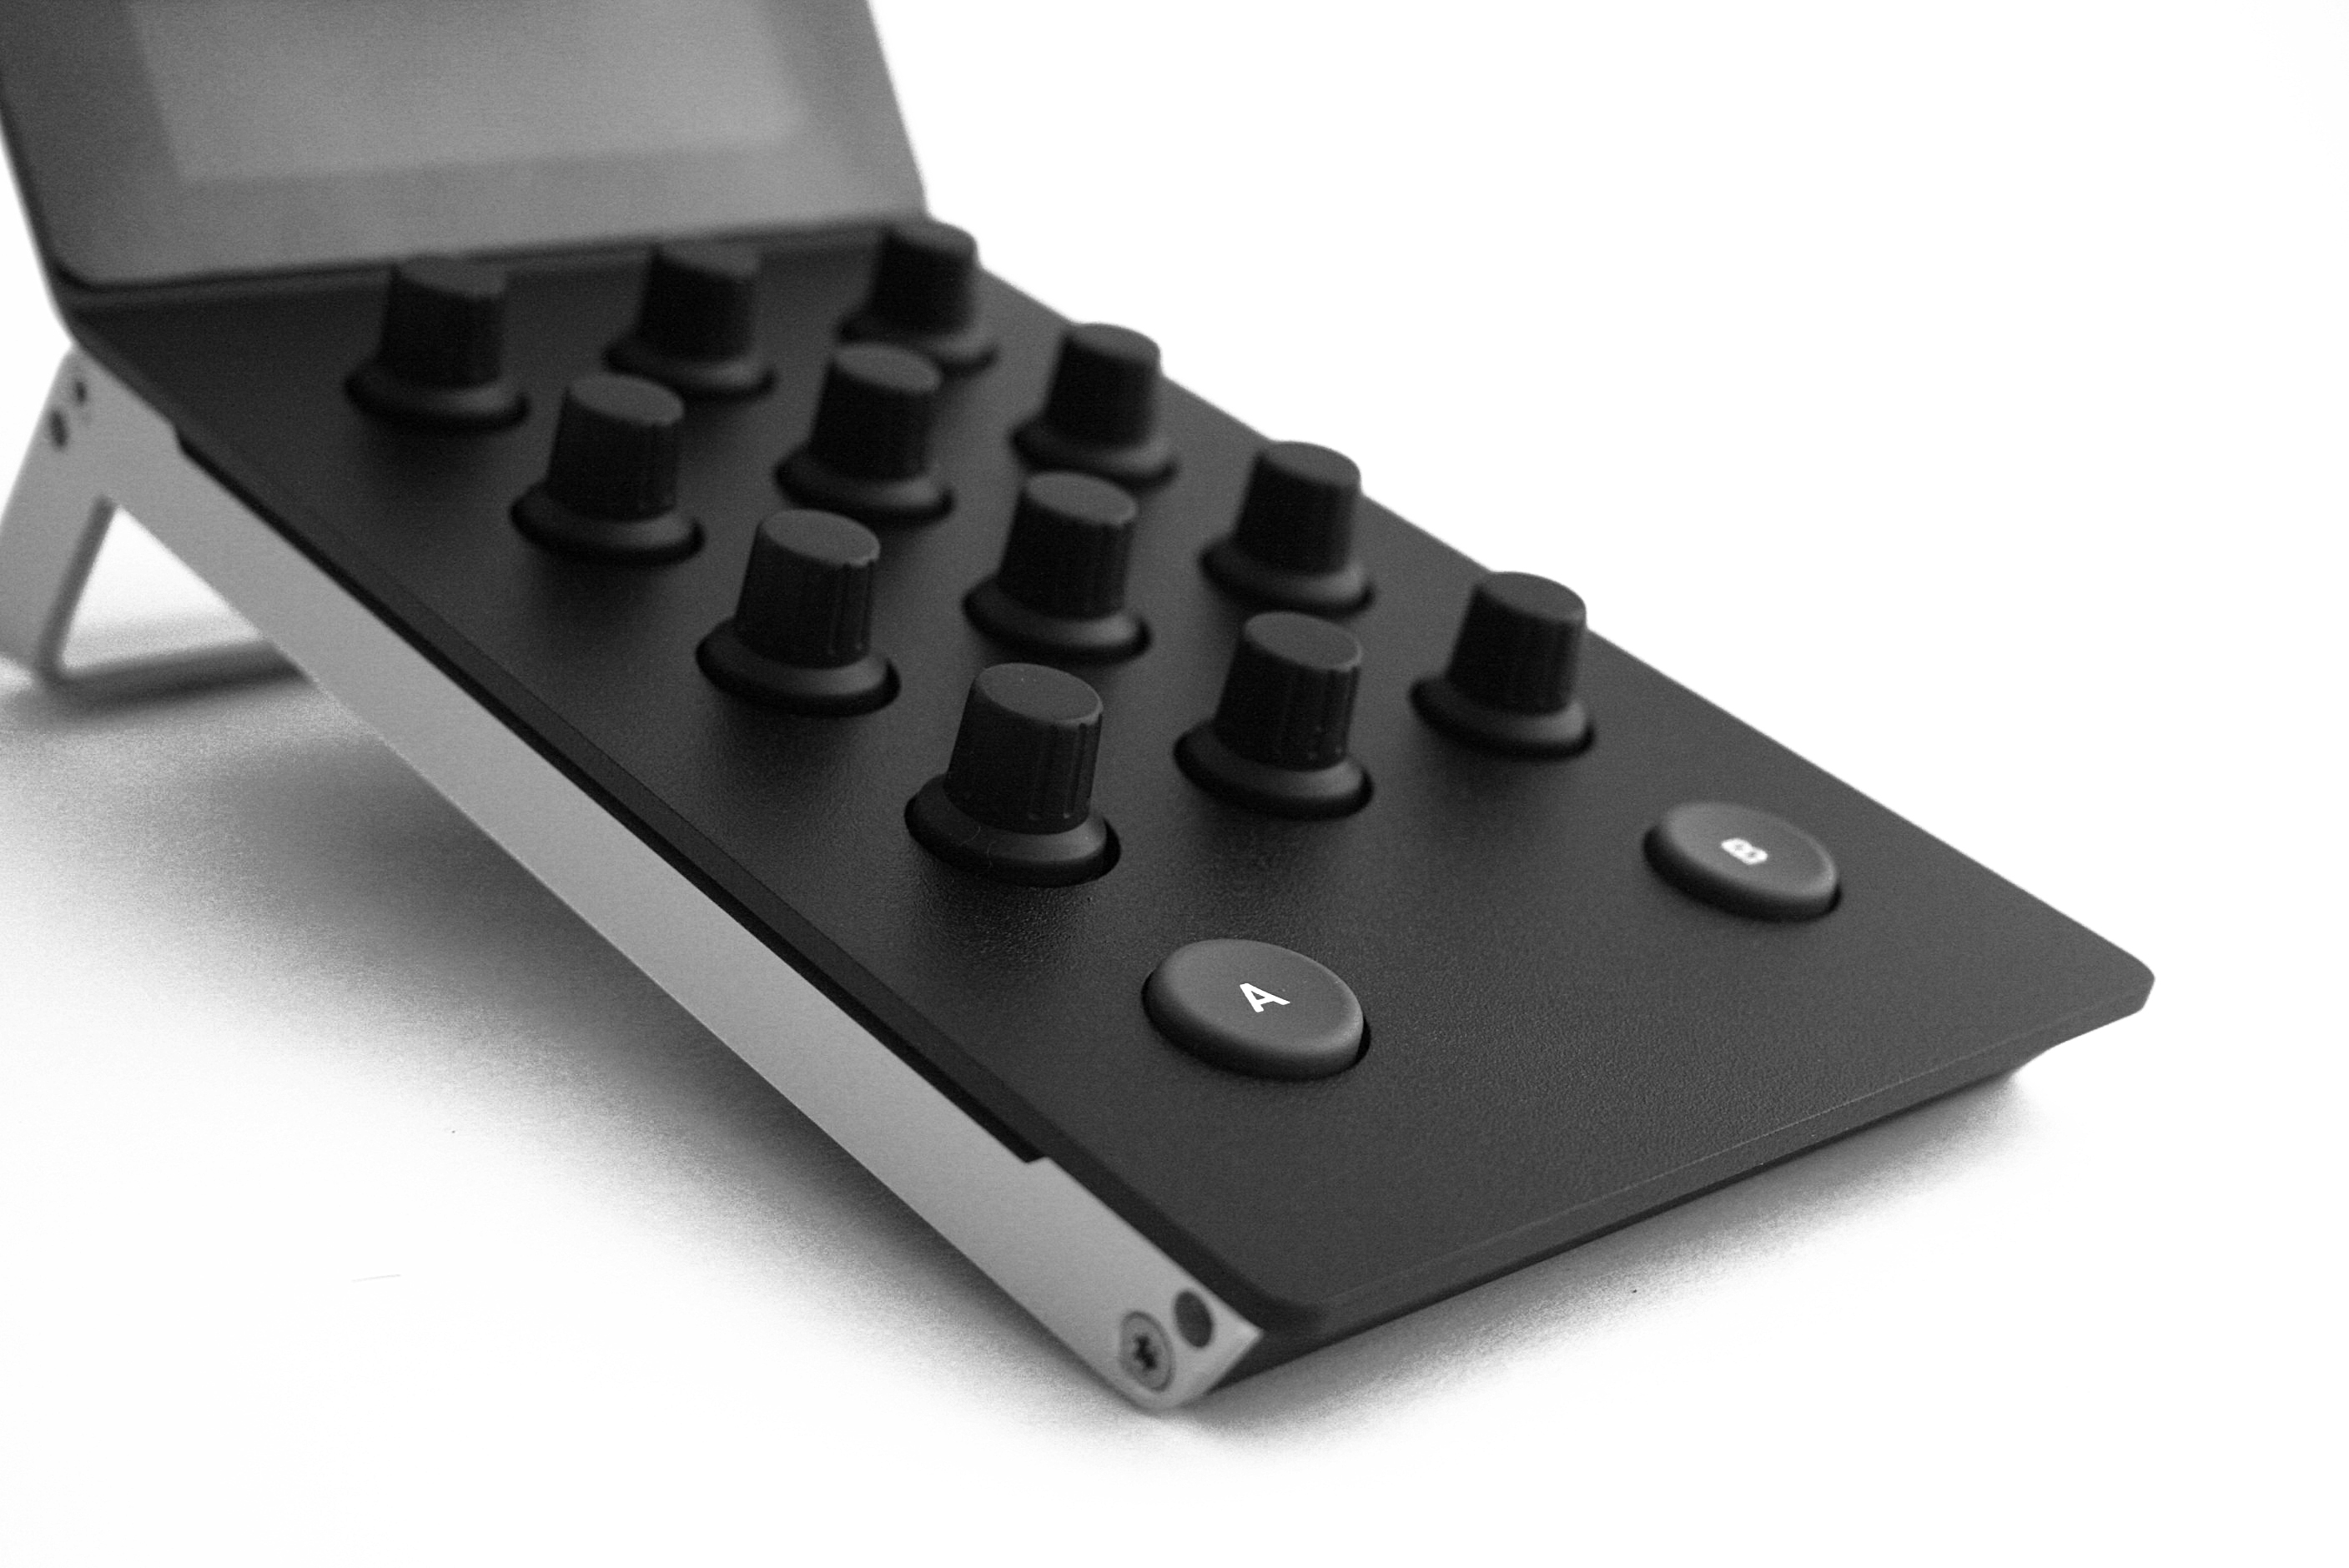
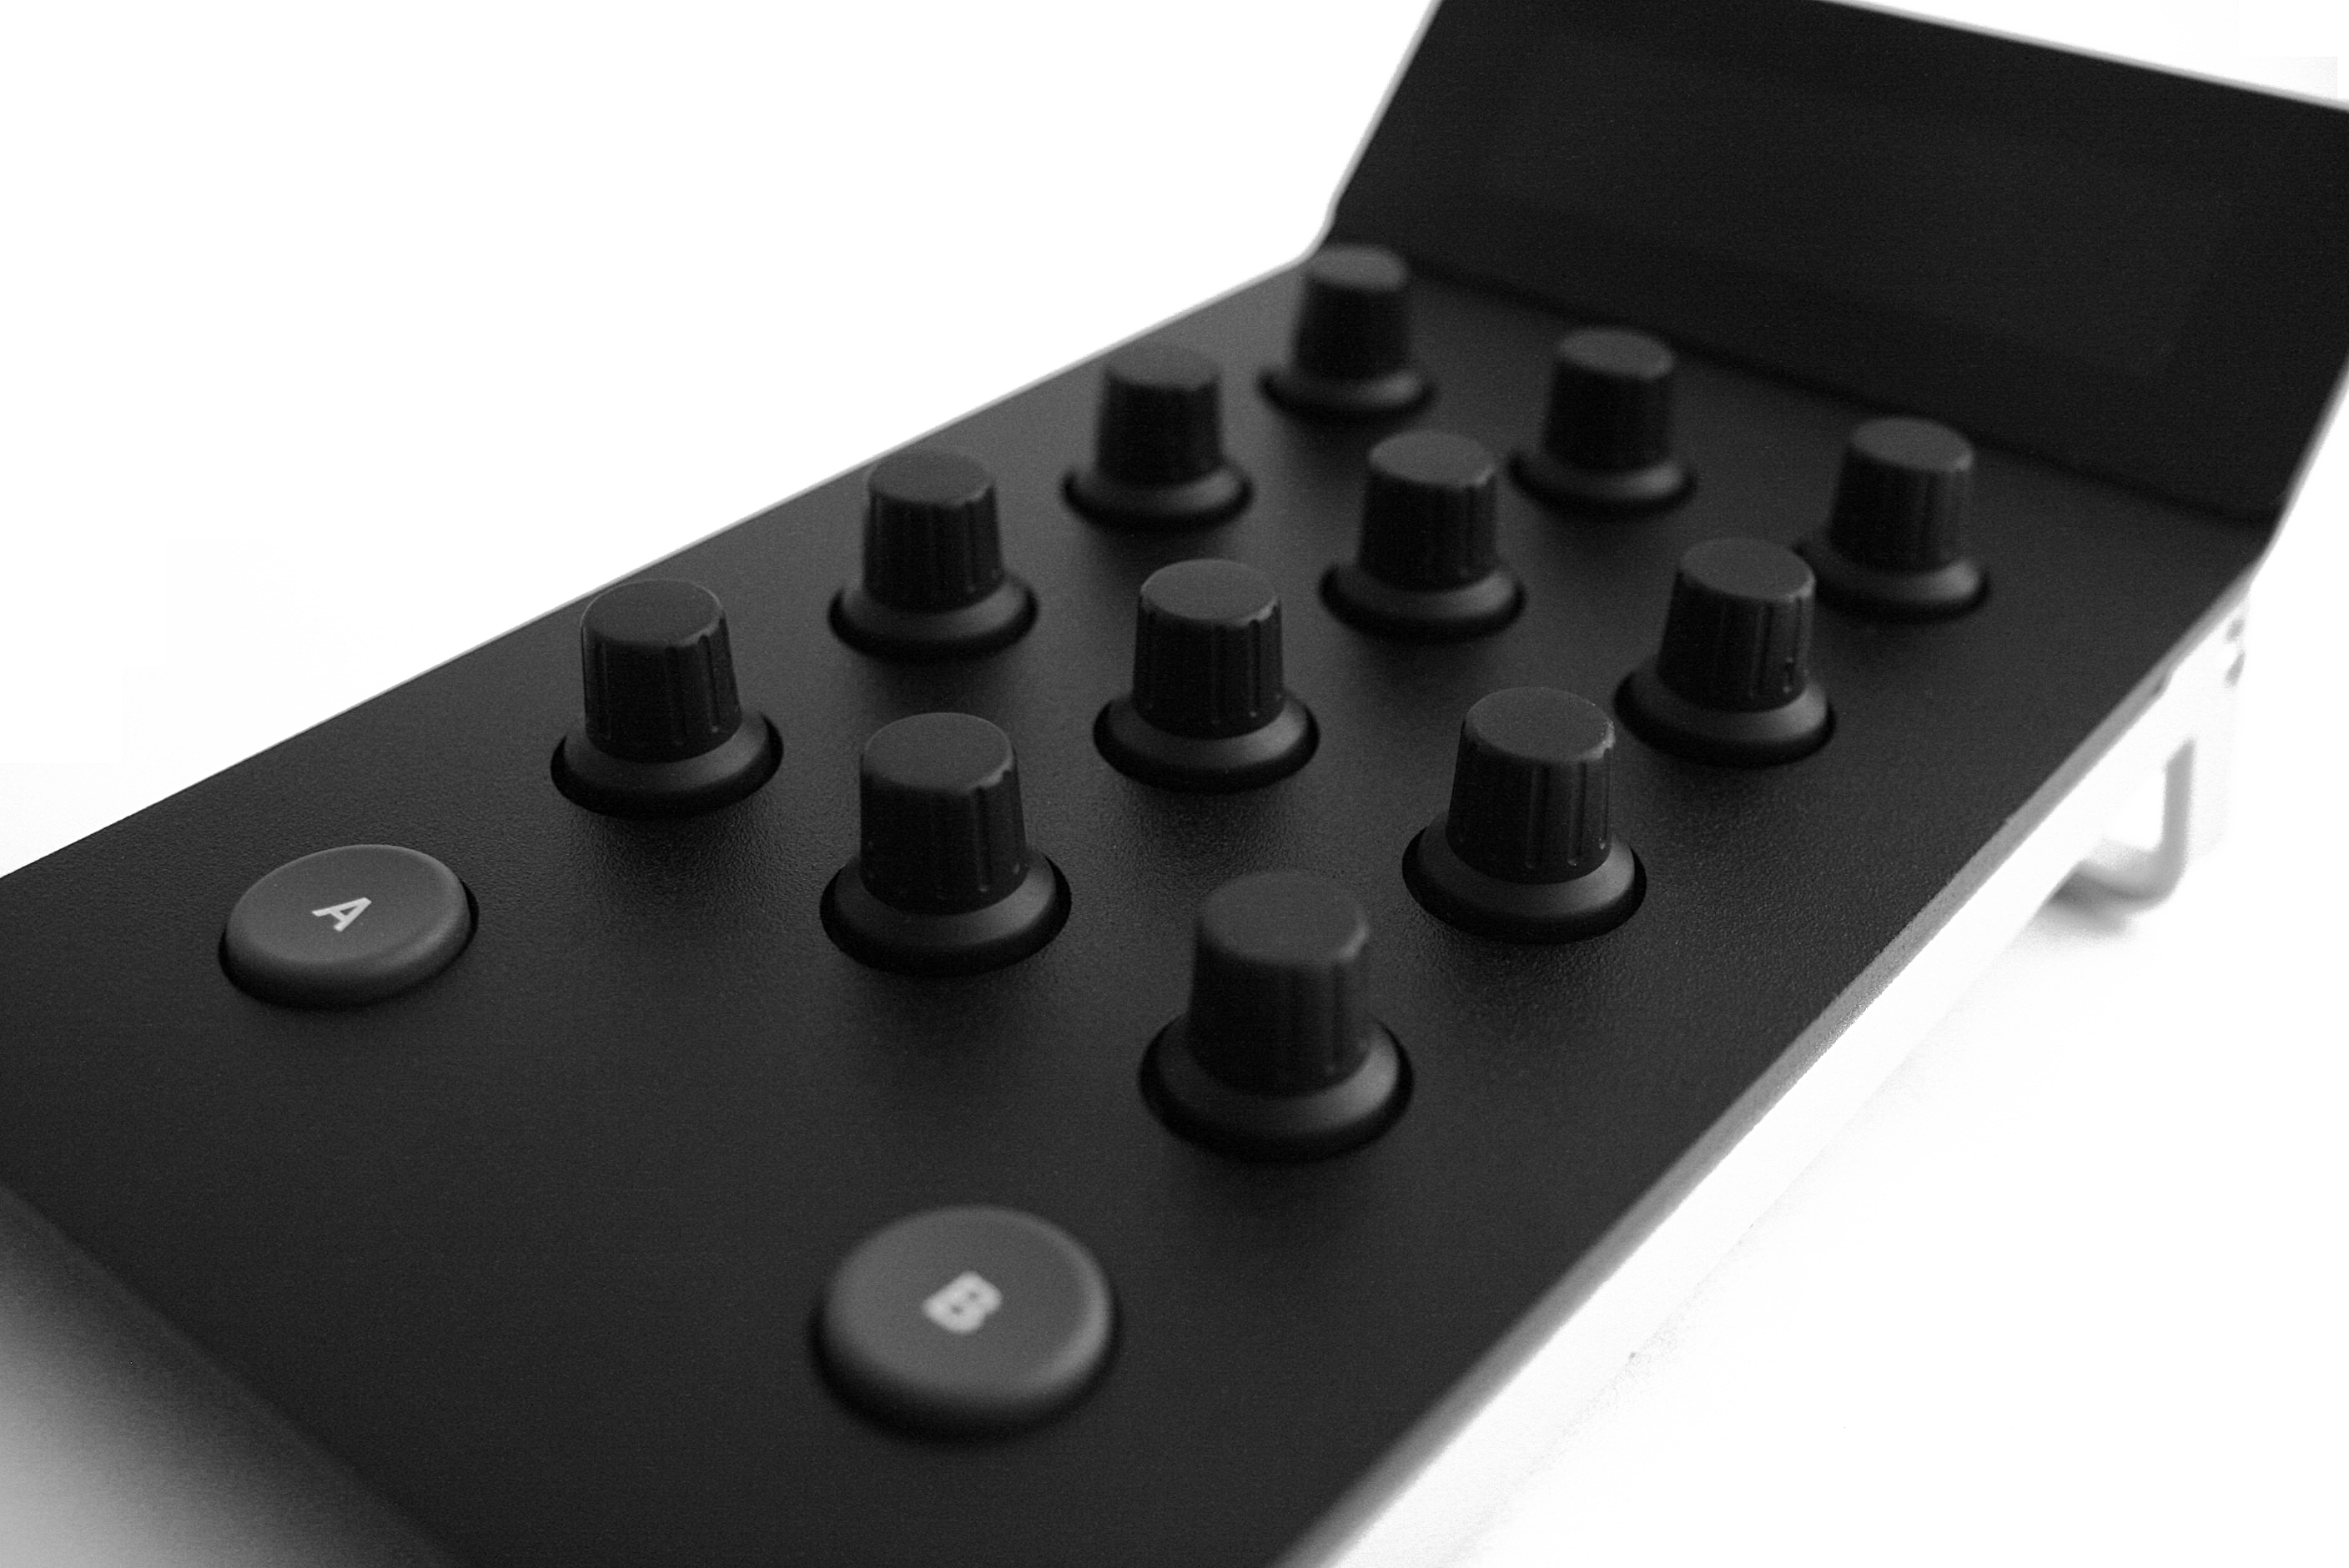
***SOLD*** Hi there, I’m selling a used *refurbished* Element Black Edition panel. Included in the kit are: - all 4 Element modules - all of them powder coated (Angry Face refurbish) - 4x new Angry Face Black Metal Rings - 4x new Angry Face Dark-petrol metallic trackerballs - custom black rubberized knobs on the Element-Kb - 4x original rings (used) - 4x USB-cables (USB-A to Mini-USB) - 6x Link Pins - Velcro soft cover - powered 7-port USB-2.0 hub incl. USB-cable - Element Sticker for Peli Case (or wherever you wanna put it 😉 The Element-Tk panel has a small dent on the front left corner. Check the pictures - in a dark grading suite it’s not noticeable, and has otherwise no impact on the function of the panel. Panel has been checked, cleaned and works 100%. With the powder coat, rings and trackerballs, this panel is better than a new one 😉 . Panel is located in Munich, Germany - shipping EU-wide. Asking price is 2300€ (excl. tax). Cheers, Mazze
-
Hi Victor - they should still be available. Please ping me via PM and let me know how many you want, and where to ship them to. Thanks, Mazze
-
Hi Victor, I'd need to check - will let you know what I can find out.
-
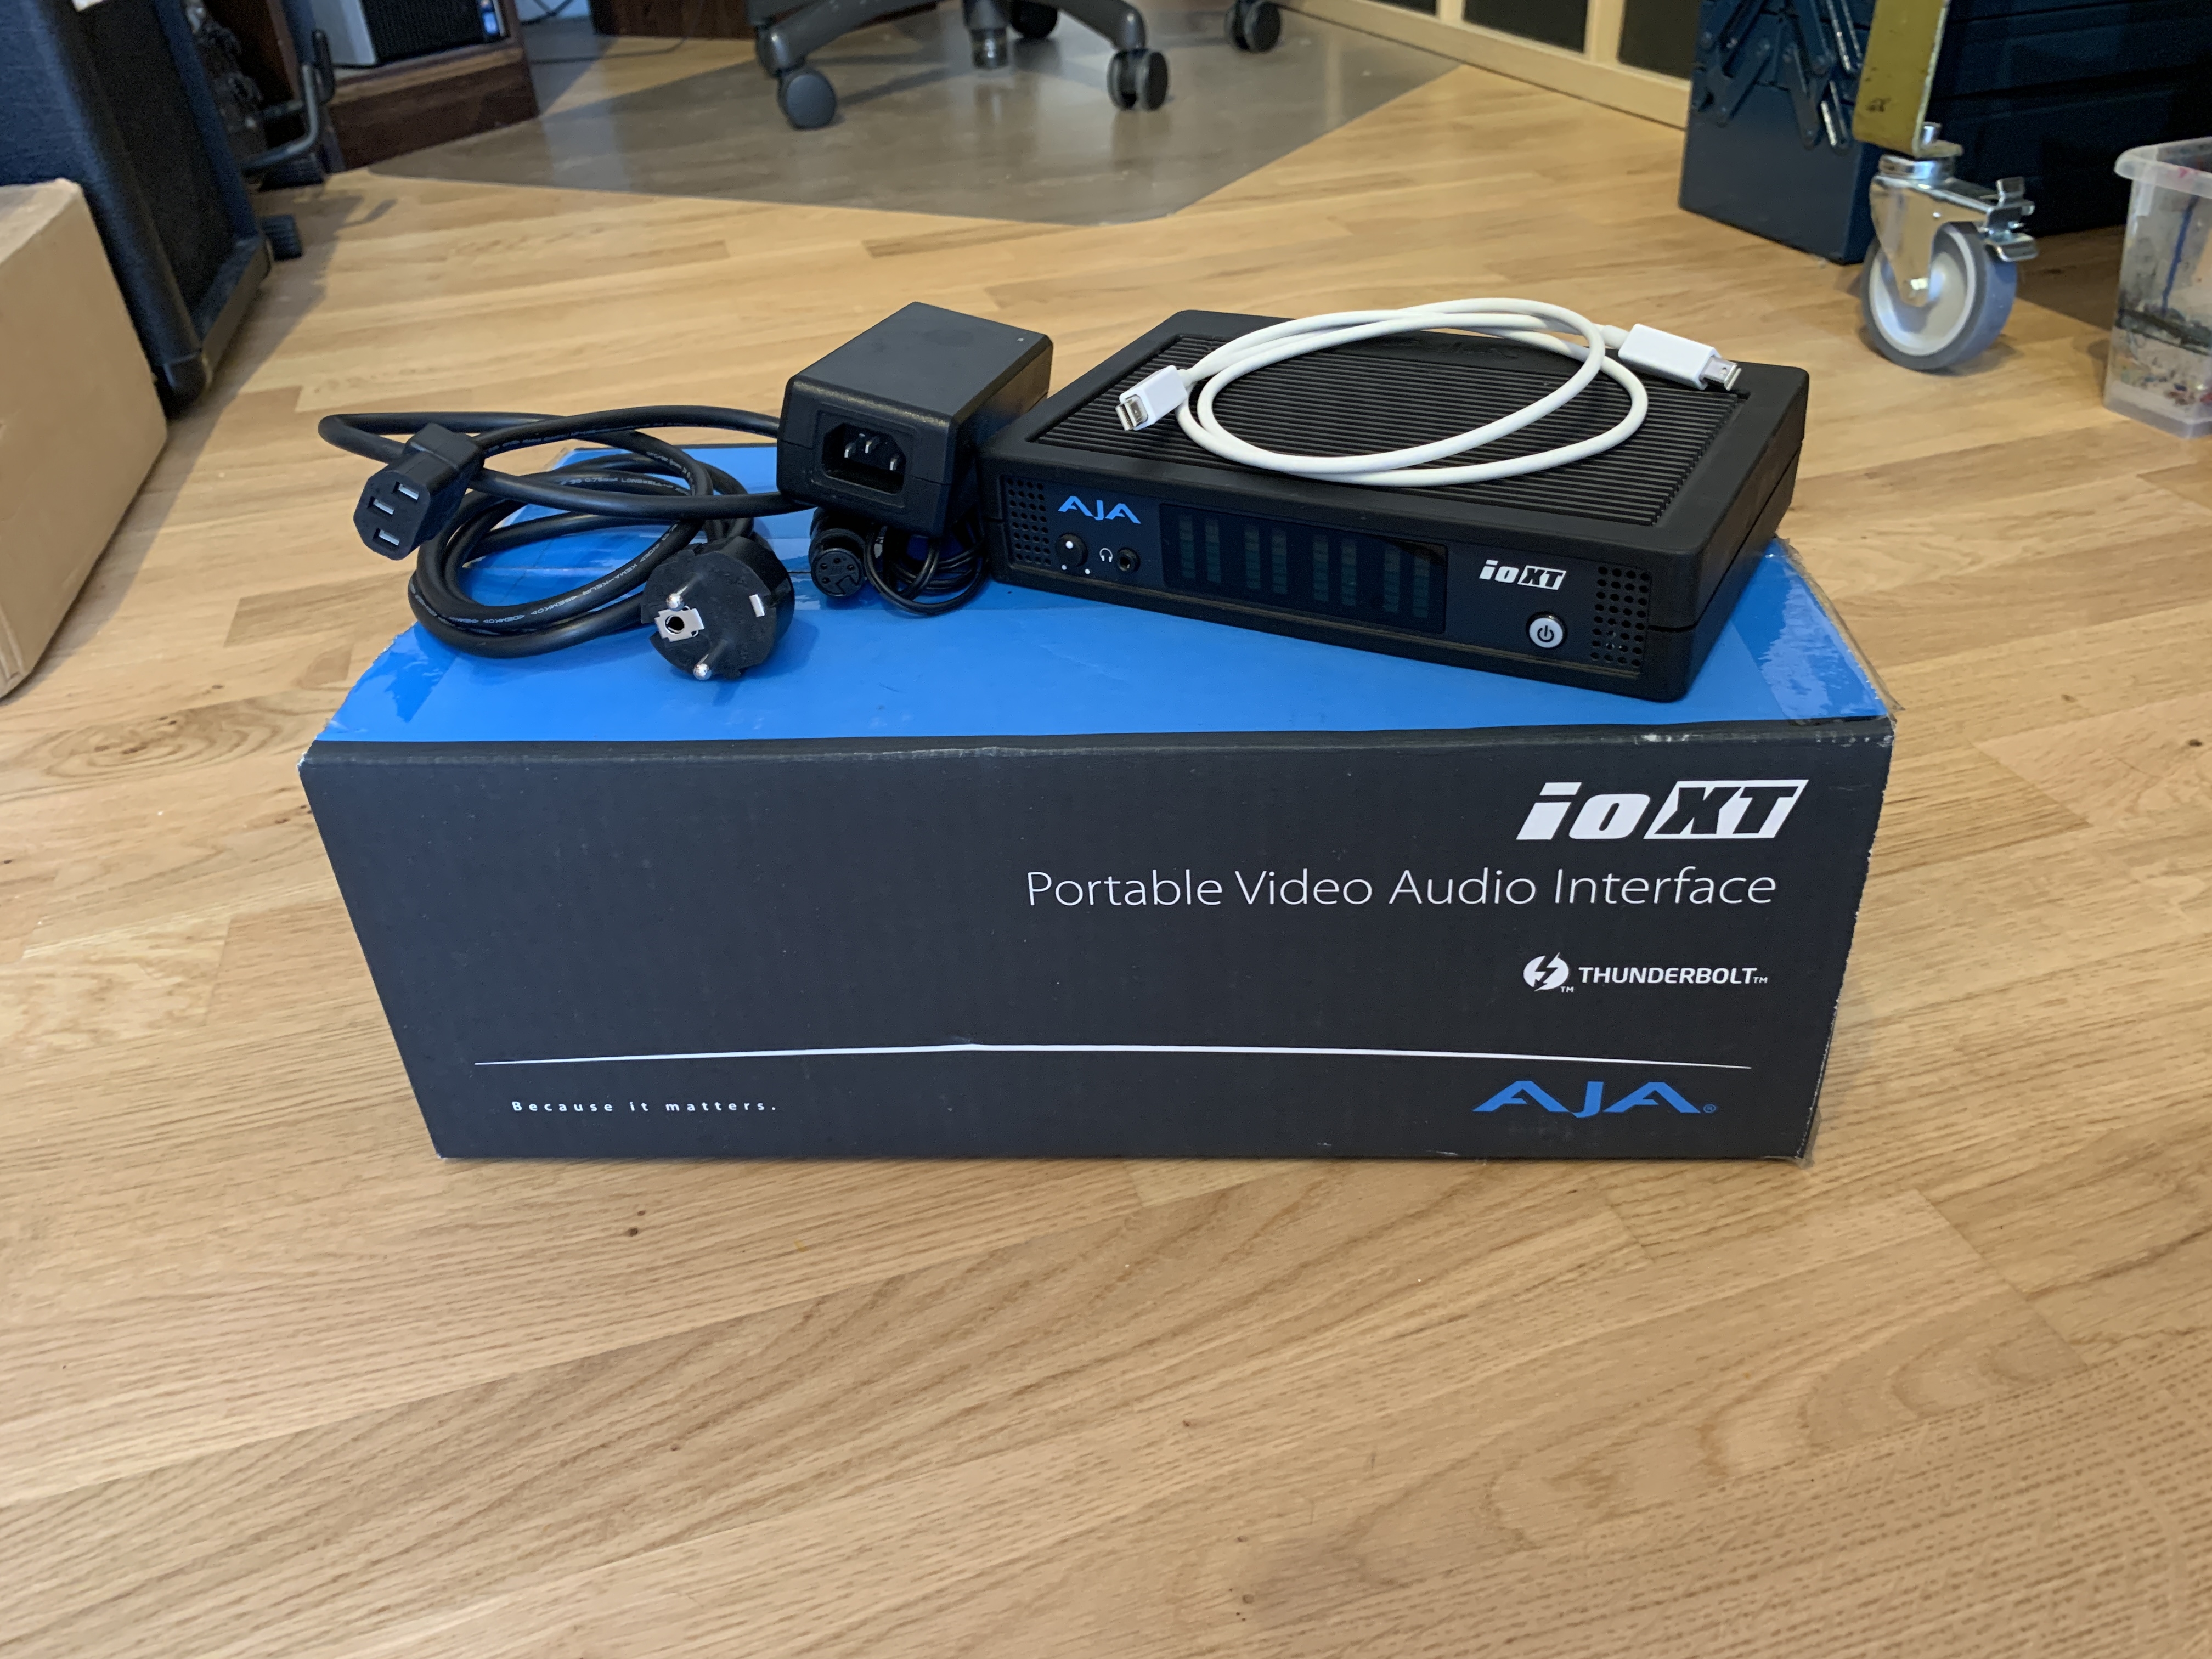
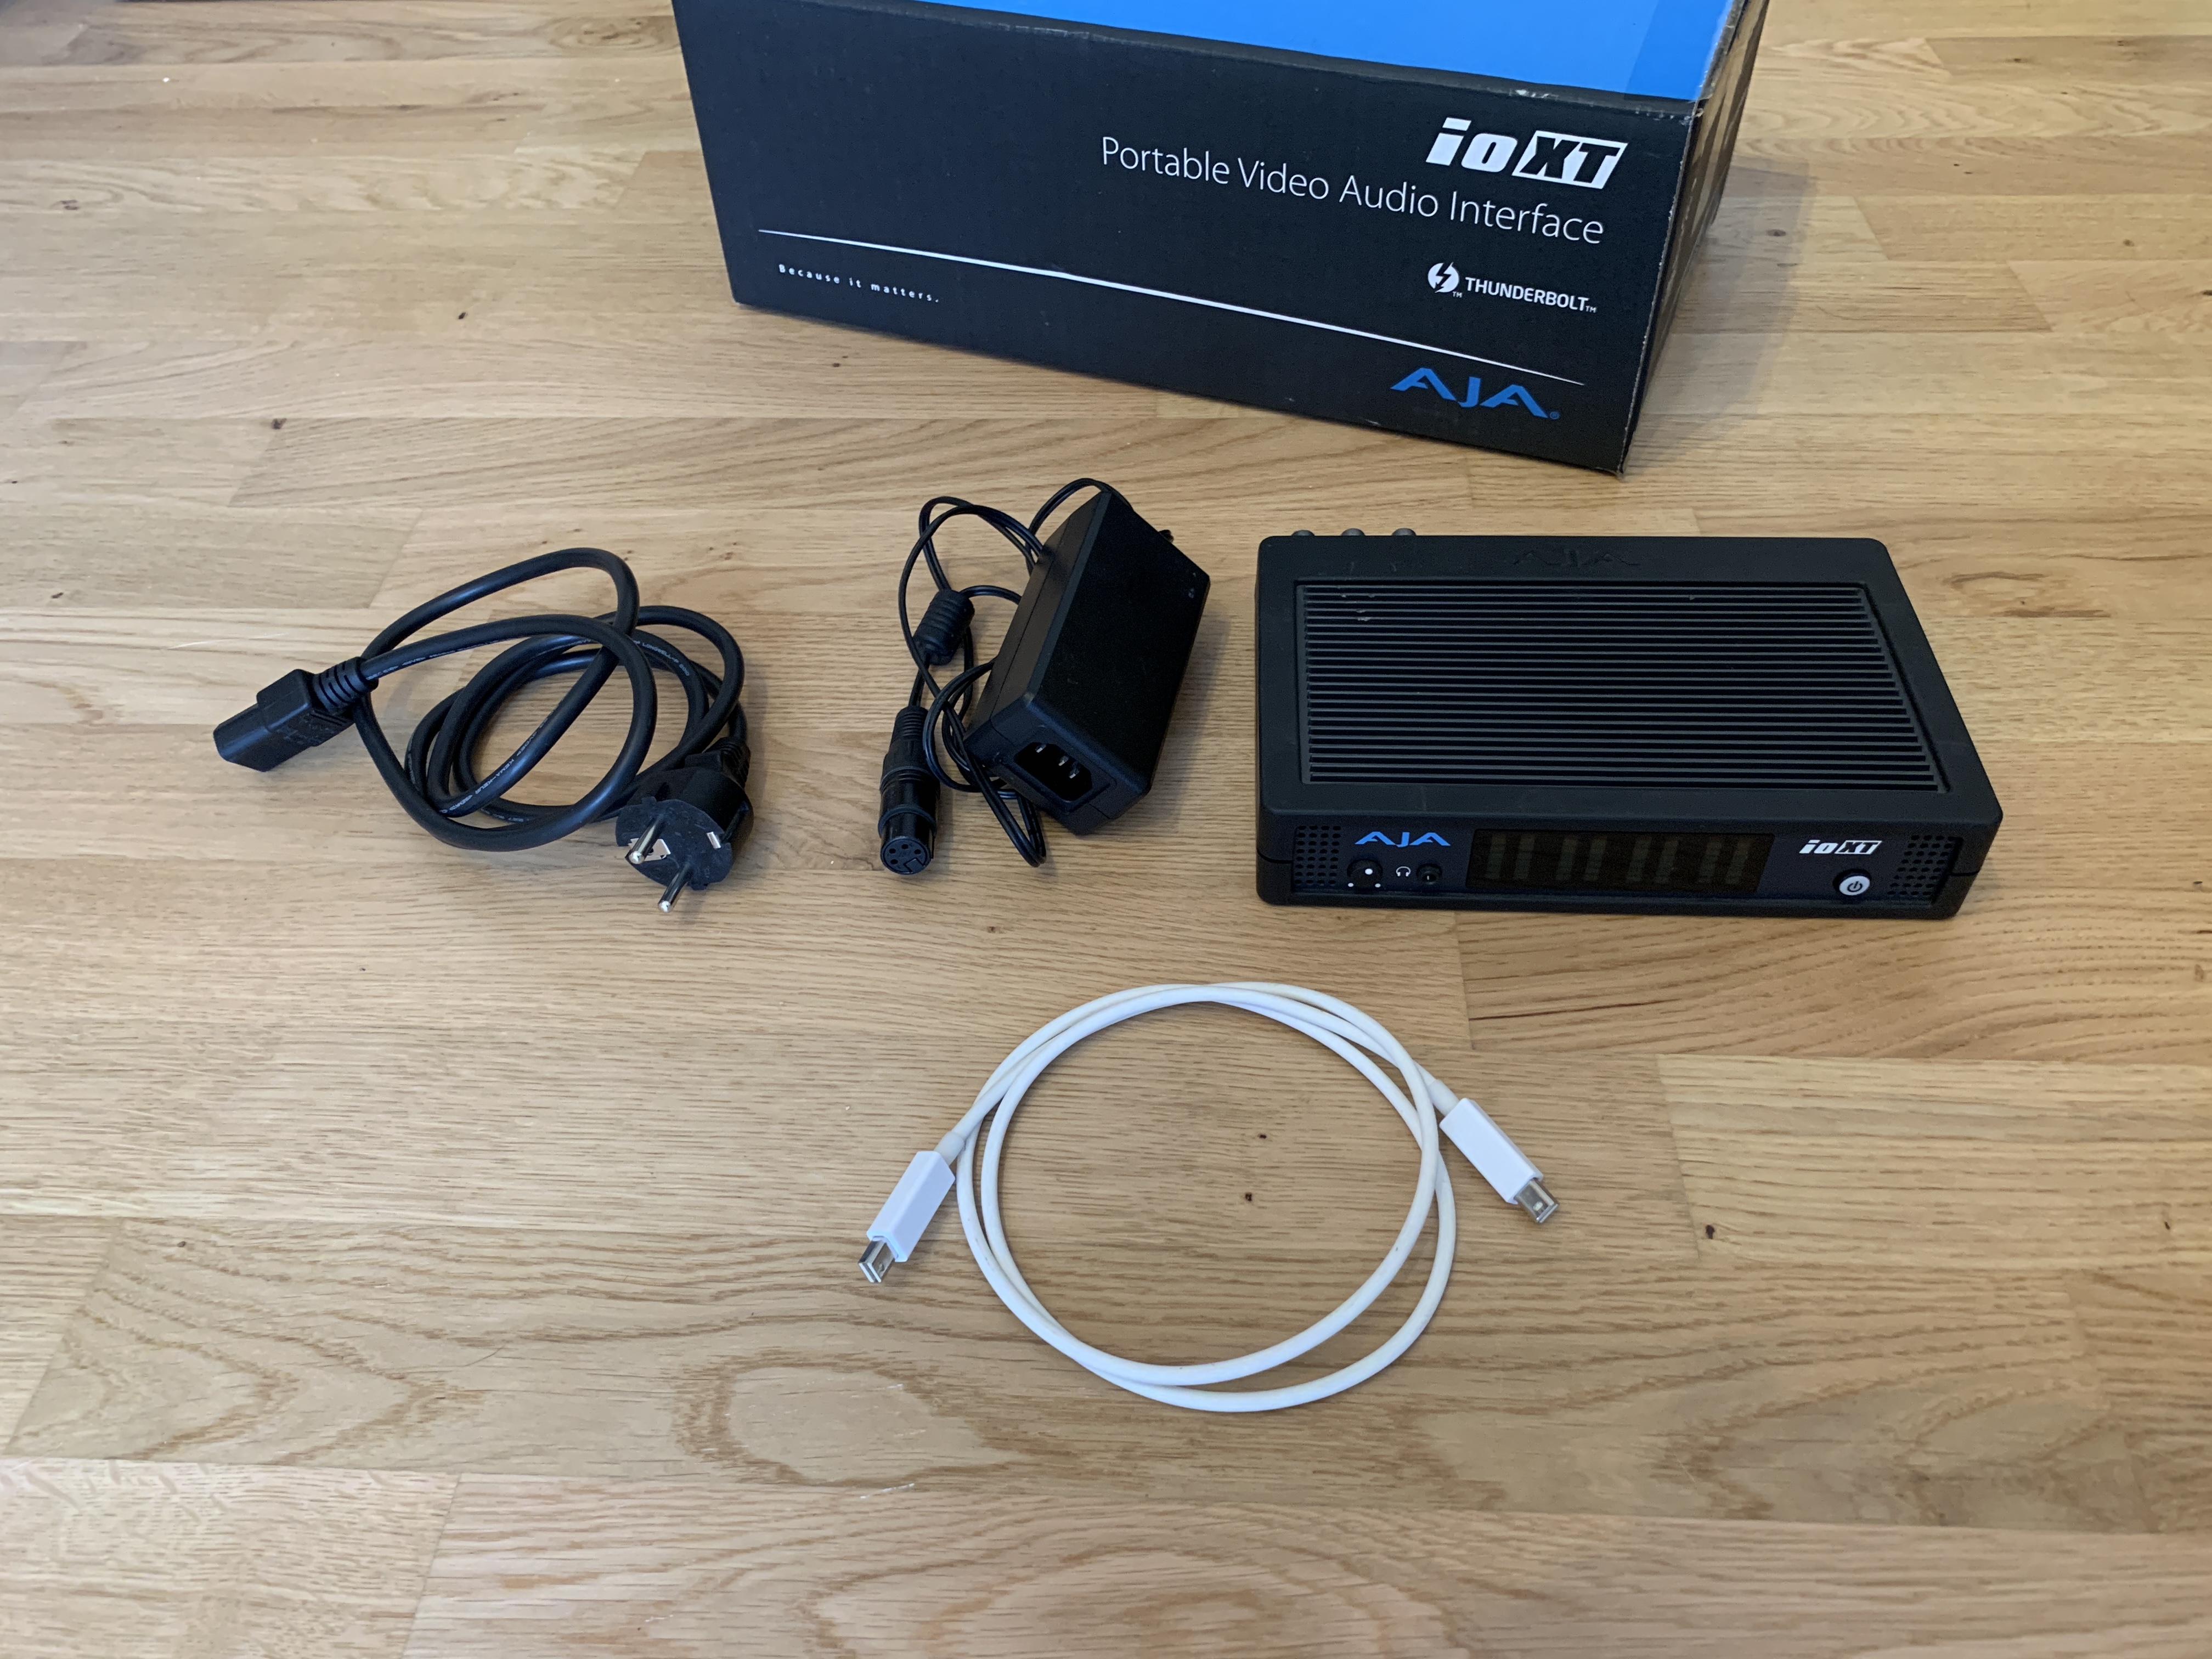
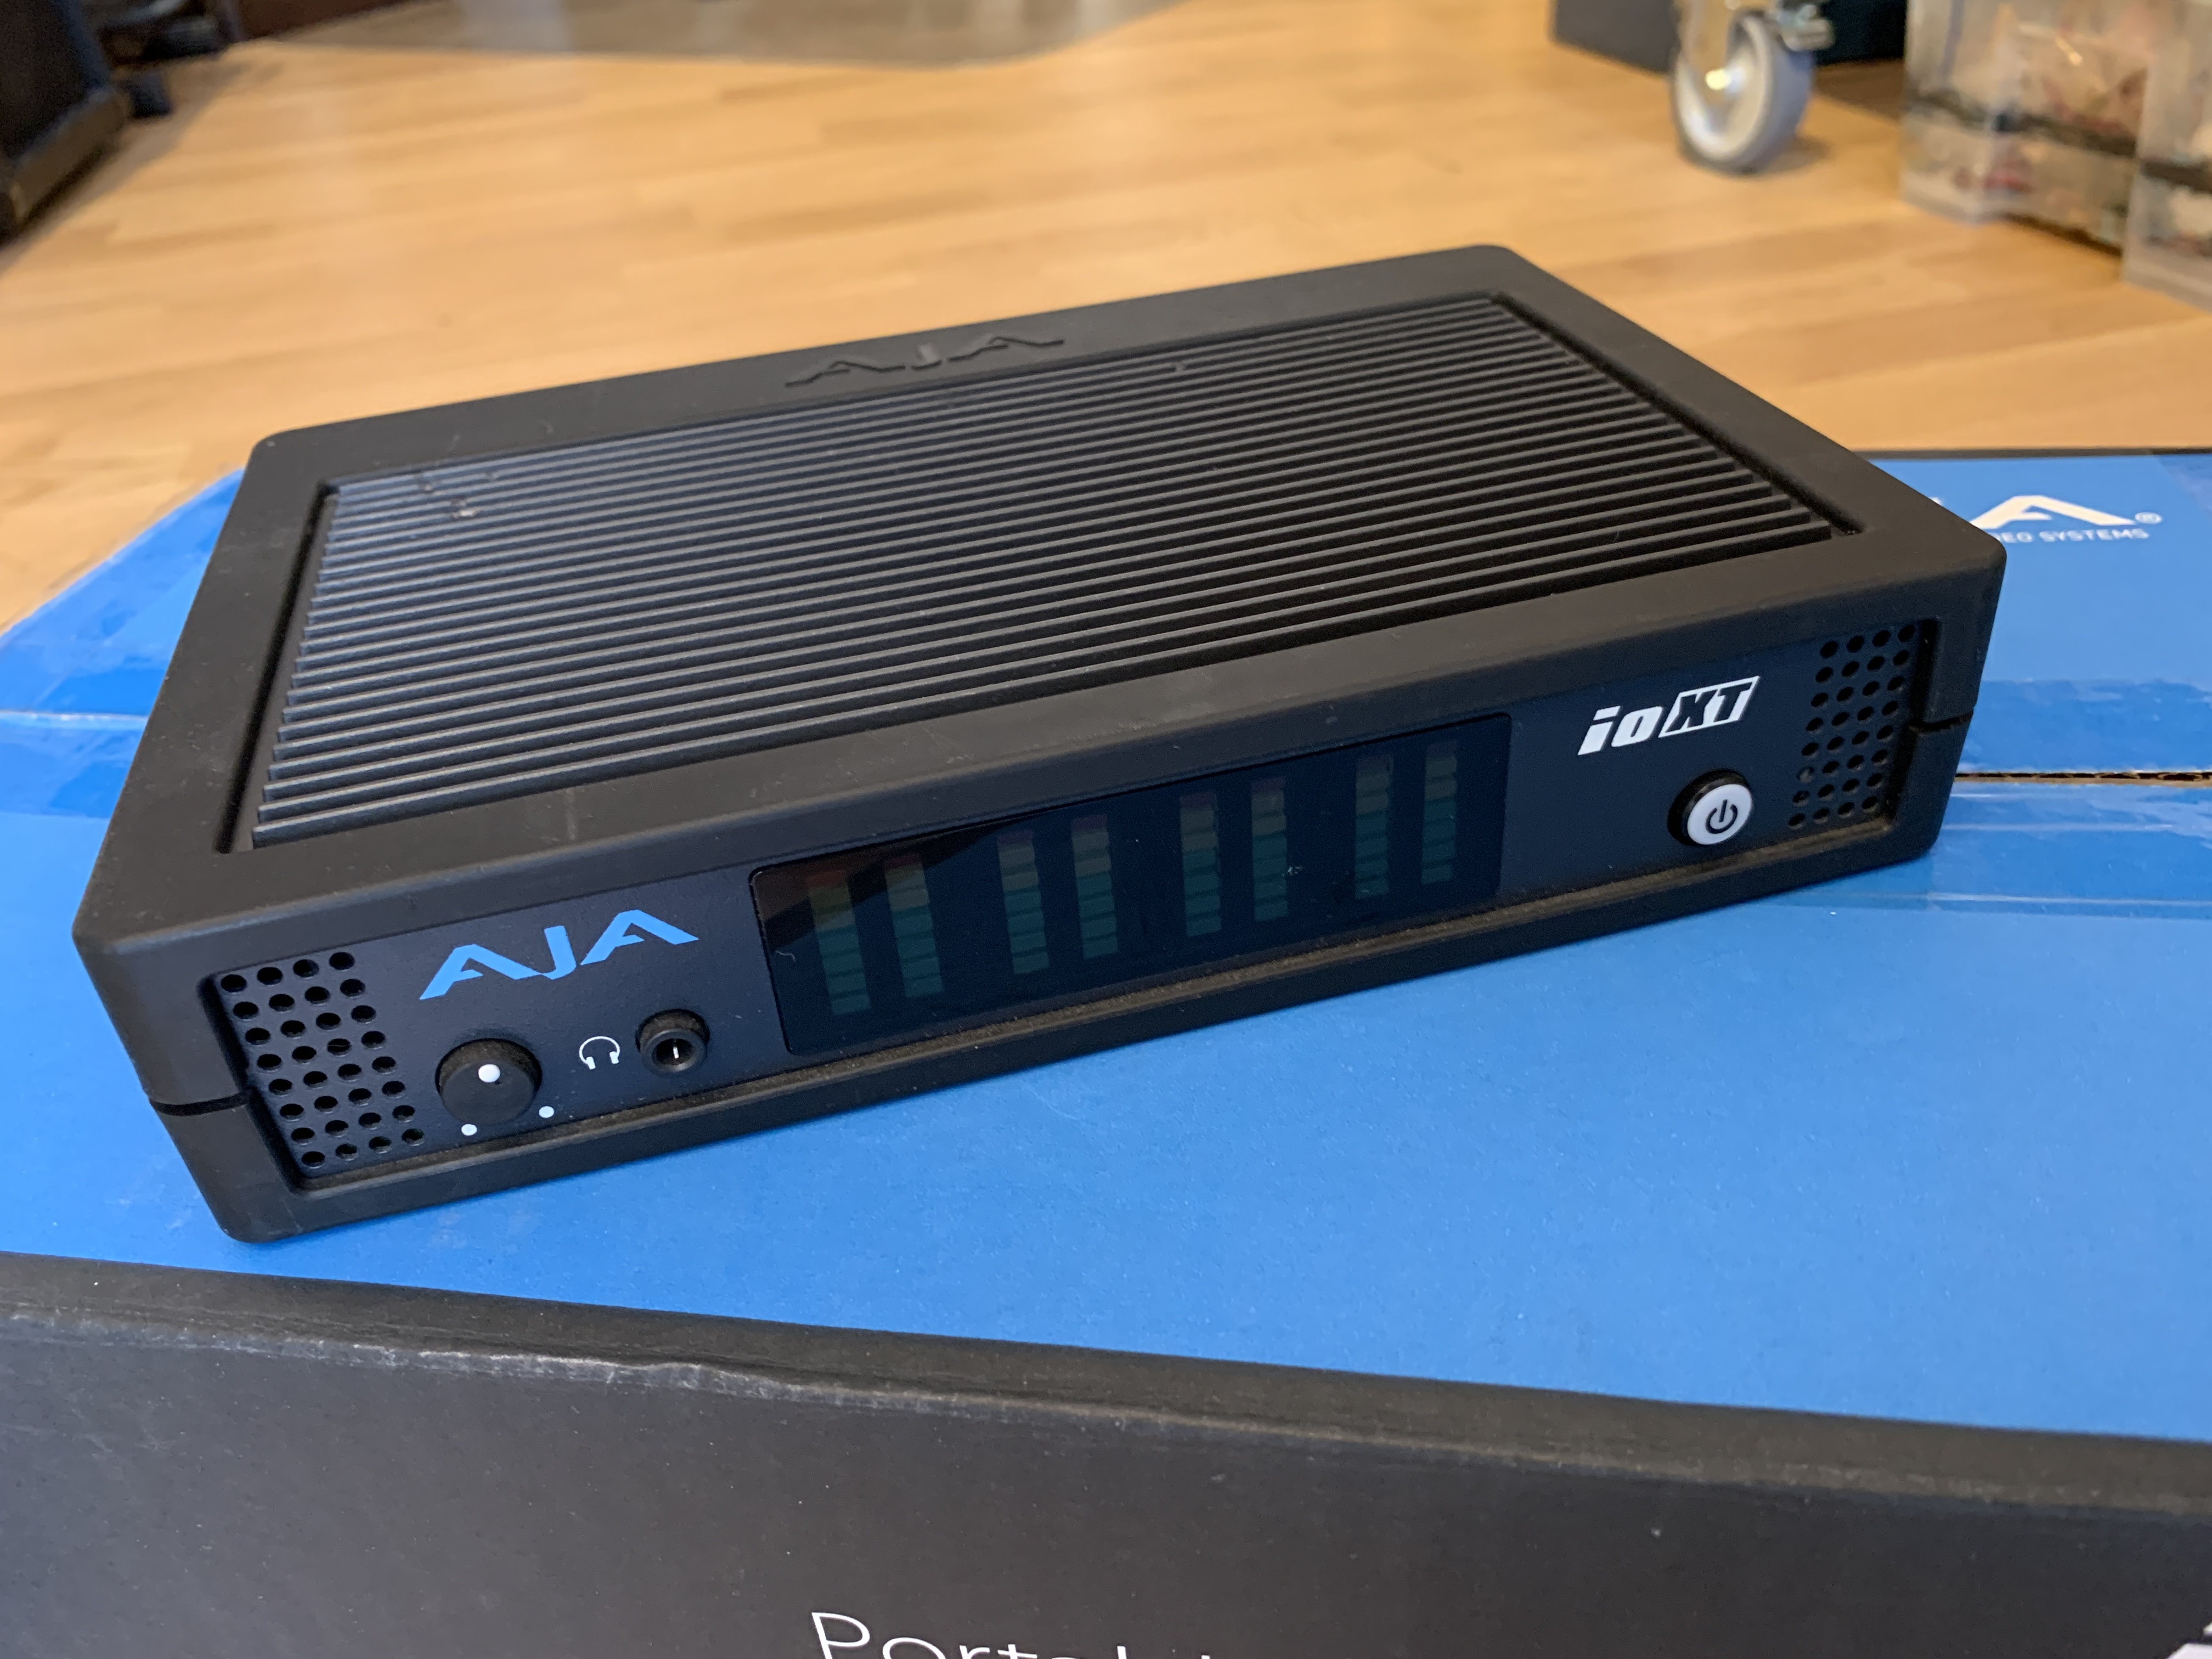
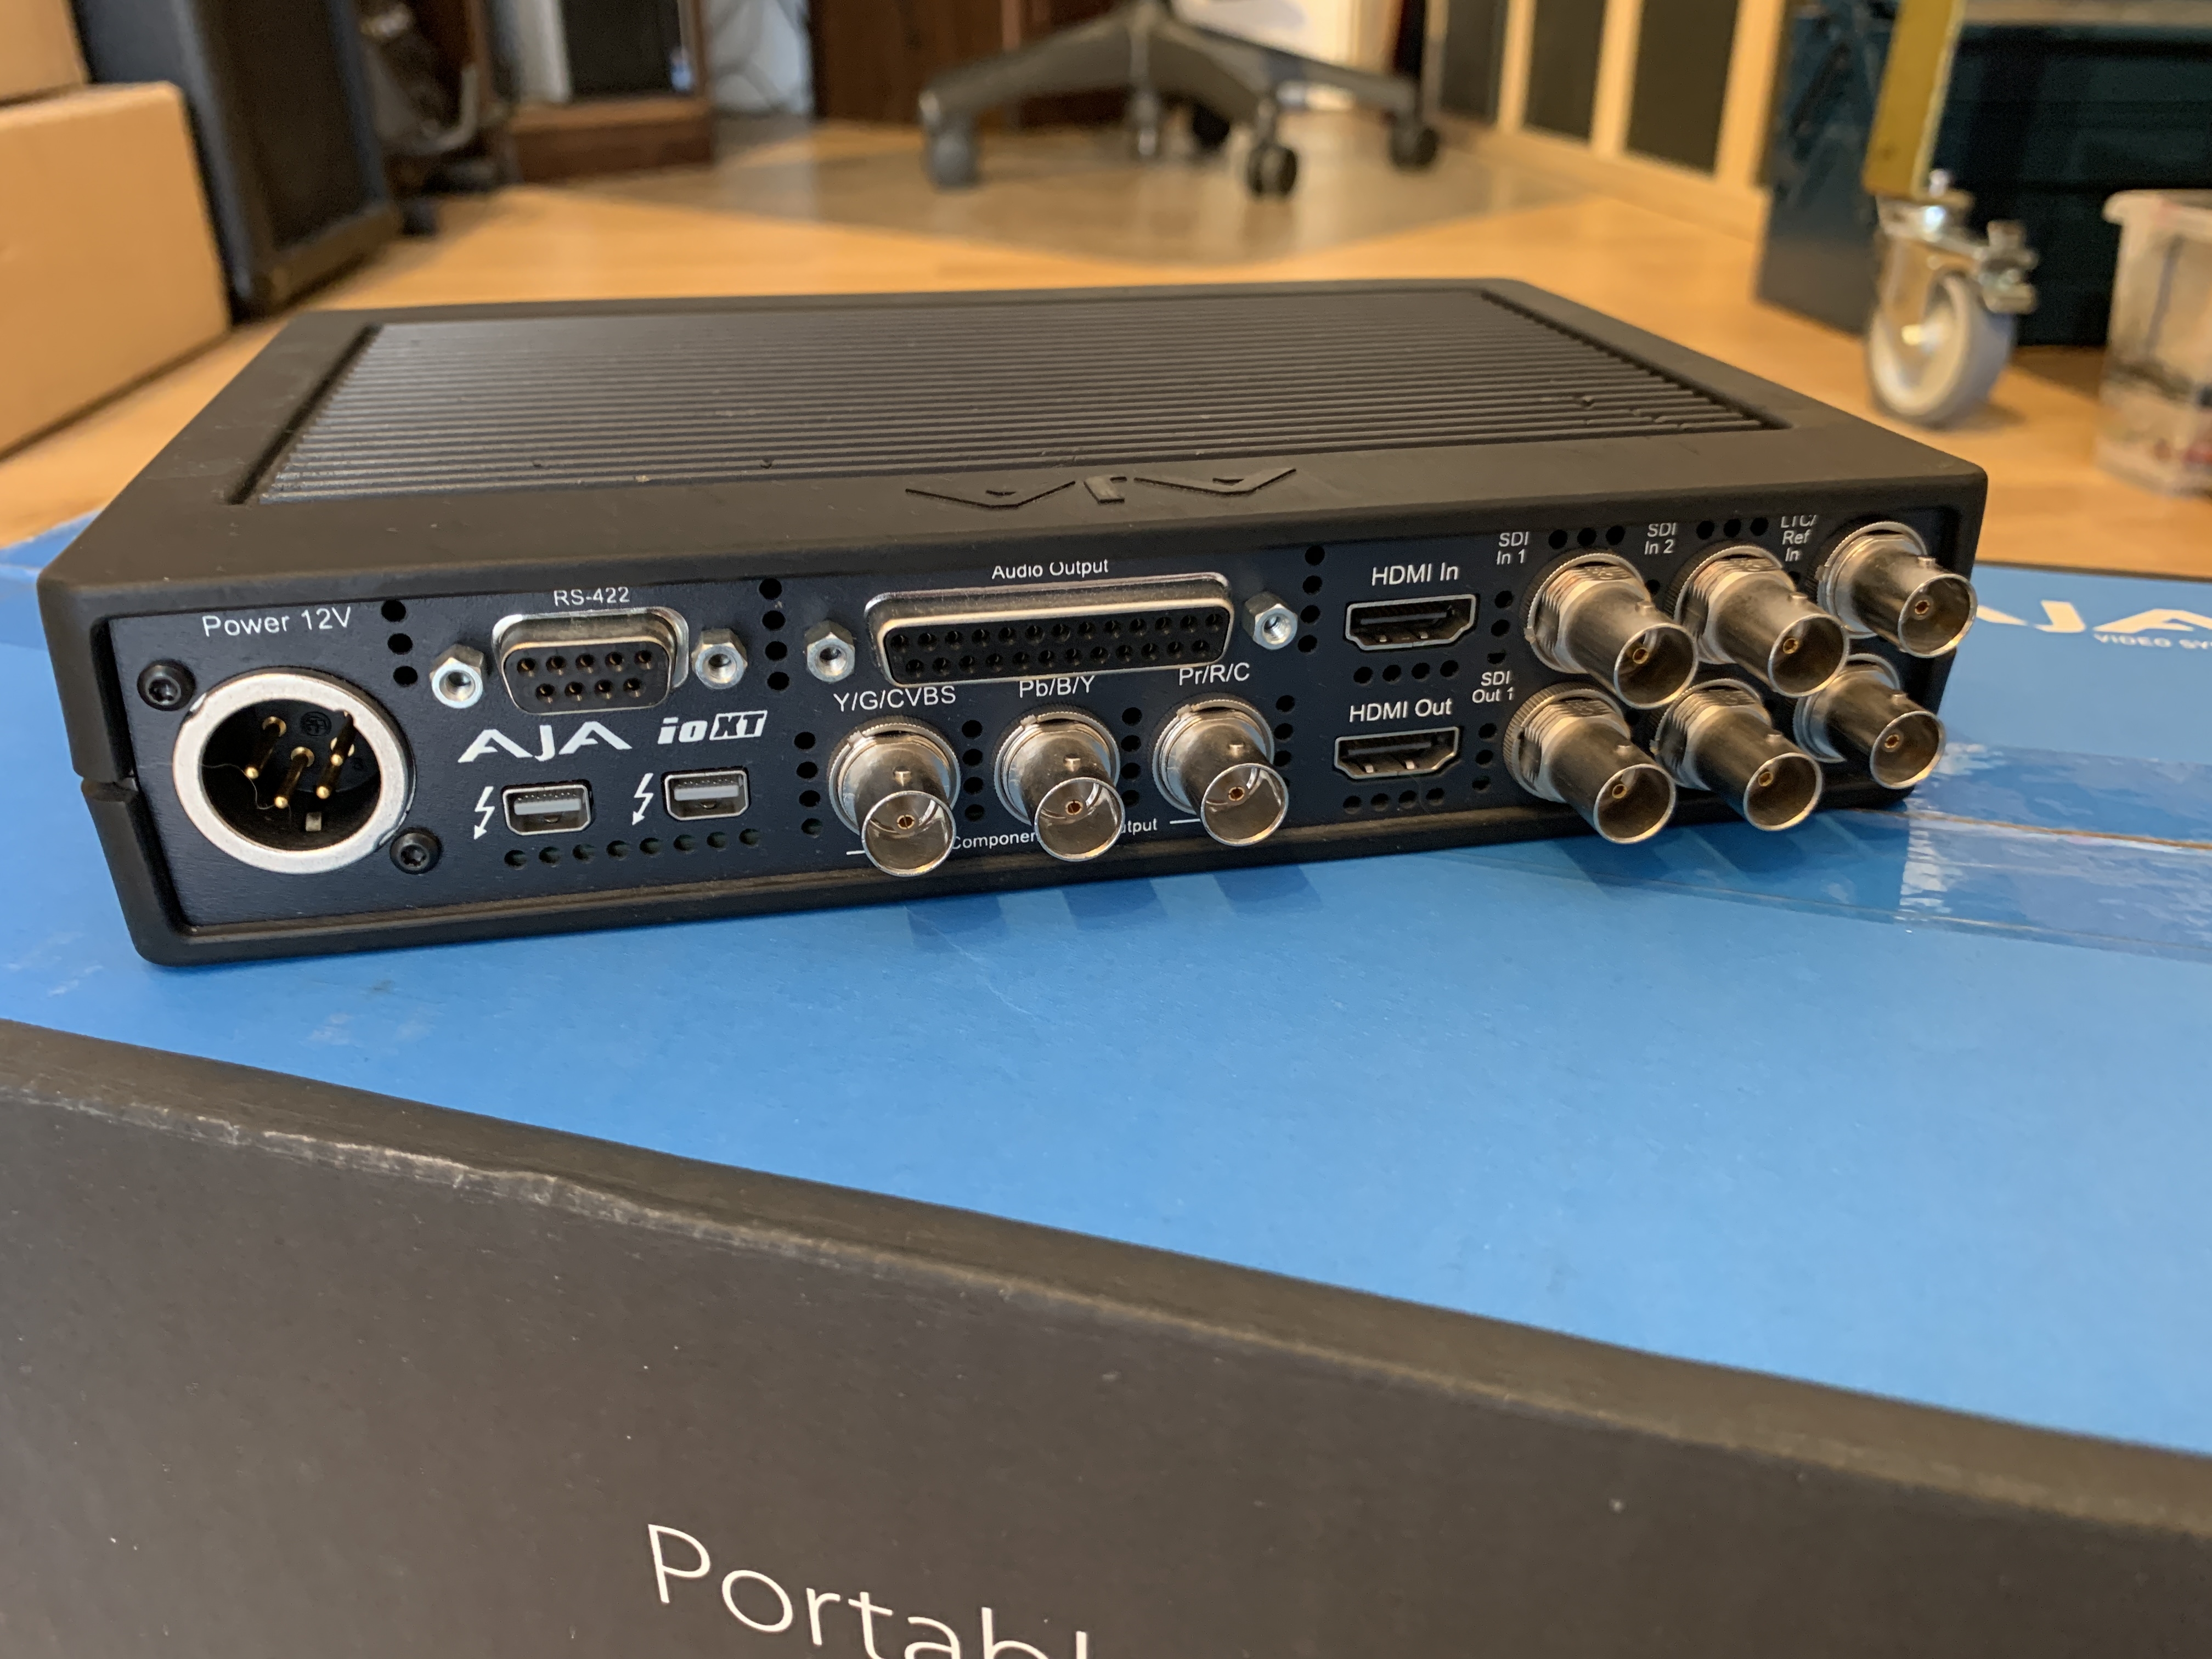
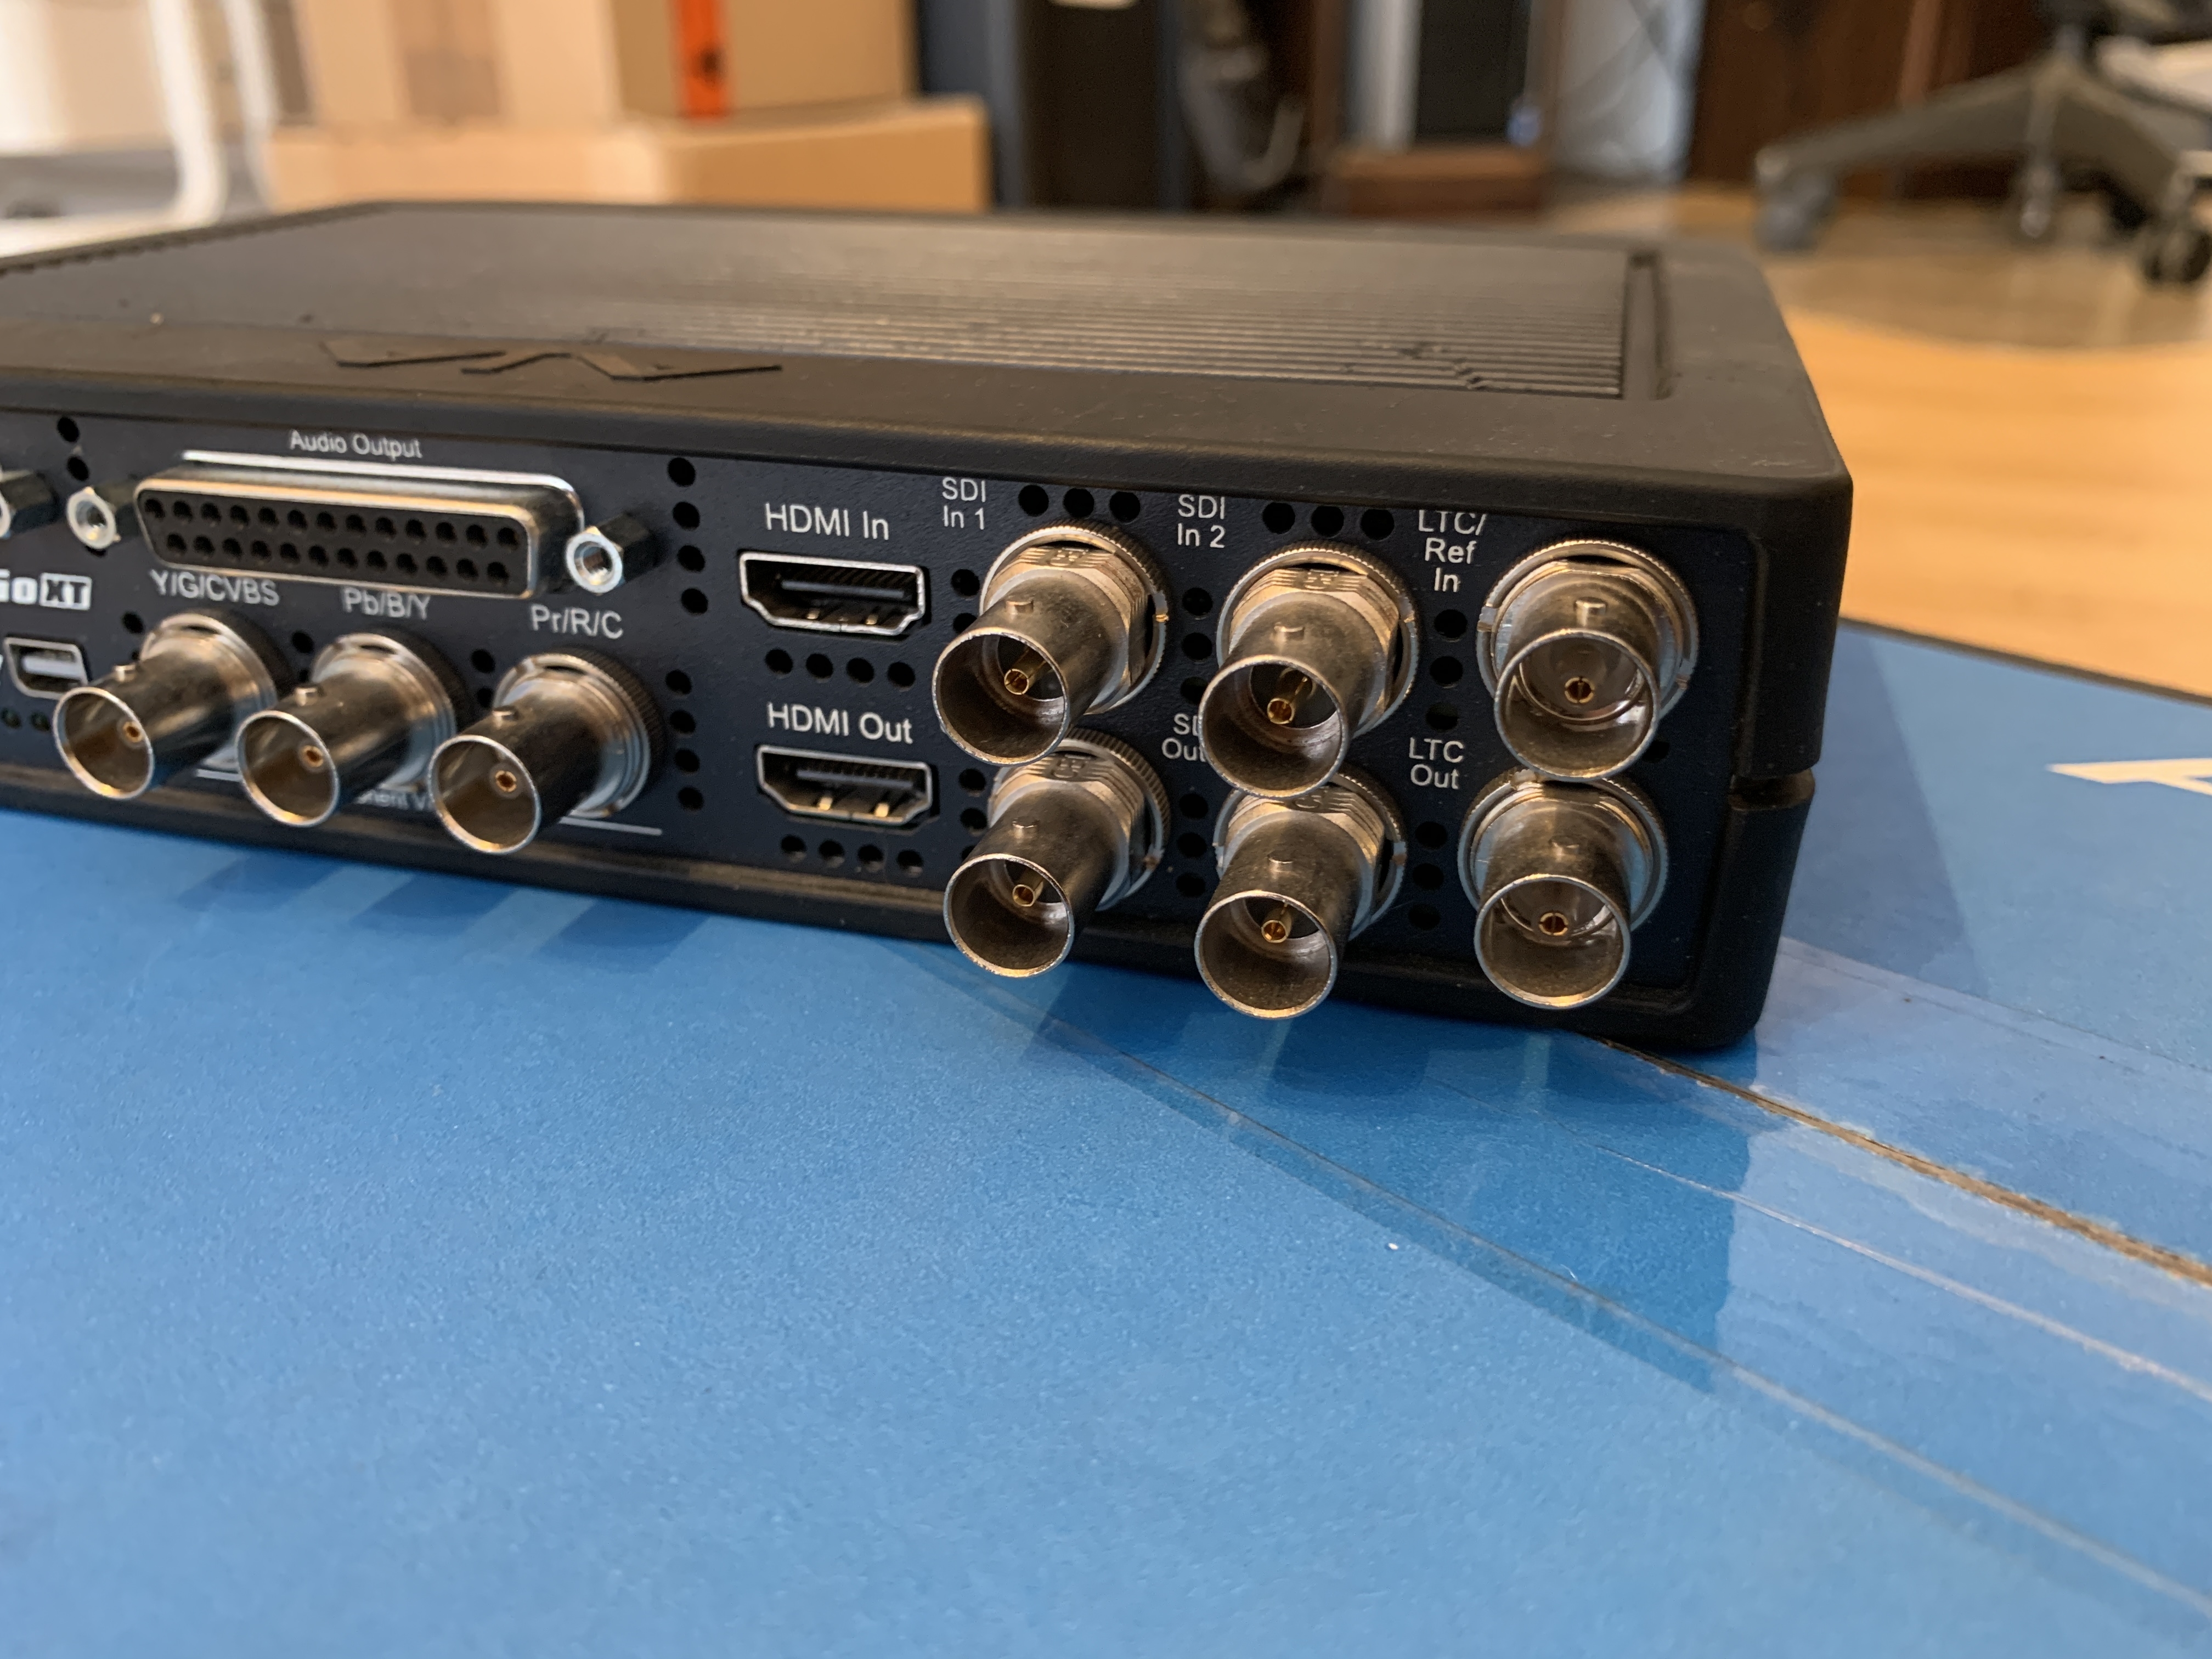
Hi there, selling my AJA Io XT. Works 100% - barely used. Has also been tested with latest driver v16.1 on M1 Max / macOS Monterey using a TB2 ==> TB3 adapter. Asking 550€ - free shipping inside the EU. Device is located in Munich, Germany. Cheers, Mazze
-
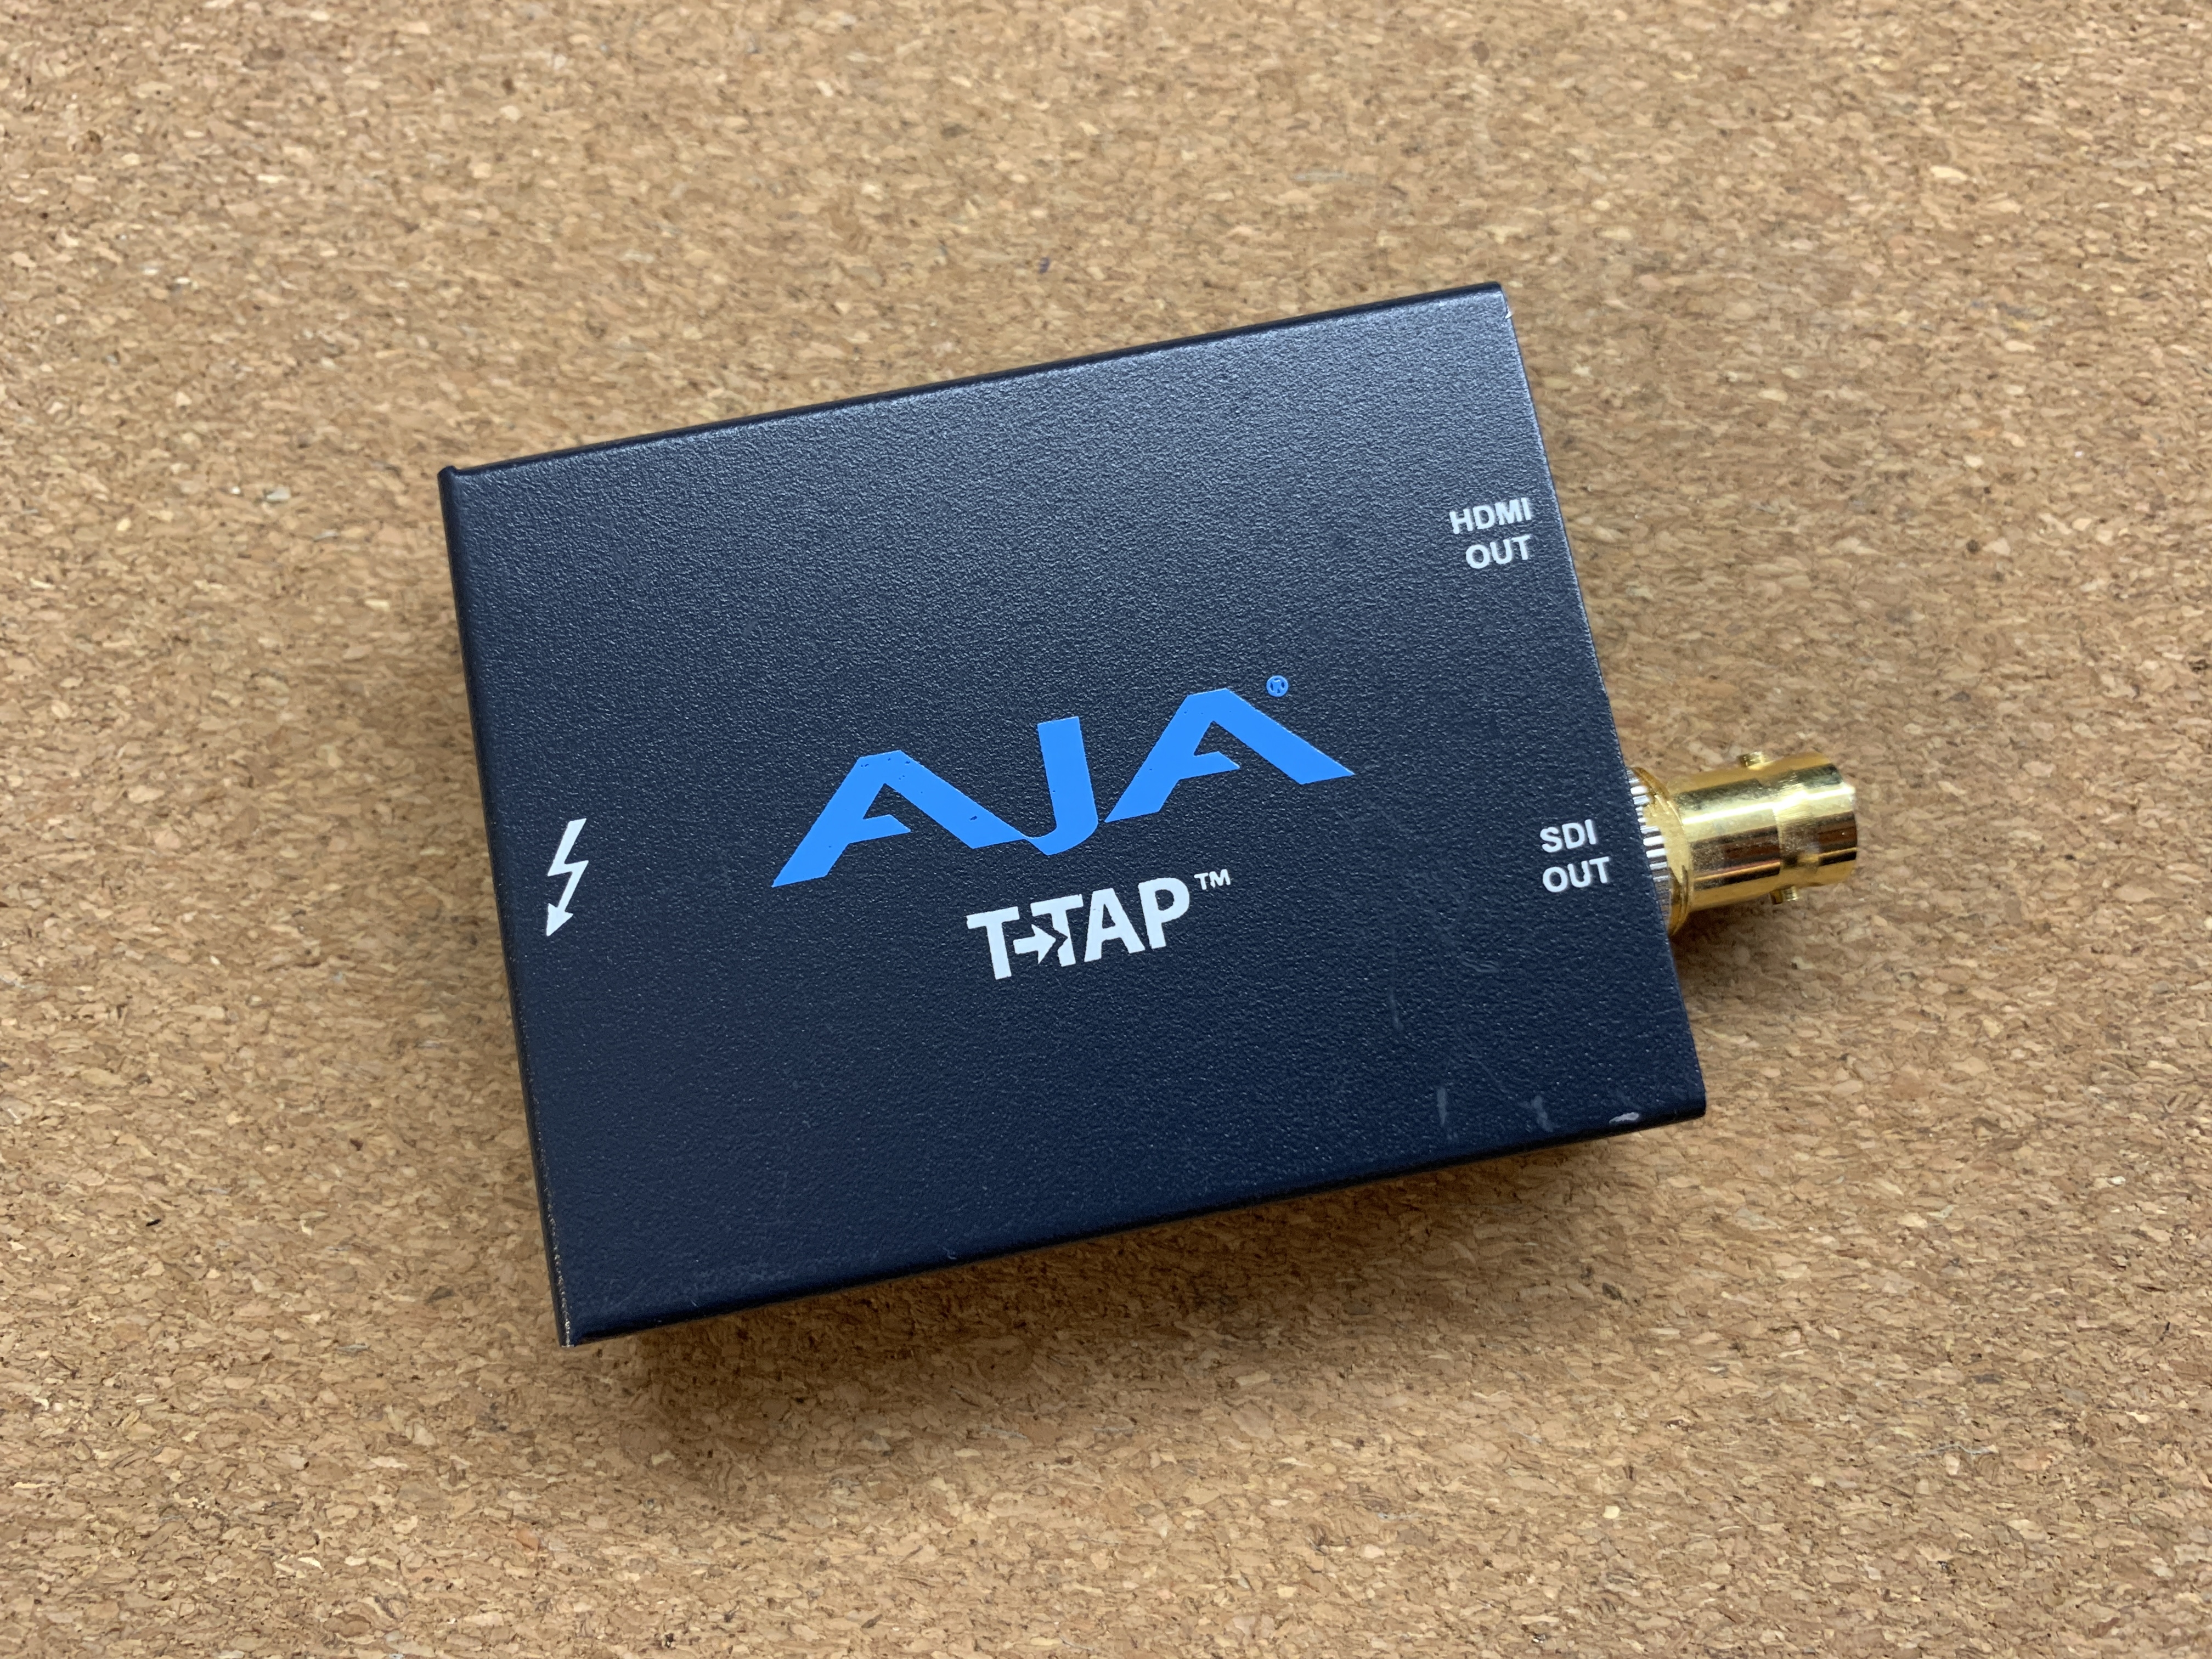
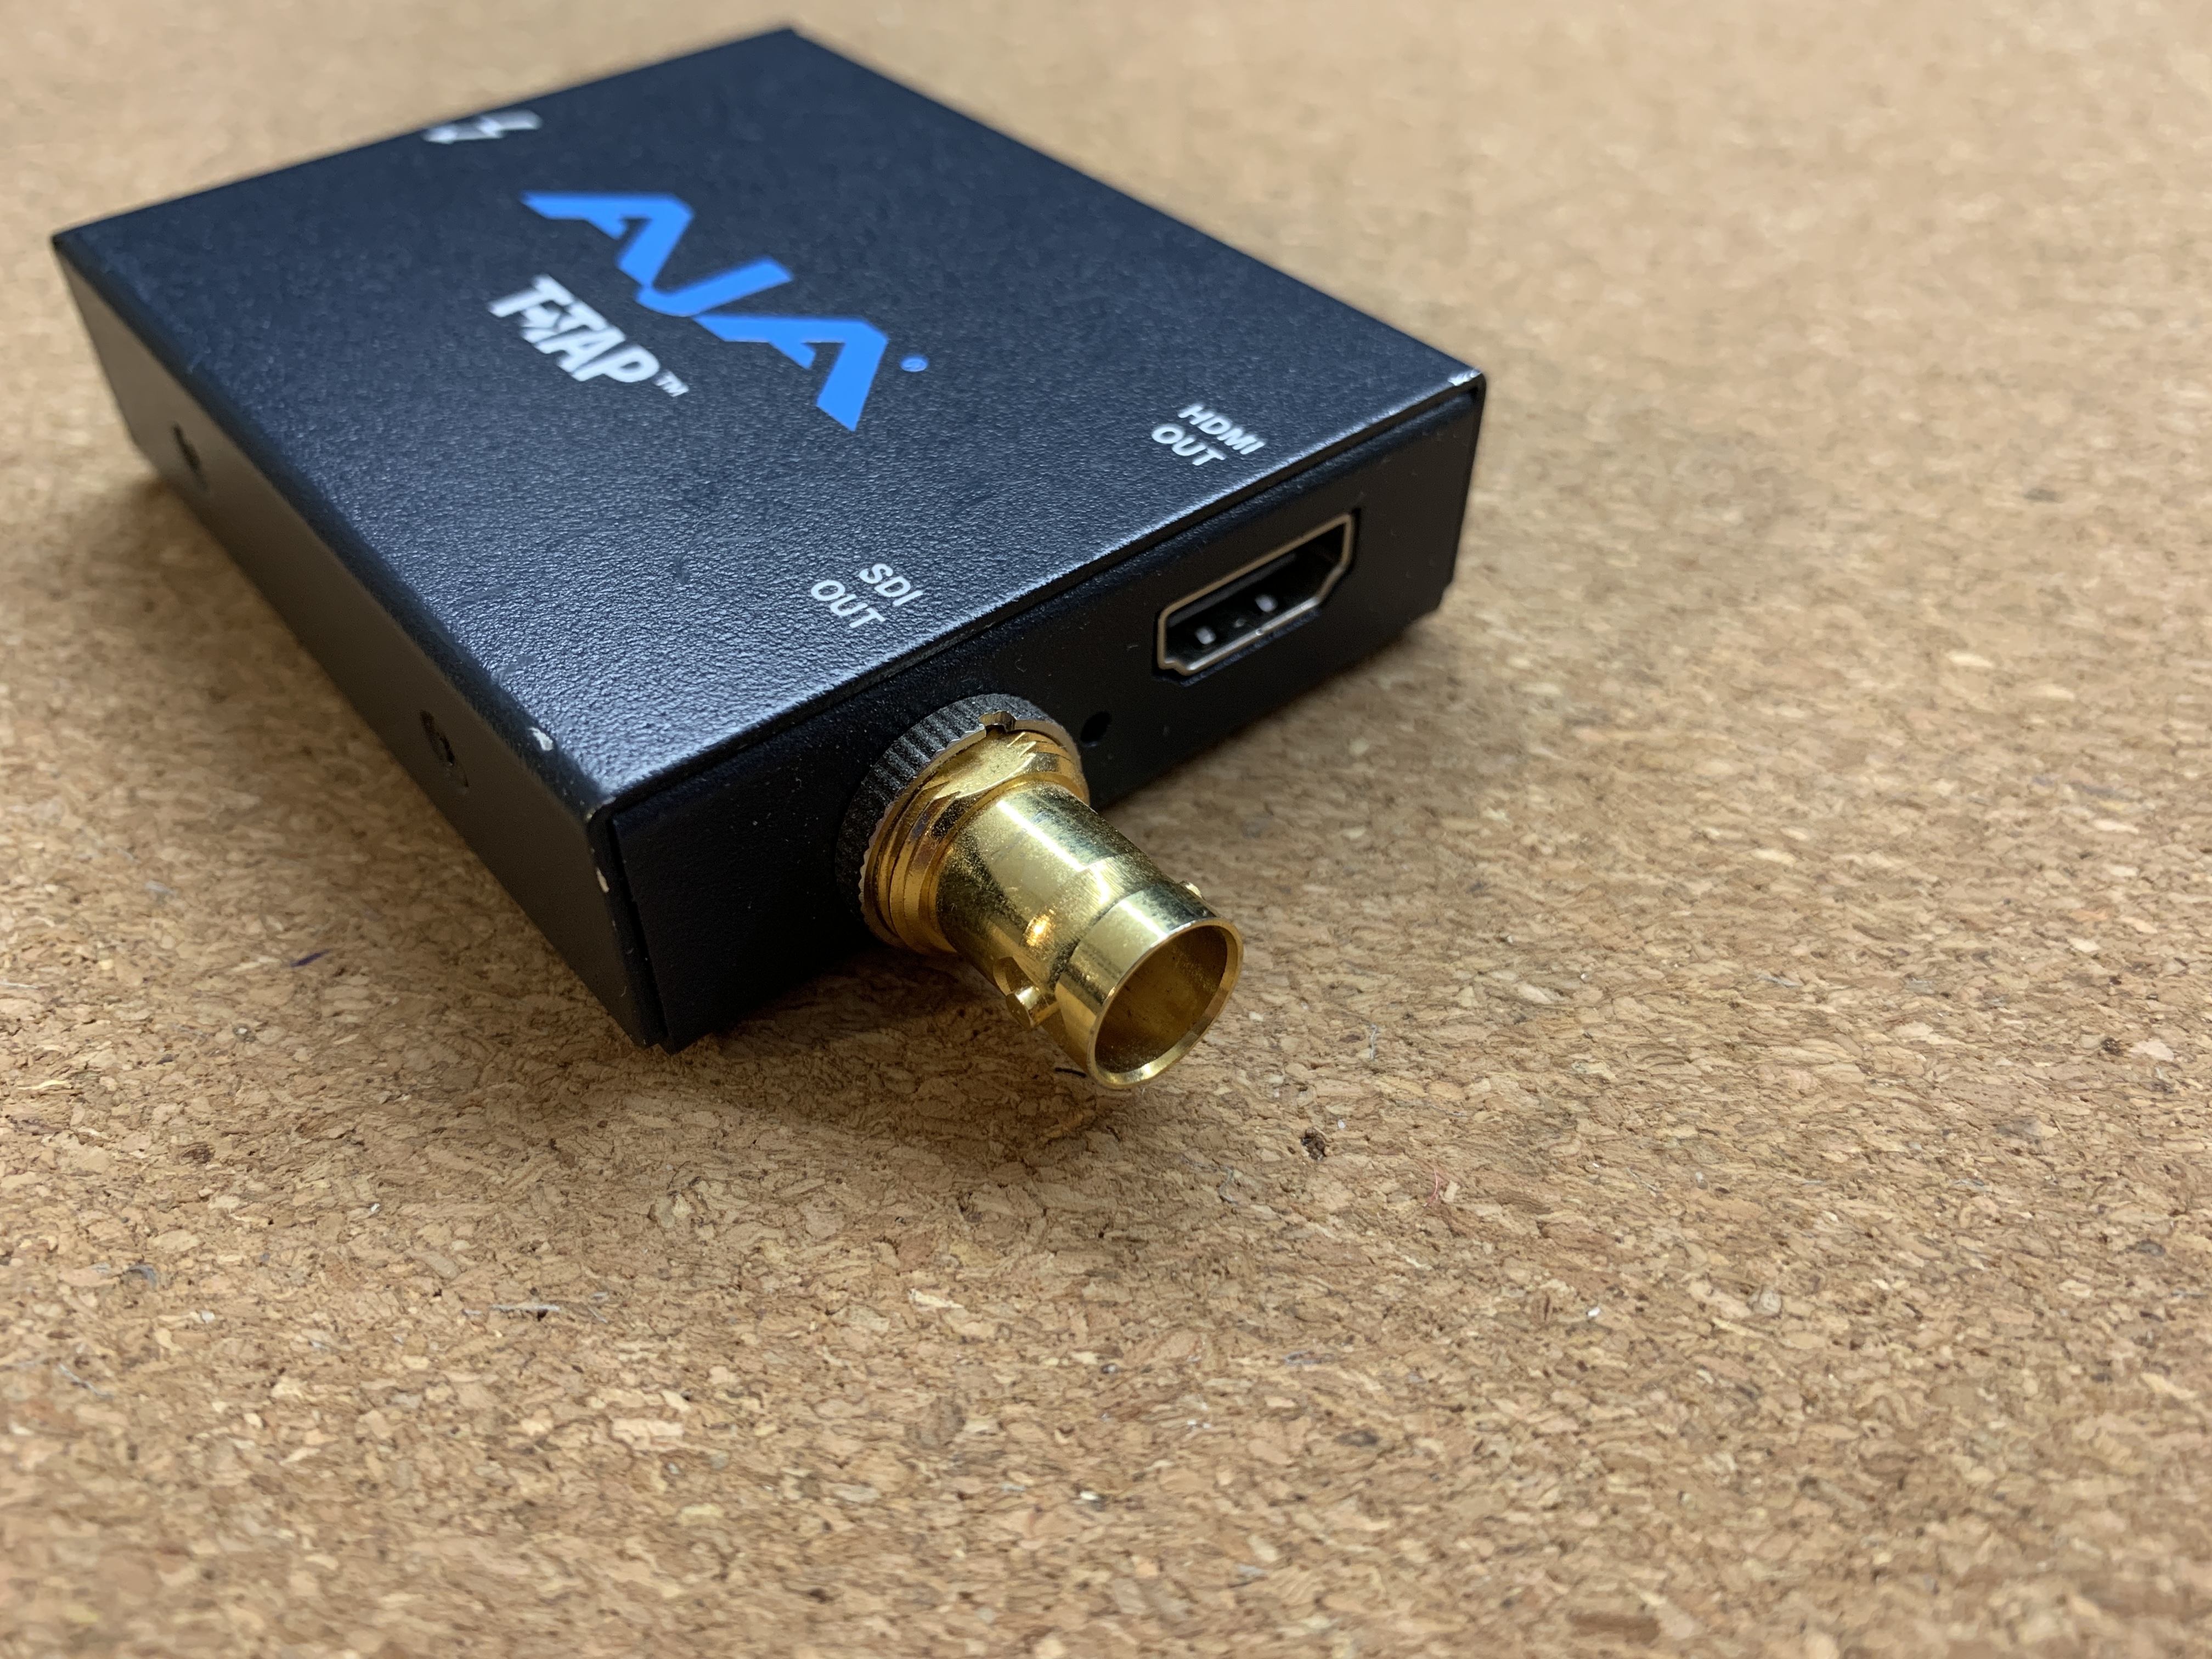
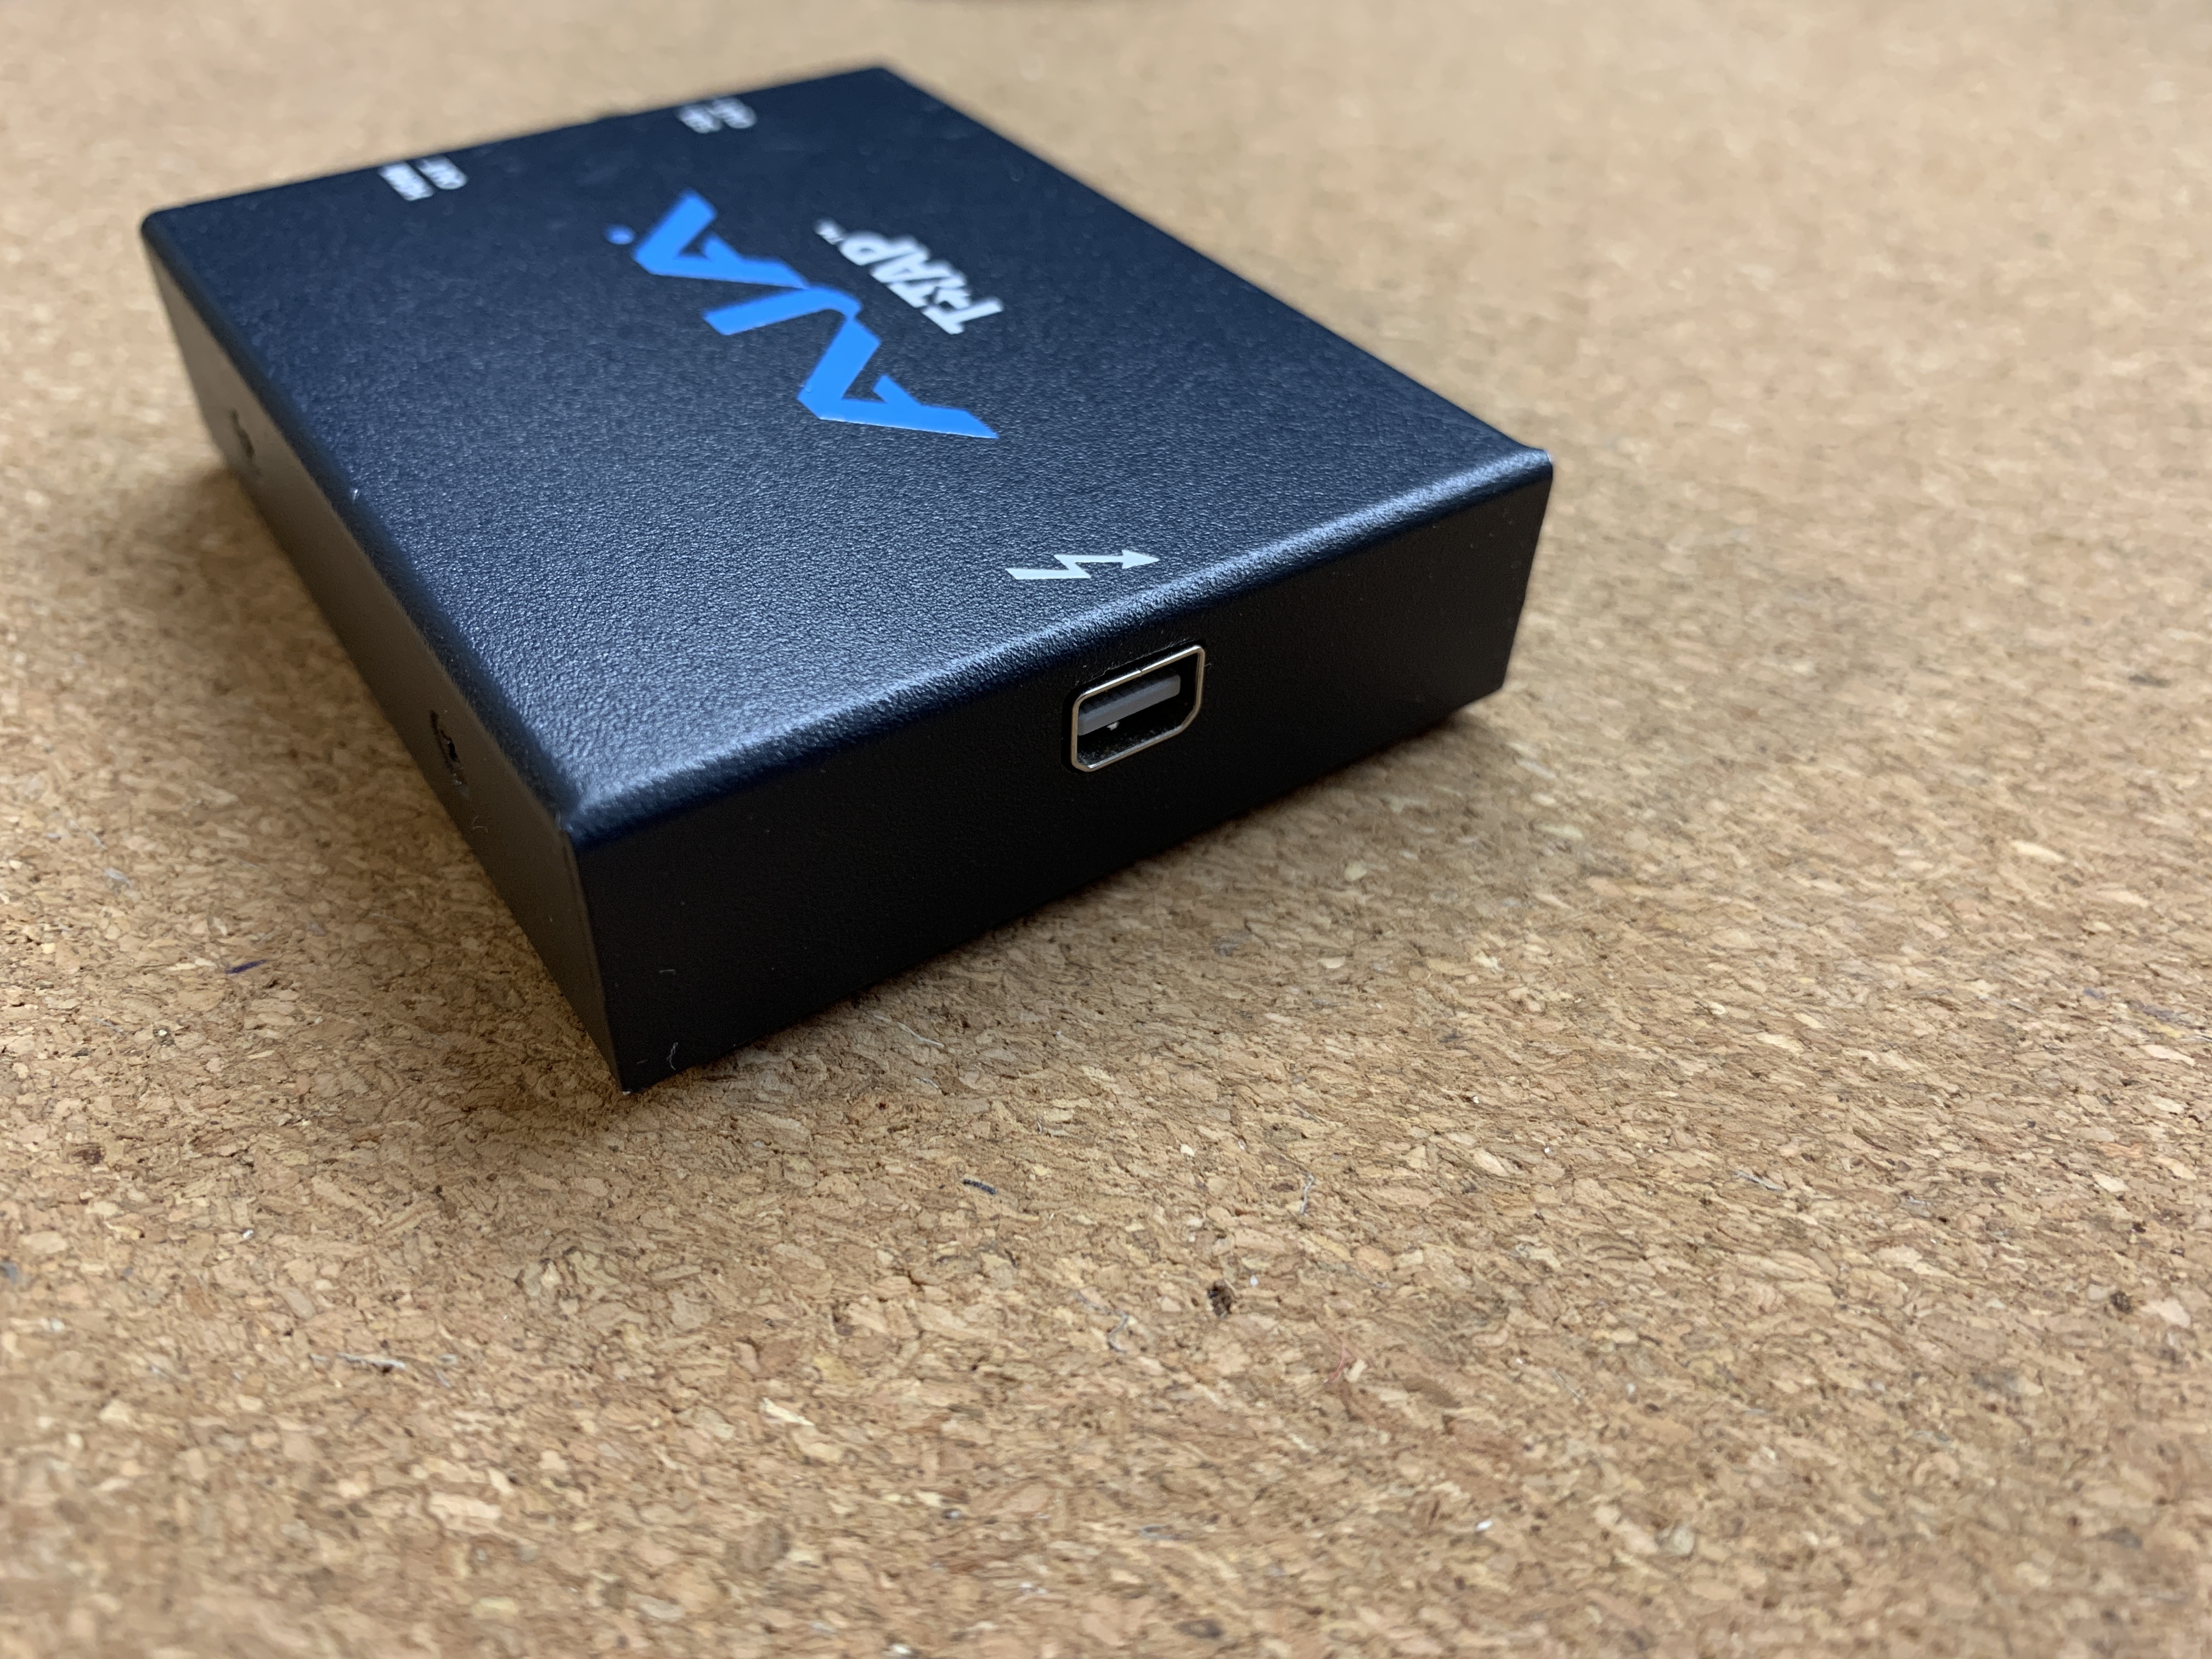
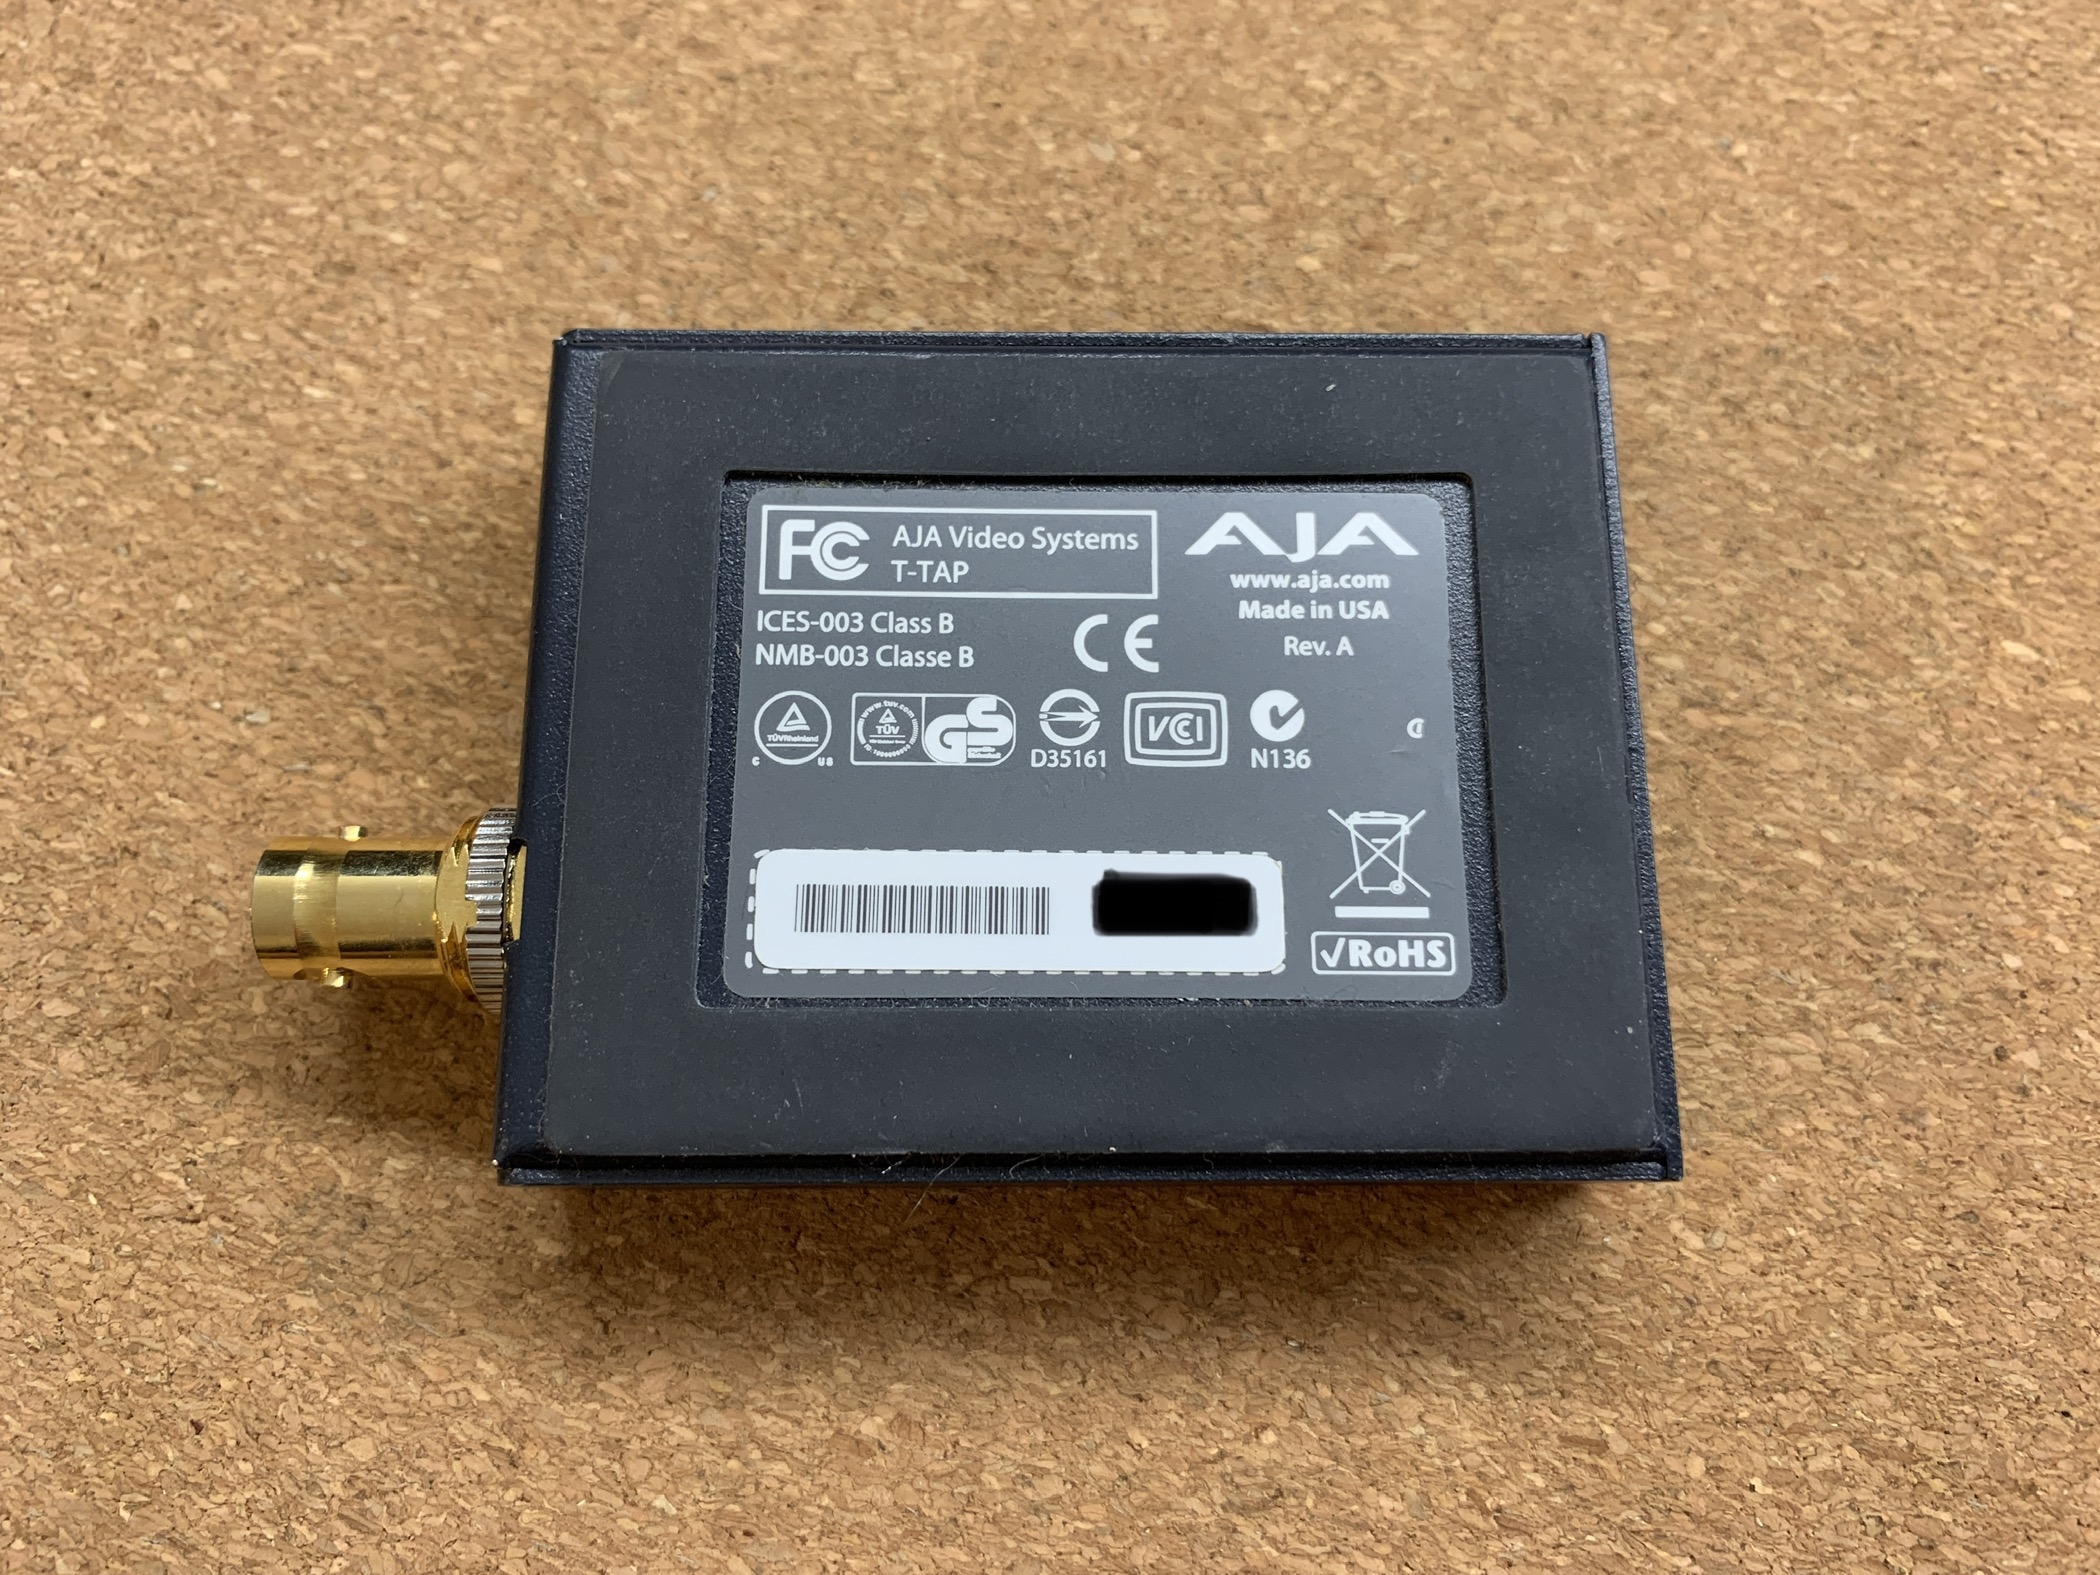
Hi there, selling my AJA T-Tap. Works 100% - barely used. Has also been tested with latest driver v16.1 on M1 Max / macOS Monterey using a TB2 ==> TB3 adapter. Asking 190€ - free shipping inside the EU. Device is located in Munich, Germany. Edit: Sold. Cheers, Mazze
-
Hey friends, we just released v9.4 of SCRATCH, Play Pro, Live Looks and Live Assist. Here's what's in: Main Live FX – Live Composition and Virtual Production. This is a new product and toolset within the Assimilate Product Suite. The product has its own release notes, available here. The product is currently still in a beta phase, where we encourage everybody to participate in. Full support for the Apple M1 Silicon. Editor update. The Editor has a new set of edit modes that align better with existing editors. The drag/drop model for multi-tracks has been improved and includes functions to prevent creating freeze frames by exceeding in-/out point ranges. Note that in the User Preference for the Editor you can switch the option back on to allow range settings beyond a clip's media size. To utilize the HDR capabilities of new computer screens and dual head monitors / tv’s, the advanced settings "Extended Dynamic Range for OpenGL for UI / Dual Head” were added. These settings ensure that the output is not clipped and can be interpreted as HDR. The settings have a slightly different effect on Windows and the Mac. On Windows the effect on the display of the UI controls is slightly more prominent. After enabling advanced setting you update the colorspace and EOTF of the corresponding monitor. For the Mac set the monitor colorspace to the actual colorspace of the monitor (P3, Rec2020) and the EOTF to a Gamma 2.2. On Windows the monitor should be set to sRGB with a Scene Linear EOTF. The operating system will then do proper HDR transform. Color Update to ACES v1.3, including an option in the project settings to select between versions. Existing projects by default stay on v1.1. ACES v1.3 contains a series of new (P3) HDR transforms for different brightness levels. The software uses the Max Luminance settings in the HDR Mastering parameters in the Project Settings to select the suitable transform. Upgraded the OCIO plug-in to use OCIO v2. A Qualifier update with a number of new controls and the controls split over 2 tabs. A new de-noise option as a pre-keyer filter. New Clip White / Black options as post-key operations. The possible range of the Expand option has been substantially increased (do note though that higher values do affect performance). Added a new layer matte Copy blend mode, which causes that the only alpha passed is that which is generated by the layer itself. Added a new Matte Wrap plugin to create a matte for a light-wrap effect. Add the plug-in as matte on a layer after the keyer layer by selecting the Matte section in the Fill/Matte menu before opening the plug-in browser. Navigate the node-tree to get to the plug-in controls to set the size and gain of the Matte Wrap as well as the option to expand it outward or inward (Invert). To indicate even slight changes, the color-balls now show a tint in the middle area when a grade is applied. Added an Unlink colorspace/eotf advanced setting to prevent automatic update of the EOTF when selecting a color space. CIE plot did not always use linear XYZ as input. In the CIE plot settings you can now set both a colorspace and EOTF override used for the CIE plot. Formats / Media Added an "Auto" options for selecting the audio channels when exporting ProRes, DNxHD and H.264/HEVC. When Auto is enabled the number of audio channels being exported is the same as the number of audio channels in the source files. Implemented dynamic per-frame metadata for Sony Raw media which includes e.g. the posture angles (pitch / roll). Video IO / Monitors The Video IO panel can now be opened directly from the start screen. The output latency has been reduced. An advance setting to override the default number of pre-roll frames/buffers for video output was added. Furthermore, a separate Vertical sync option for UI and Dual-Head display was added (previously this was an implicit part of the selected sync mode). The GenLock function on the VideoIO card now automatically uses an external reference clock if available and if it is using the same framerate as the output channel is set to. All output channels are now synchronized. VideoIO devices are now hot-pluggable and settings can be updated while inside a project without the need for a restart. The startup logo and reference monitor splash screen could show too bright on HDR displays. The display now takes into account the EOTF settings for the display. Alternatively you can force the startup logo display in HDR PQ by enabling the corresponding advanced settings. Furthermore, the text display on the splash screen has been improved if the Video IO or Dual Head screen size differs from the UI screen. Note that the changes in the VideoIO setup also had consequences for external applications that use this functionality – like e.g. external software scopes. Check with the vendor of that software if it already supports the new VideoIO interface of the Assimilate Product Suite. Product Specific Play Pro now also shows the Metadata entry panel in the project tree to enter metadata used in various reports. Added the paste options panel, including the Paste Forward function to Play Pro. The record-state did not always come through properly when using Teradek Bolt wireless equipment. You can now specify Teradek as the source (rather than the camera type) to ensure that the Auto record option works. Added Brompton as LUT box option in Live Looks and Live Assist to control the look on a video wall. This function can apply a (LUT) grade to one or multiple Tessera video wall controllers from Brompton Technology. Fix on the image capture function from the IS-Mini 4k LUT box for Live Looks / Live Assist. Tools The Sync-player function can now handle longer computer names (mac-os recently extended the potential size of computer names). This does mean that you no longer can sync with older version systems. Added F1 - F5 function keys to the Remote Control function. These functions can dynamically be assigned to specific functions in the Remote Control panel. Camera The Camera menu has been updated to accommodate various functions for the Live FX toolset. In general these changes do not affect compositions in a post-production / non-live context unless the virtual camera was explicitly used. The main change is that the virtual camera is no longer specified in just a (vertical) Field of View but rather with a Focal Length settings and Sensor Size (width, height and crop), which together determine the Field of View. The default values in the new setup differ from the original Field of View default. The virtual camera position is now specified with an origin position and an offset (which can be animated). The Far-Plane setting in the new setup is dynamically adjusted, which prevent the issue that layers could end up ‘behind’ the far-plane and effectively become invisible with very high resolution media (>8k). Misc Added the SHA1 and xxHash64 checksum options next to md5 in the Construct consolidate. The Consolidate report to show the Checksum type that was used in with the timeline consolidation process. Importing still images automatically get a user defined length. The default length can be set in the Preference panel of the Editor. The Import function of the Animation Editor now allows loading in general csv files with animation data. New Lens (Un)distort plug-in. Update of the camera menu (to align / accommodate various Live FX functions). Playback is no longer stopped when minimizing the app (on Windows - macOS already had the correct behavior). Added a "Relative" option to the layer-Canvas setting. The startup screen now shows more specifically which modules are licensed. Some of the Assimilate plug-ins did not properly pass the alpha of their input. Use Ctrl + Shift + Arrow to move 10 frames. The exact number of frames can be set in the player preferences panel. Search function enhancements where you can specify the metadata item to search for: e.g. 'scene 01a' searches all scene metadata fields for the value 01a* The in/out parameters on the Fill/Matte menu can now show as a timecode. Added the [Note Delete] panel mapping to delete the note of a shot at the current play position. Download from HERE. Something to play around with during the holidays 😉 . Cheers! Mazze 9.4_out_now.psd
-
Depending on how much "bleeds" outside of the P3 gamut, it could simply be RGB vs. YUV. Inside Resolve (or any DI system for that matter, with very few exceptions) all is RGB-based and so is your measurement. When you then render out to a YUV based codec, the encoder used will convert the RGB data to YUV. That conversion might introduce certain "spikes" that reach outside of the defined gamut. Vice versa, when pulling the rendered result back in, the first thing that happens right after the decode, is a YUV to RGB conversion. Effectively you now have two conversions in between your two measurements. You can check against by exporting the original timeline as RGB DPX and pull those back in and analyse. If they are a 100% match (as you're not going to YUV and back again with those) - the culprit lies with the YUV conversion, and can't be avoided. Cheers, Mazze
-
Hey people, as some of you might know, the original foam inserts to fit Tangent's Element panels into a Peli Case 1510 ceased production around 2017 or so and have been unavailable since. Reason enough for me to look into producing them again, as demand was still there. I have now started a small production batch with an estimated shipping date of december 1st. Pre-order (incl. a small discount) is up now and will last until Nov. 28th 🙂 . https://www.angry-face.com/foam-inserts-for-the-peli-case-1510-are-back/ Cheers, Mazze
- 1 reply
-
- 2
-

-
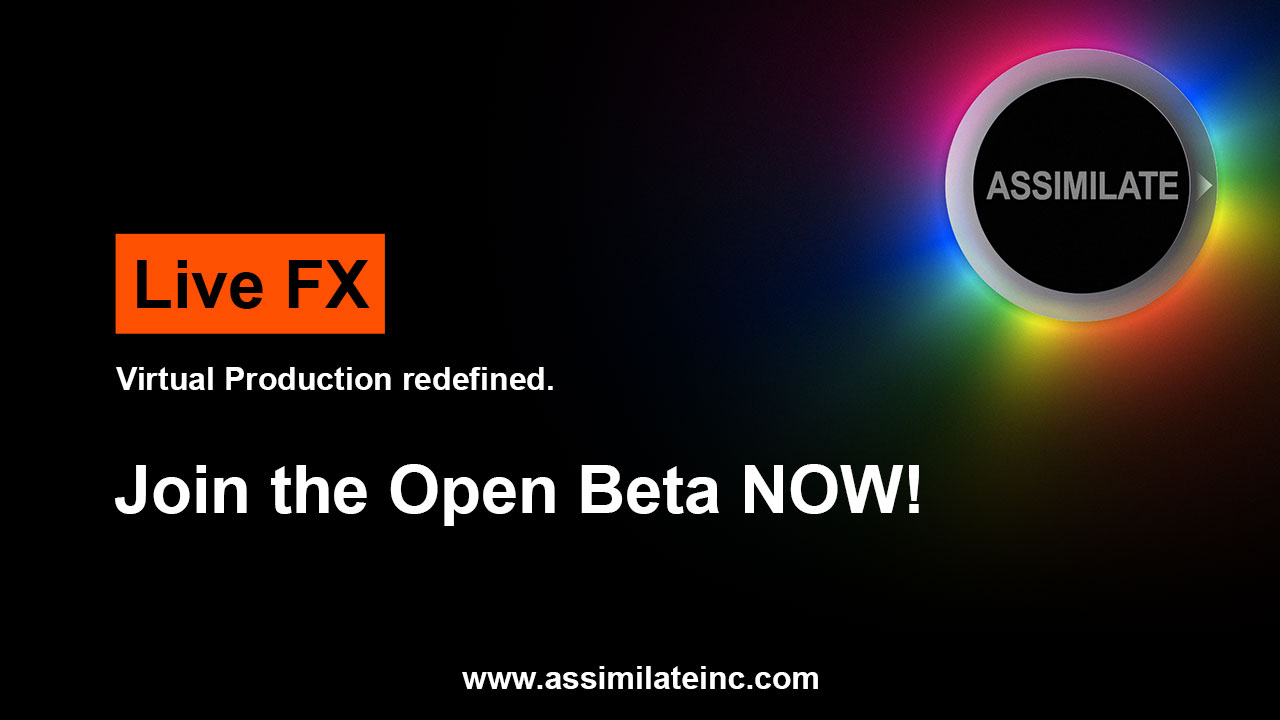
Hi people, we've been working on a new software for virtual production over the past couple of months. As of today, Assimilate Live FX is out in open beta. It does a whole lot of stuff - from compositing over camera tracking to LED wall control and DMX lighting control. We've defined a few workflows that we found made the most sense. But given how much this still is a pioneering field, we also threw in a bunch of tools that help defining custom workflows (which we'd love to hear about and possibly streamline those as well). So, if you wanna know more about Live FX - head over the Assimilate webpage: https://www.assimilateinc.com/products/livefx/ From there you can also register for the open beta. We also created a small tutorials series to get everyone started asap. 6 videso with each being around 10 mins long: https://www.youtube.com/watch?v=YX7Ds7eNFLg&list=PLMHM5FmtrBBOXhjMfaLV7y58fEYSEkDxp&index=2 And if you have any questions - you know where to find me 😉 . Cheers, Mazze
-
Brand new to Scratch, so many questions right off the bat =D
Mazze replied to Rinaldi Ambiroa's topic in Scratch
Hi Rinaldi, on 1) Not sure - it seems to work fine here. What resolution is your footage, what resolution is your timeline / main output node and which other tools (like e.g. scopes) do you have opened, if any? on 2) Note that the scaling in the viewport is not a high quality algorithm. Check the footage on a reference screen or display it 1:1 to judge edges and such. SCRATCH does not make things look nice without being asked - it rather shows what's actually there. on 3) To the left of the playback controls is a button to set playback to once/loop/bounce. Shift + Enter does that as well. Control-clicking that button (or using Ctrl + up/down arrow keys) changes playback speed. Hit "R" (or the Range button to the right of the playback controls) to set the playback range to the current clip. Cheers, Mazze -
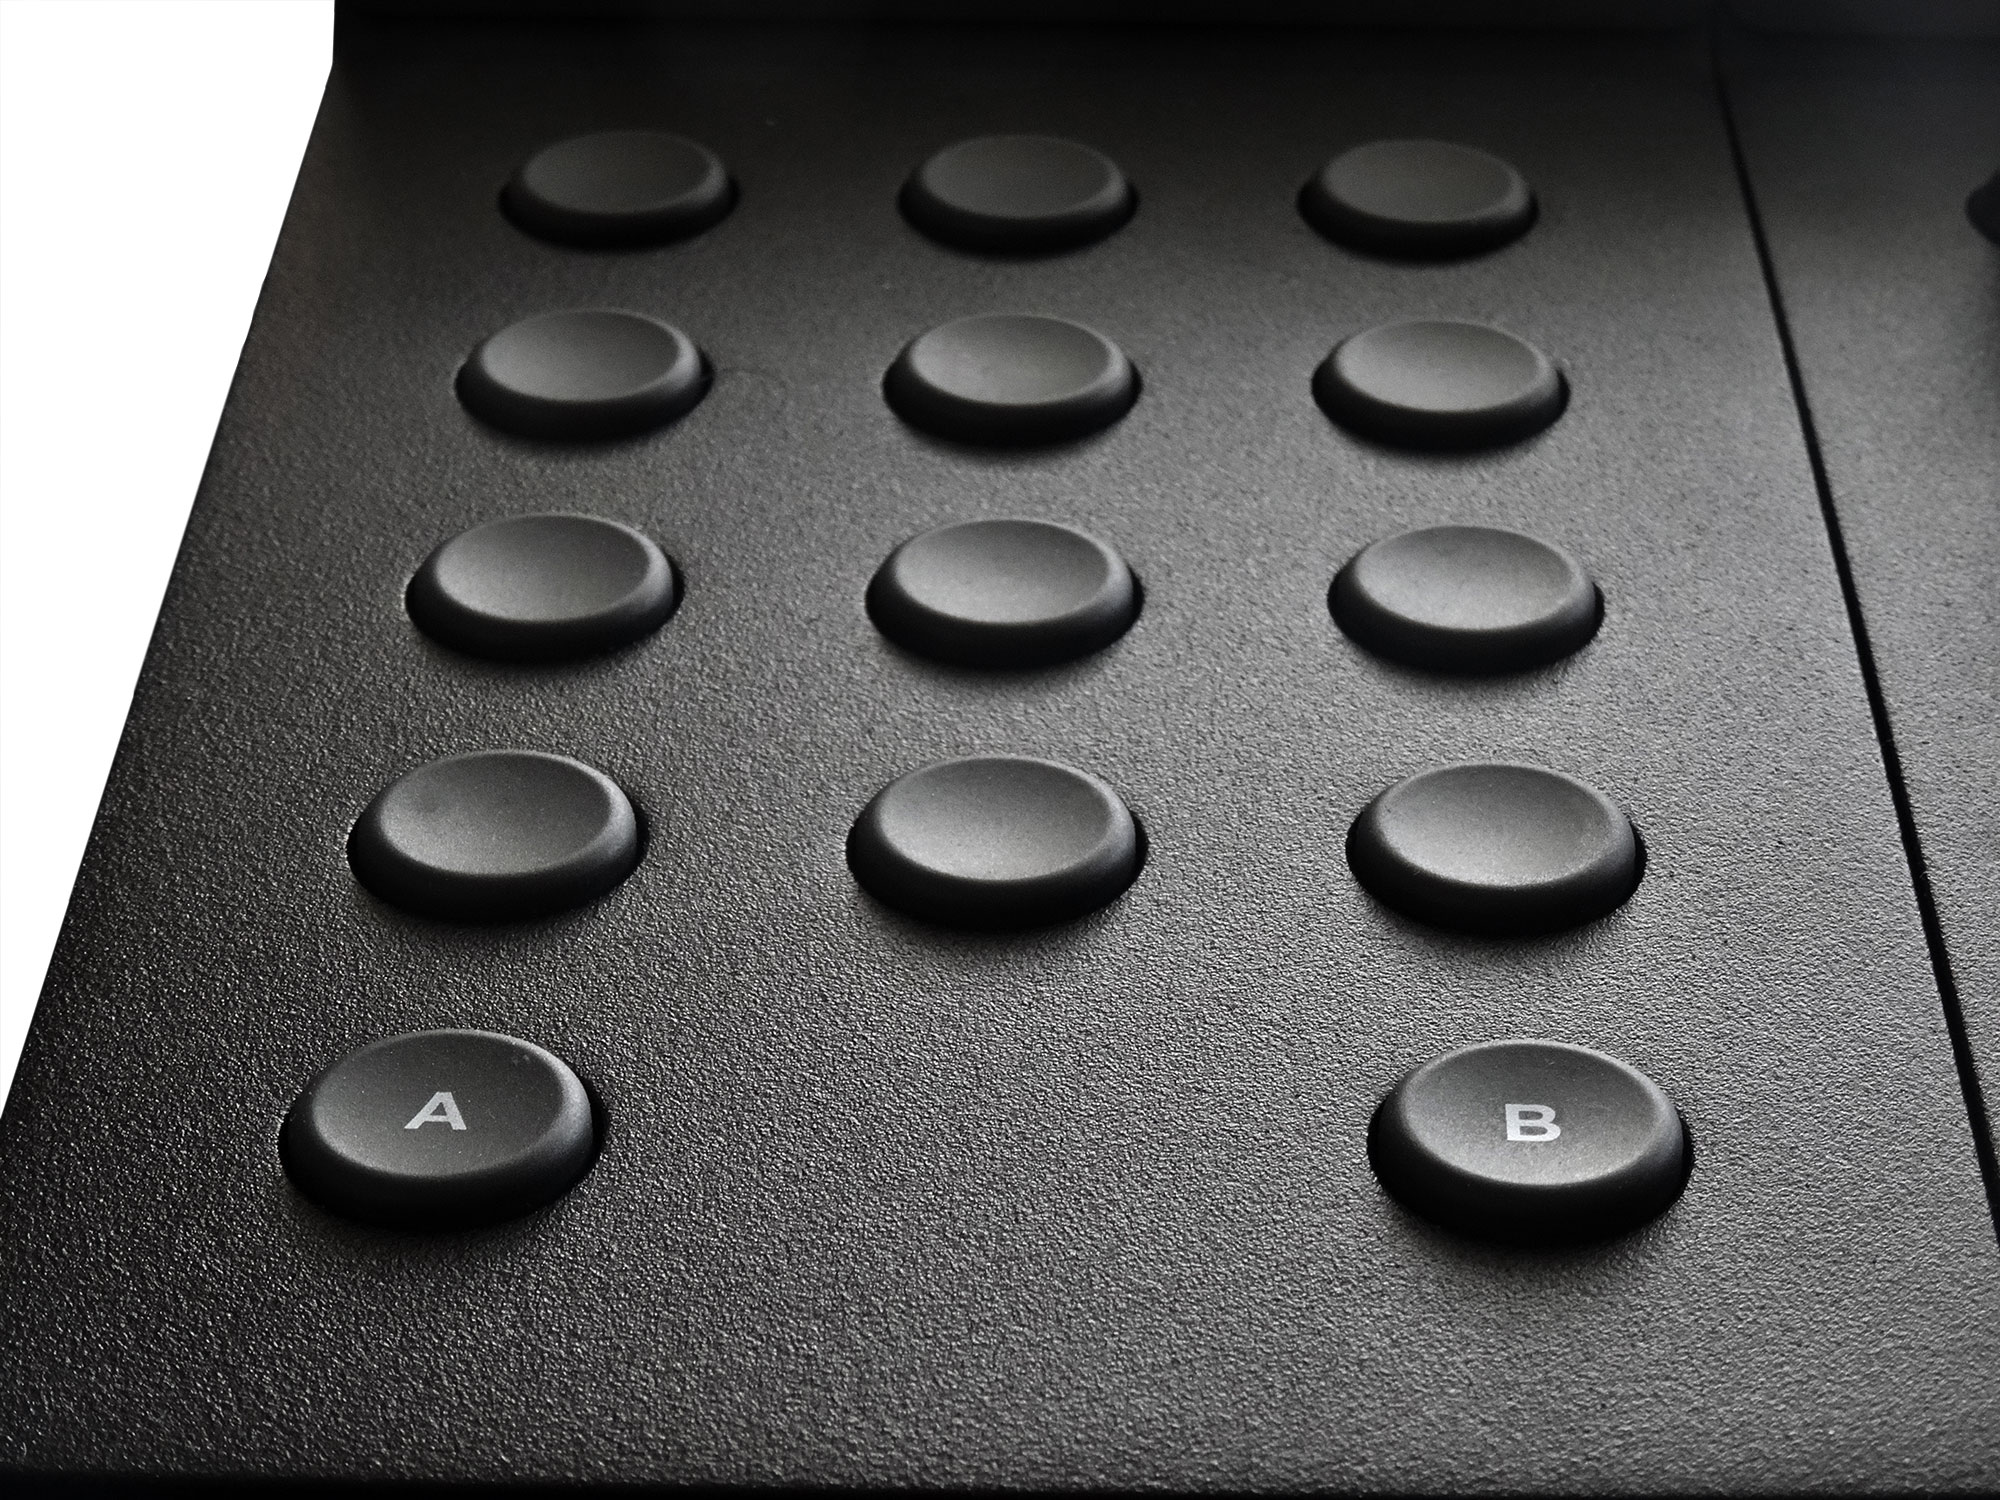
Hey everyone, I'm happy to announce that as of today, all Tangent Element panels sold by Angry Face will have a powder coated fine structured finish, instead of the old softcoating! But there’s more – we are proud to present you: The Tangent Element Black Edition! Included in this bundle of powder coated Elements are our black aluminium rings, dark-petrol metallic trackerballs and our custom black rubberized knobs – all for just 2850€ (excl. VAT). And for everyone who already has a set of Elements – we got you covered with our Refurbish offer – incl. optional upgrades for rings, trackerballs and knobs! Cheers! Mazze Here's a few pictures:
-
Hi everyone, here's a tutorial showing how to set up the integration between Hedge and SCRATCH, so after a successfull offload, Hedge will automatically create a timeline inside the SCRATCH project and populate it with the backupped media, so it's ready for QC, audio sync and transcoding. For the engaged DIT, there now is a nicely priced bundle, containing - Live Looks for live grading - Hedge for offload & backup - SCRATCH for dailies transcoding & reporting https://www.assimilateinc.com/products/scratch-for-dailies/ Cheers, Mazze
-
This video is sort of the follow-up tutorial to the one about frame-based metadata and transcoding to OpenEXR. Today we're looking at how to load and conform an EDL from Avid, and automatically pull the vfx-shotnames, which are included in the EDL as markers (or 'locators' if you prefer) and replace the original clipnames with the new vfx-shotnames, before transcoding the camera RAW incl all its metadata to OpenEXR. Good stuff, people. Cheers! Mazze
-
Frame-based metadata and how to forward it from camera RAW into OpenEXR. Enjoy 🙂 . Cheers, Mazze