

Lowepost
-
Posts
765 -
Joined
-
Last visited
Content Type
Profiles
Articles
Articles - Premium
Resources
Insider
Courses
Forums
Store
Everything posted by Lowepost
-
Professional Color Grading Techniques in DaVinci Resolve
Lowepost commented on Lowepost's course in The Art of Color Grading
Thanks for your kind words! Sorry about that missing clip, we have updated the folder now. Thanks for letting us know! -
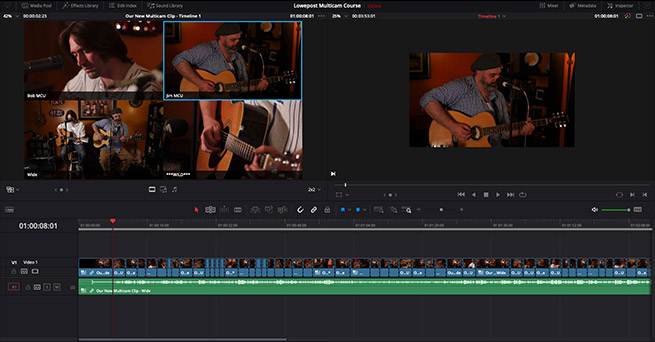 Learn everything you need to know about multicam editing in DaVinci Resolve with the award-winning editor Kevin P. Mcauliffe. DaVinci Resolve has quickly become the application of choice for many editors and the multicam features are both innovative and lightning quick to work with. Kevin will teach you how to synchronize camera angles based on in- or out-points and timecode, but also by analyzing audio sample plots. You will learn how to use metadata for name and angle information, offset and switch single camera angles, work with linecuts and pre-grade entire camera angles. You will also get acess to the footage you need to follow along and an extra performance to play around with. Download project files About the instructor Kevin P McAuliffe is an award winning editor and visual effects creator with over 20 years of teaching and training experience. Over the past years Kevin has delivered world-class work for clients such as Warner Bros, Walt Disney Company, 20th Century Fox, Universal and Elevation Pictures. Who is this course designed for? DaVinci Resolve users Editors with background from Avid Media Composer, Premiere and Final Cut COURSE OVERVIEW 01: Introduction 02: Project creation and keyboard shortcuts 03: Clip setup 04: Multicam preparation 05: Timeline creation and editing multicam clips 06: Multicam editing 07: Grading multicam clips 08: Working with linecuts 09: Finishing up
 -
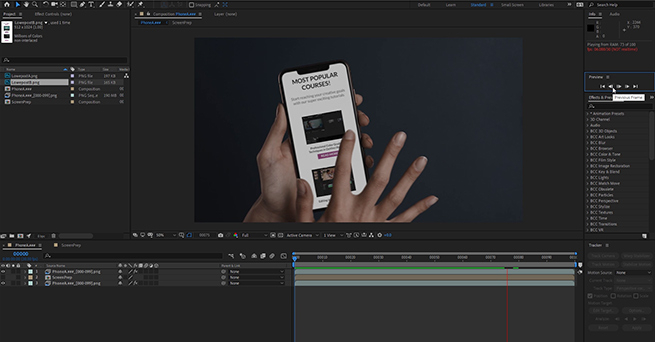 In this course you will learn all the techniques you need to do a perfect screen replacement regardless of the difficulty level of the shot. Instructor Lee Lanier will walk you through different approaches on a variety of screens with several challenges such as out of focus screens, hidden corners, motion blur, hands obscuring the screens, missing reflections and much more. These strategies will help you solve the most complex shots inside of After Effects & Mocha. The footage and assets used in this course is available for download. Download project files About the instructor Lee Lanier has created visual effects on numerous features films for Walt Disney Studios and PDI/DreamWorks. Lee is a world-renowned expert in the video effects field, and has written several popular high-end software books, and taught at the Gnomon School of Visual Effects in Hollywood. Who is this course designed for? Finishing artists Compositors
 -
 John Daro is a world-renowned senior colorist working at Warner Bros in Los Angeles, and in this masterclass you are invited into his color suite. John has color graded feature films and tv-series for all the major studios in Hollywood and will teach you techniques and strategies that will help you become a better colorist. The course is about the art and craft of color grading and is not designed to teach the operations of a specific software. All the footage used in this course except for the bonus lesson is available for download. Download project files About the instructor John Daro is a world-renowned colorist that started his career at FotoKem in Burbank, Los Angeles. At FotoKem he pioneered post production techniques and was one of the original colorist team members which led FotoKem to be one of the top post production houses in the world. Now John is working with color grading feature films and tv-series at Warner Bros in Hollywood. Who is this course designed for? Colorists COURSE OVERVIEW LESSON 01: COLOR CORRECTION In this lesson John teaches how to balance and match images using printer light techniques. He explores ways to work with exposure, contrast and saturation to preserve the original intent of the photography. Strategies related to black- and white levels, gamma work and color biases are also discussed. All the shots John is working with are available for download. LESSON 02: COLOR GRADING John moves on to discuss story telling and the creative decisions behind a the color grade, and walk through the process of creating great looking images and creative looks. LESSON 03: SKIN TONES (BONUS LESSON) In this bonus lesson John talks about different approaches to separate skin tones, and gives a solid approach to build an HSL key for isolating skin tones.
- 29 comments
-
- 34
-

-

-
masterclass_promo.mp4
-
Introduction to visual effects in DaVinci Resolve Fusion
Lowepost commented on Lowepost's course in Introduction
Hi Joshua. I recommend that you have a look at the chroma keying course as that will answer all your questions. There are several ways to prepare the footage for a good key and could all be done inside of Fusion. -
Masterclass in Color Grading with Derek Hansen
Lowepost posted a course in Color Grading Masterclasses
 Derek Hansen is one of the most successful colorists in Los Angeles, with experience from high-end commercial work at MPC, The Mill and Arsenal Creative. In this masterclass you are invited into his color suite to watch how he creates great looking images and discuss workflow, techniques, creativity and strategies that will help you become a better colorist. The course is about the art and craft of color grading and is not designed to teach the operations of a specific software. The footage used in this course is available for download. Download project files About the instructor Derek Hansen is a world-renowned colorist with background from MPC, The Mill and Arsenal Creative. He has crafted images for many top directors such as Gia Coppola, Young Replicant, Luke Monahan and Brian Buckley, and graded music videos for artists such as Miley Cyrus, St. Vincent, J. Cole and Mehan Trainor to name a few. Who is this course designed for? Colorists COURSE OVERVIEW LESSON 01: COLOR SETUP AND ANALYZING THE SCENE Derek is setting up the color workflow and analyzing the scene. LESSON 02: PRIMARY BALANCE Starting with the primary balance and discussing the importance of it. LESSON 03: ORGANIZATION AND RIPPLING Discussing layer organization and grade rippling. LESSON 04: BALANCING Balancing and discussing all the decisions to be made when it comes to brightness and exposure. Dealing with challenges such as thin images and sharp highlights. LESSON 05: REFERENCES Analyzing the references from the client and preparing for the look creation. LESSON 06: CURVE MANAGEMENT In this lesson Derek recreates some of the characteristics of Kodak Eastman, and use techniques to compress the midtones and control the highlights. LESSON 07: DEEP SATURATION Continuing the work of recreating the Kodak Eastman look, compressing the image with hue curves and creating deep rich saturated colors. LESSON 08: HUE SHIFTING Pushing and hue-shifting the individual colors to bring the colors into harmony and create a stronger look. LESSON 09: RED TONES Finessing the look by bringing in the red film tones. LESSON 10: SECONDARY WORK Finishing it all up with some shadow, highlight and skin keys to create a better match.
- 27 comments
-
- 48
-
-
-
Professional Color Grading Techniques in DaVinci Resolve
Lowepost commented on Lowepost's course in The Art of Color Grading
-
Learn essential and advanced chroma keying techniques in our new DaVinci Resolve Fusion course! This course will prepare you to take up any complex task such as poorly lit green-screens, spill issues, fine details, reflections, tracking marks, soft lenses, and much more with confidence. Read more here
-
Professional Color Grading Techniques in DaVinci Resolve
Lowepost commented on Lowepost's course in The Art of Color Grading
Yes, all the shots are included. Also a set of power grades and a grain sample. -
Hi Anders. We stopped and did some look lessons in the professional color grading courses instead. When it comes to our plan for color grading and look creation training we will release a masterclass with one of the top colorists in Hollywood before the summer.
-
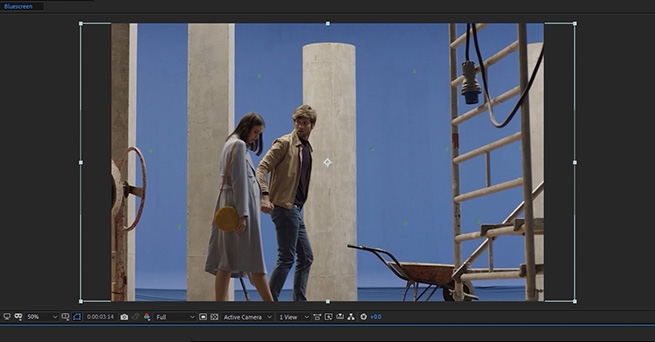
 In this course you will learn essential and advanced chroma keying techniques in DaVinci Resolve Fusion. Instructor, Lee Lanier explores a range of techniques to give you the tools you need to create the perfect key, over and over again. Lee will solve complex shots with poorly lit green-screens, spill issues, fine details, reflections, tracking marks, soft lenses, and much more. Typical shots you have to deal with in production. Chroma keying can be a very time-intensive process that ends with a bad result, but the techniques you will learn in this course will prepare you to take up any complex task with confident and deliver a good result. The chroma keying course is taught by Lee Lanier which has written several books on the topic and teached chroma keying techniques at the Gnomon School of Visual Effects in Hollywood. The footage and assets used in this course are available for download so that you can easily follow along. Download project files About the instructor Lee Lanier has created visual effects on numerous features films for Walt Disney Studios and PDI/DreamWorks. Lee is a world-renowned expert in the video effects field, and has written several popular high-end software books, and taught at the Gnomon School of Visual Effects in Hollywood. Who is this course designed for? DaVinci Resolve users Compositors Finishing artists Lessons overview 01: Introduction 02: Chroma Keyer 03: Ultra Keyer 04: Luma keyer 05: Delta keyer 06: Spill supression 07: Keying bluescreen 08: Removing tracking marks 09: Combining keyers 10: Additional matte inputs 11: Custom luma masks 12: Keying in color tab 13: Sending a matte to the color tab Software required DaVinci Resolve
 -
 In this course you will learn essential and advanced chroma keying techniques in Adobe After Effects. Instructor, Lee Lanier will explore a range of different techniques to give you the tools you need to create the perfect key, over and over again. Most of the time will be used inside of After Effect's Keylight, which is the go-to-keyer for many compositors, and Lee will solve complex shots with poorly lit green-screens, soft lenses, blonde hair details and much more. We know this is what you have to deal with in production. Chroma keying can be a very time-intensive process that ends with a bad result, but the techniques you will learn in this course will prepare you to take up any complex task with confident and deliver a good result. The chroma keying course is taught by Lee Lanier which has written several books on the topic and teached chroma keying techniques at the Gnomon School of Visual Effects in Hollywood. The footage and assets used in this course are available for download so that you can easily follow along. Download project files About the instructor Lee Lanier has created visual effects on numerous features films for Walt Disney Studios and PDI/DreamWorks. Lee is a world-renowned expert in the video effects field, and has written several popular high-end software books, and taught at the Gnomon School of Visual Effects in Hollywood. Who is this course designed for? Compositors Lessons overview 01: Introduction 02: Extract 03: Color Range 04: Linear Color Key 05: InnerOuter Key 06: Color Difference Key 07: Difference Matte 08: Keylight 09: Spill Supression 10: Adjusting Mattes 11: Matte Effects 12: Garbage and Core Masks 13: Other Spill Techniques 14: Refine Matte Effects 15: Using a Second Keyer 16: Custom Luma Mattes Software required After Effects
 -
Professional Color Grading Techniques in DaVinci Resolve
Lowepost commented on Lowepost's course in The Art of Color Grading
You should balance prior to the LUT (or custom curve) and watch the result through the LUT (or custom curve). No. You should balance prior to the curve and judge the balance by watching the corrections through the curve. -
Professional Color Grading Techniques in DaVinci Resolve
Lowepost commented on Lowepost's course in The Art of Color Grading
That's true and the reason we put the line up at about 60 IRE and not higher. The other explanation was to point out that the luminance ranges from black on the left side to white on the right side. -
This is the ultimate course for editors and conform artists who want to learn everything about conforming inside of DaVinci Resolve! With 21 lessons and almost 5 hours of in-depth DaVinci Resolve training, Kevin McAuliffe will take you through every step and technical detail of the process from conforming media to mastering the final picture. About the instructor Kevin is an award winning editor and visual effects creator based in Toronto with over 15 years of teaching and training experience. Over the past years Kevin has delivered world-class work for clients such as Warner Bros, Walt Disney Company, 20th Century Fox, Universal and Elevation Pictures. Who is this course designed for? Editors Conform Artists Colorists Software required A free version of DaVinci Resolve or DaVinci Resolve Studio. Avid. Premiere and Final Cut X are used in some of the lessons. This training series is sponsored by our friends at digitalrebellion.com
-
Professional Color Grading Techniques in DaVinci Resolve
Lowepost commented on Lowepost's course in The Art of Color Grading
It can be hard to see small differences in compressed files, so most of the corrections in all the lessons are overdone a bit to the make the result more noticeable for the viewer. That's something we mention several times in the course and we do encourage the viewers to be much more careful with the values than we are when judging the final result on the grading monitor. With this technique you should be able to even out the differences and get a great looking result without affecting the hair. Even on very complex shots with a lot of neighbouring tones. Also note that in this example we demonstrate how to play the two hues against each other to affect imbalance in the entire shot, but you can isolate the effect to affect only the skin tones if you create more separation between skin and hair in the balance node and pick more specific hue ranges. You can even apply the techniques inside of a key to isolate it even further, but in most cases you will be perfectly fine by playing the curves against each other. It will give a much cleaner result, and if you discover that some hues are affected negatively you can counter balance the shot after the hue shift with the offset. -
Professional Color Grading Techniques in DaVinci Resolve
Lowepost commented on Lowepost's course in The Art of Color Grading
Thanks for your patience. Lesson 09 (Color Harmony) is updated together with a new clip and powergrade. -
Professional Color Grading Techniques in DaVinci Resolve
Lowepost commented on Lowepost's course in The Art of Color Grading
You will have to change input color space to match the camera, in your case the Sony. The timeline color space can still be Arri Log C because you don't want your controls to behave different each time you're working with a new camera format. -
Professional Color Grading Techniques in DaVinci Resolve
Lowepost commented on Lowepost's course in The Art of Color Grading
The input color space should be set to the camera color space which in this case is Alexa Log C because Alexa footage is used in the example. When it comes to the timeline color space in general, it only affects the "feel" of the controls, so it's purely a matter of taste. From our understanding Alexa Log C is definitely the most common timeline color space used in the professional world and especially among Baselight users. -
Professional Color Grading Techniques in DaVinci Resolve
Lowepost commented on Lowepost's course in The Art of Color Grading
Thanks @James Lakey. We have seen this particular setup a couple of times, but you will quite different results by playing around in the same area, shifting hue angles and adjusting the strengths. The combination of dialing in extreme colors and mapping them to the tonal range by adjusting the strength is an extremely powerful technique that allows numerous of looks, but it can take some time to get used to. This is just an example. When it comes to hitting the numbers in general in all the lessons it's because we have walked through the lessons several times prior to recording and don't want to waste your time "experimenting on screen". -
Professional Color Grading Techniques in DaVinci Resolve
Lowepost commented on Lowepost's course in The Art of Color Grading
We are not referring to order of operations inside of nodes at 04:09 in lesson 08. Th difference is that we are dialing in exposure AFTER the color adjustments and not the other way around as seen in all the other lessons. This is because we want to demonstrate the impact brightness and contrast adjustments has on color and the reason why we encourage you to do it the other way around. -
Professional Color Grading Techniques in DaVinci Resolve
Lowepost commented on Lowepost's course in The Art of Color Grading
The first node will be optimized for the key operation only, and you don't necessarily want to build your grade on that. That's why you want to keep it separate from the main stream and leave it as a constant source to pull keys from. -
Professional Color Grading Techniques in DaVinci Resolve
Lowepost commented on Lowepost's course in The Art of Color Grading
Hi Josh, Thanks for your kind words! @Jussi Rovanperä is right, it's the LUT that causes the shift in the other channels. When you watch any correction through any LUT, the relationship between the different color channels that the curve is made up by will influence the result. That means, by pushing one of the color channels through a LUT, the other two will be altered. The more aggressive the LUT is, the more of your correction will be altered. When you do a correction prior to a Film Emulation LUT, the result will be altered differently than in a pure Technical LUT because the relationship between the color channels that the curve is made up by is different. This is even true when adjusting the exposure only. Some LUTs will push more cold colors into the blacks when you lower the brightness, while others will push more warm colors into the highlights when you do the same thing. This is what we in the course refer to when we say that your corrections will expand and compress based on the shape of the curve. It's important to understand the relationship between the correction you do and the LUT you work under, also when it comes to exposure alone. This is the way color timers worked back in the days as the signal would be altered depending on what film stock (LUT in a digital world) it was watched through. This workflow is adapted in the high-end post facilities and is considered the purest and most natural way to correct an image.